AC Installation Guide
Everything you need to know before, during, and after installing an air conditioner — from permits and electrical prep to step-by-step instructions for every AC type
GET STARTEDWhy This Guide Matters: Improper installation is the #1 cause of AC inefficiency, premature failure, and warranty voidance. Studies show that a correctly installed unit can be up to 30% more efficient than one installed poorly. This guide walks you through every critical step so you can ensure your investment performs at its best.
- Before You Begin
- Check Your Electrical Panel
- Do You Need a Permit?
- How to Choose an HVAC Contractor
- Window AC Installation
- Mini-Split AC Installation
- Central AC Installation
- Through-the-Wall AC Installation
- Portable AC Setup
- Indoor & Outdoor Placement
- Refrigerant Line Set
- Vacuuming the AC System
- Common Installation Mistakes
- After Installation
- Installation Cost Breakdown
- Frequently Asked Questions
Why Proper AC Installation Matters
Installing an air conditioner is not simply about mounting a unit and plugging it in. The quality of installation directly impacts cooling performance, energy consumption, equipment lifespan, and safety. According to the U.S. Department of Energy, improper installation can reduce an AC system's efficiency by up to 30%, leading to significantly higher electricity bills and more frequent repairs.
Whether you're installing a simple window unit, a ductless mini-split, or a full central air conditioning system, following the correct procedure ensures your unit operates at its rated SEER efficiency, maintains proper refrigerant charge, and delivers consistent comfort throughout its expected service life. A poorly installed system may also void the manufacturer's warranty, leaving you responsible for all future repair costs.
Correct Installation
Poor Installation
Wasted Energy Cost
Before You Begin
Before purchasing or installing any air conditioner, there are several critical preparation steps. Skipping these can lead to costly surprises mid-installation, code violations, or the need to return an incompatible unit. Proper preparation applies whether you're cooling a single bedroom, outfitting a whole-house system, or setting up climate control for a home office.
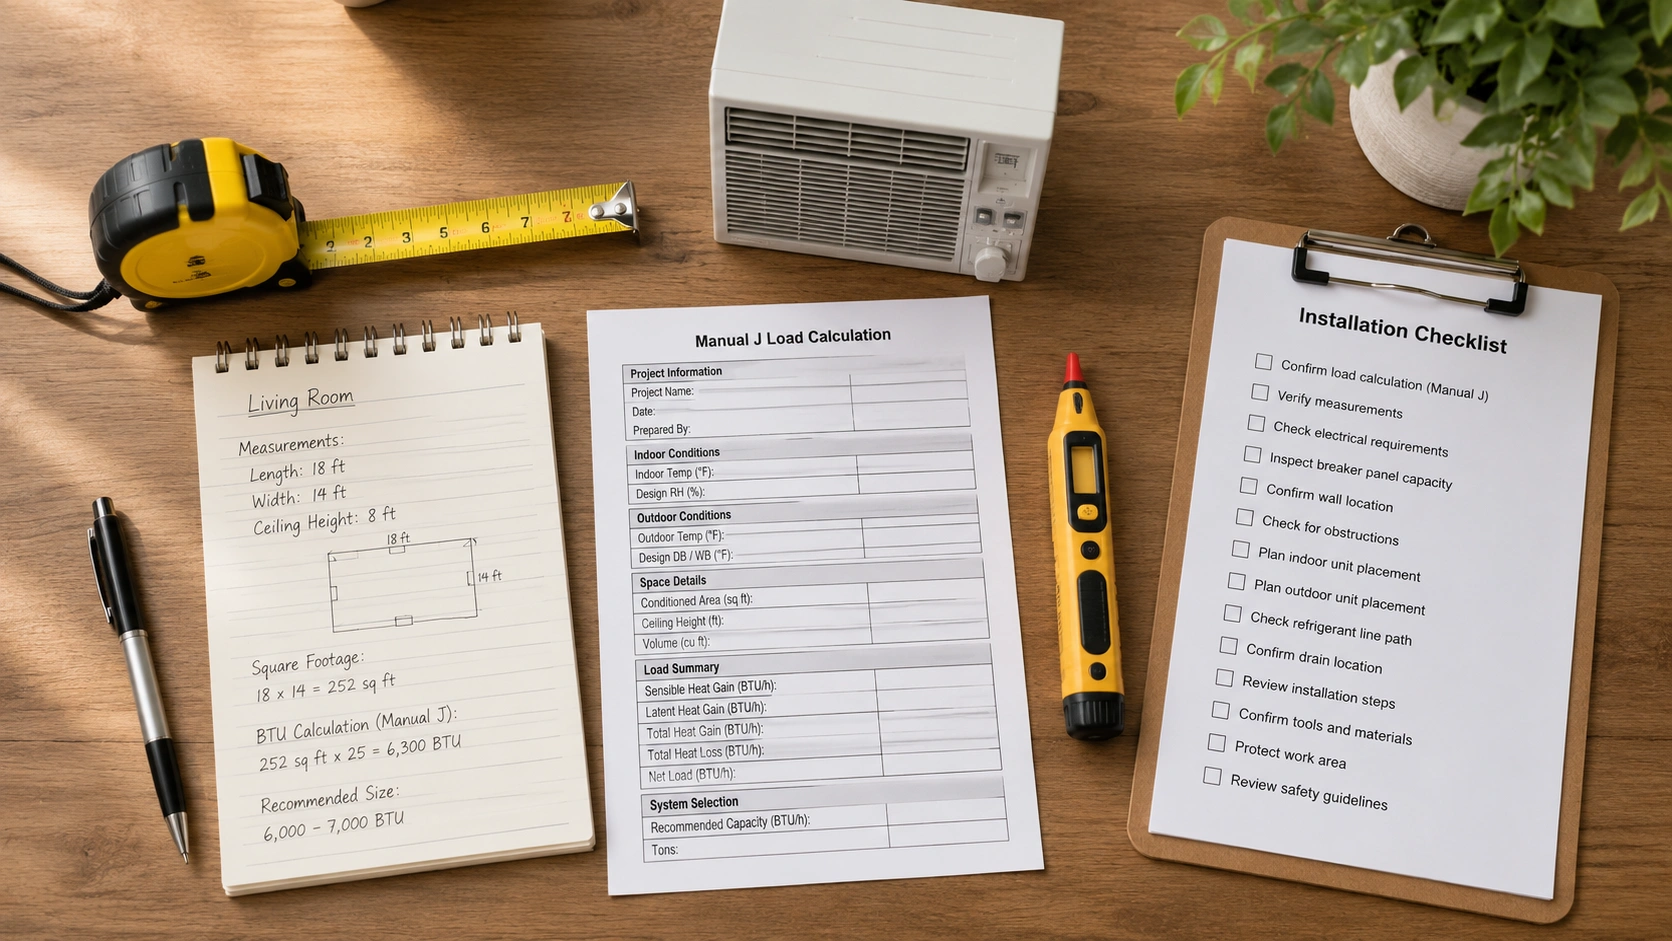
Start by accurately sizing your AC using a BTU calculator or a professional Manual J load calculation. An undersized unit will struggle to cool your space, while an oversized unit will short-cycle and fail to dehumidify properly. Understanding the voltage requirements and breaker sizes for your chosen AC type is equally important to avoid electrical overloads.
Check Your Electrical Panel
Your home's electrical panel is the foundation of a safe AC installation. Different AC types demand vastly different electrical supplies. A small 5,000 BTU window unit may only need a standard 115V outlet, while a 18,000 BTU mini-split or central AC system typically requires a dedicated 208/230V circuit with its own breaker.
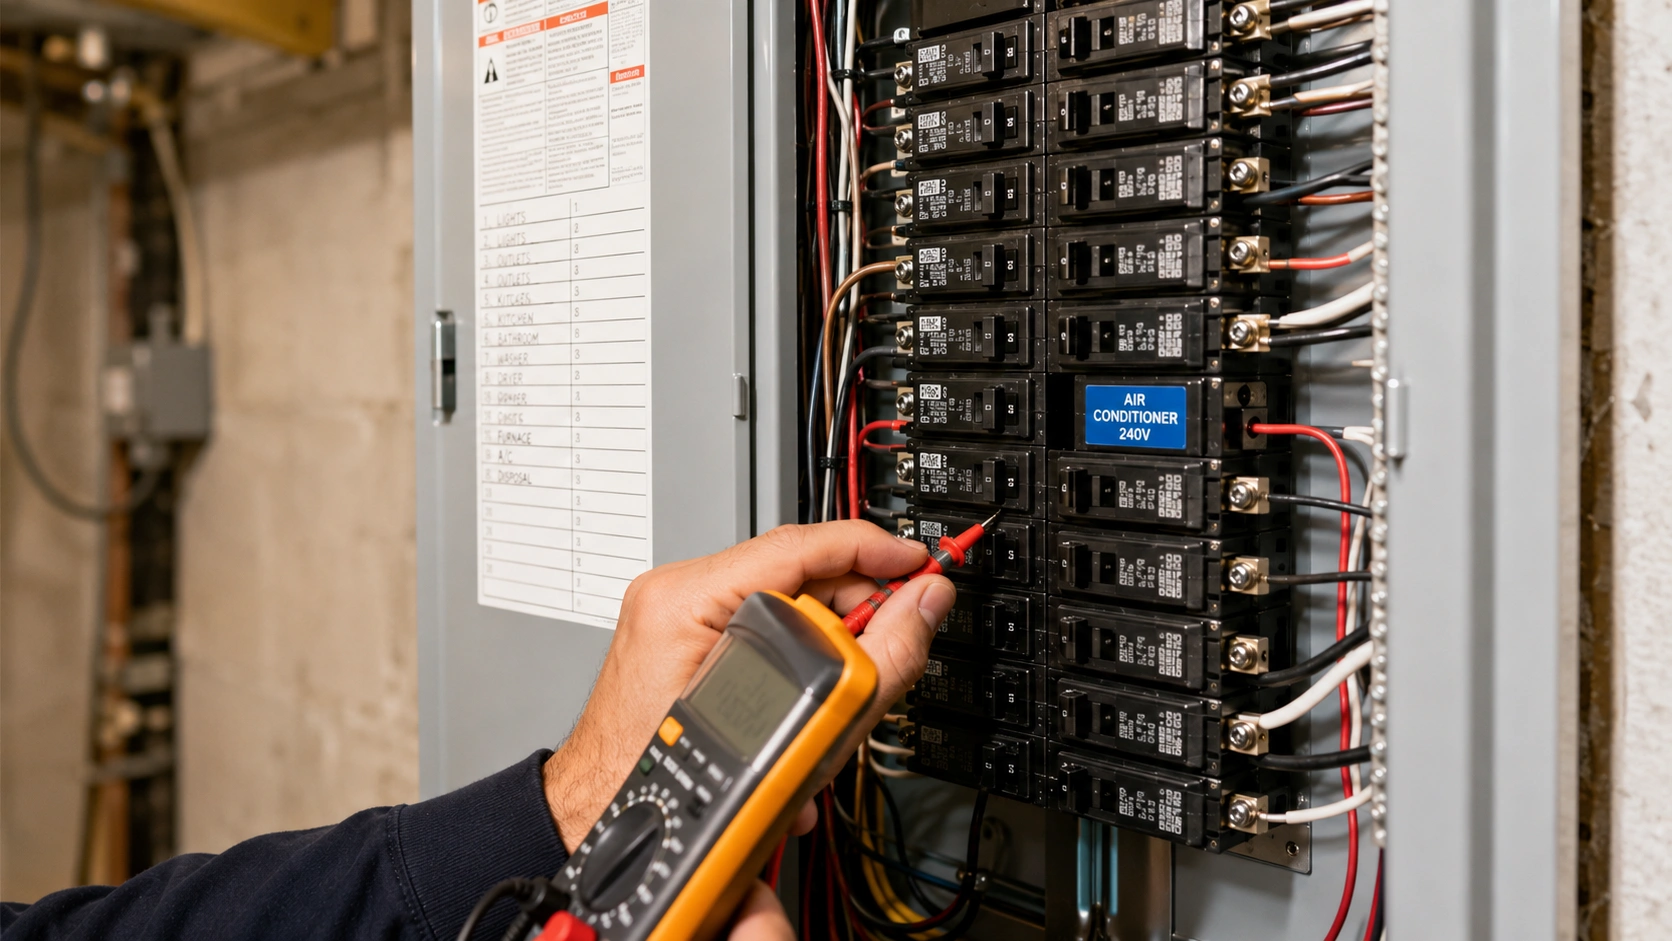
Here's what to verify when checking your electrical panel:
- Total panel capacity: Most modern homes have 200-amp service. If your home has only 100 amps, adding a central AC or large mini-split may require a panel upgrade ($500–$2,000).
- Available breaker slots: Mini-splits and central AC need dedicated circuits. Ensure you have empty slots or room for a sub-panel.
- Wire gauge: The existing wiring to the intended location must match the AC's amperage draw. A 12,000 BTU unit typically needs a 15-amp circuit with 14-gauge wire, while larger units may need 20-amp or 30-amp circuits with 12-gauge or 10-gauge wire.
- GFCI protection: Some local codes require GFCI protection for outdoor AC components. Check your local HVAC building codes.
- Grounding: Verify proper grounding. Incorrect grounding is a serious safety hazard and a common inspection failure point.
If you are unsure about your electrical capacity or need to add a new circuit, hire a licensed electrician. Electrical work that doesn't meet code can cause fires, void your AC warranty, and fail inspection. Never attempt to modify your electrical panel yourself.
Do You Need a Permit?
Permit requirements vary significantly by location and AC type. Understanding when you need a permit can save you from fines, forced removal of work, and problems when selling your home. Generally, the rule of thumb is: if the installation involves permanent electrical modifications, structural changes, or refrigerant handling, a permit is required.
• Window AC units (plug-in, no permanent modification)
• Portable AC units (no installation needed)
• Replacing an existing unit with the same type and capacity
• Mini-split AC (new electrical circuit, wall penetrations)
• Central AC systems (ductwork, electrical, refrigerant)
• Through-the-wall AC (structural wall modification)
• Ducted systems (new ductwork installation)
Permit fees typically range from $50 to $300 depending on your municipality and the scope of work. The permit process usually involves submitting an application with equipment specifications, having the work inspected during and after installation, and receiving a certificate of compliance. Your HVAC contractor should handle permit acquisition as part of their service — if they suggest skipping permits, that's a major red flag.
Even if your area doesn't require a permit for a specific installation type, getting one provides legal protection and documentation. If you ever replace or repair the system, or sell your home, permitted work demonstrates it was done correctly. Learn how to avoid AC scams where unlicensed contractors cut corners on permits.
How to Choose an HVAC Contractor
For any installation beyond a plug-in window unit, choosing the right contractor is arguably the most important decision you'll make. A skilled installer ensures your system operates efficiently, while a poor one can cause years of problems. Here's how to select a qualified HVAC contractor:
- Verify licensing and insurance: Confirm the contractor holds a valid state HVAC license and carries both general liability insurance and workers' compensation. Ask for proof and verify with your state's licensing board. Learn about HVAC license and insurance requirements.
- Check EPA certification: Anyone handling refrigerant must hold EPA Section 608 certification. This is a federal requirement under EPA refrigerant regulations.
- Read reviews and references: Check Google, Yelp, and the BBB. Ask for at least three recent references from similar installations.
- Get multiple quotes: Obtain at least three written estimates. Be wary of quotes that are significantly lower than others — they may indicate corner-cutting on materials or labor. Learn how to get an accurate installation quote.
- Confirm experience with your AC type: Installing a ceiling cassette AC requires different skills than a standard floor-mounted unit. Ensure the contractor has specific experience with your chosen system.
- Review the warranty coverage: A good contractor should offer a labor warranty (typically 1–5 years) in addition to the manufacturer's equipment warranty. Understand the full AC warranty terms.
- Ask about post-installation support: Will they handle warranty registration? Do they offer maintenance plans? What's their response time for warranty calls?
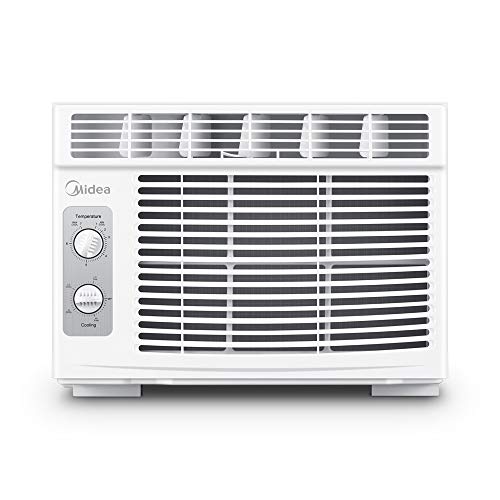
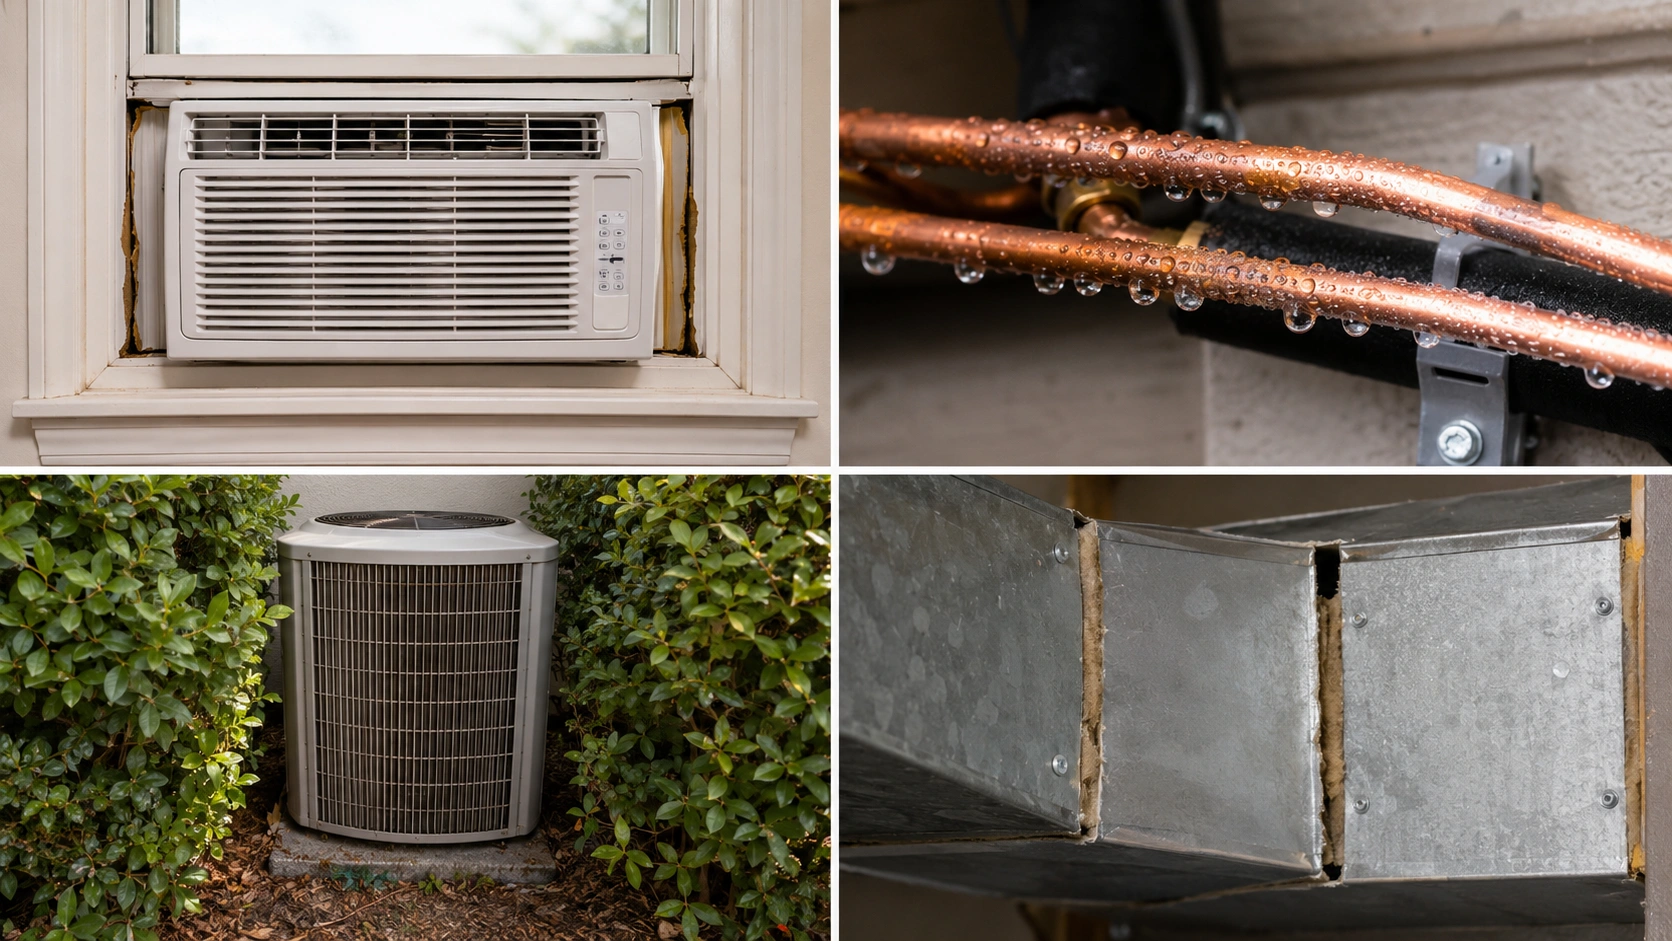
Window AC Installation
A window air conditioner is the most straightforward type to install and is often a viable DIY project for homeowners. Most window units operate on a standard 115V household outlet and don't require permanent electrical modifications. They are ideal for cooling individual rooms like bedrooms, home offices, and small apartments. Budget-friendly options start in the under $200 range, making them one of the most accessible cooling solutions.

Tools needed: Measuring tape, level, screwdriver, drill, utility knife, foam weatherstripping, and the mounting hardware included with the unit.
- Measure your window: Verify the unit fits your window opening (width and height). Most window ACs are designed for double-hung windows 24–40 inches wide. Check the unit's specifications for minimum and maximum window sizes.
- Install the mounting bracket: Attach the L-shaped mounting bracket to the windowsill using the provided screws. Ensure it's level — an tilted unit can cause drainage problems and compressor damage.
- Slide the unit into place: With assistance (window units are heavy — typically 50–100 lbs), lift the unit and set it onto the bracket. Center it in the window opening.
- Extend the side panels: Pull out the accordion-style side panels to fill the gaps on each side of the unit. These panels prevent warm air from entering and cooled air from escaping.
- Seal all gaps: Apply foam weatherstripping around the perimeter where the unit meets the window frame. Even small gaps can significantly reduce cooling efficiency. This step also keeps insects out.
- Secure the window: Lower the upper window sash onto the top of the unit. Use the provided bracket or locks to prevent the window from being opened accidentally.
- Install the drain hose (if applicable): Some window units require a drain hose for condensate removal. Route it away from your foundation to prevent water damage.
- Plug in and test: Connect the unit to a dedicated outlet — do not use an extension cord, as this is a fire hazard. Turn it on and verify it cools properly within 10–15 minutes.
For a more permanent and airtight solution, consider a through-the-wall AC instead. It offers the same cooling power as a window unit but doesn't block your window and provides a cleaner installation. Many renters, however, may prefer portable units since they require no permanent modifications.
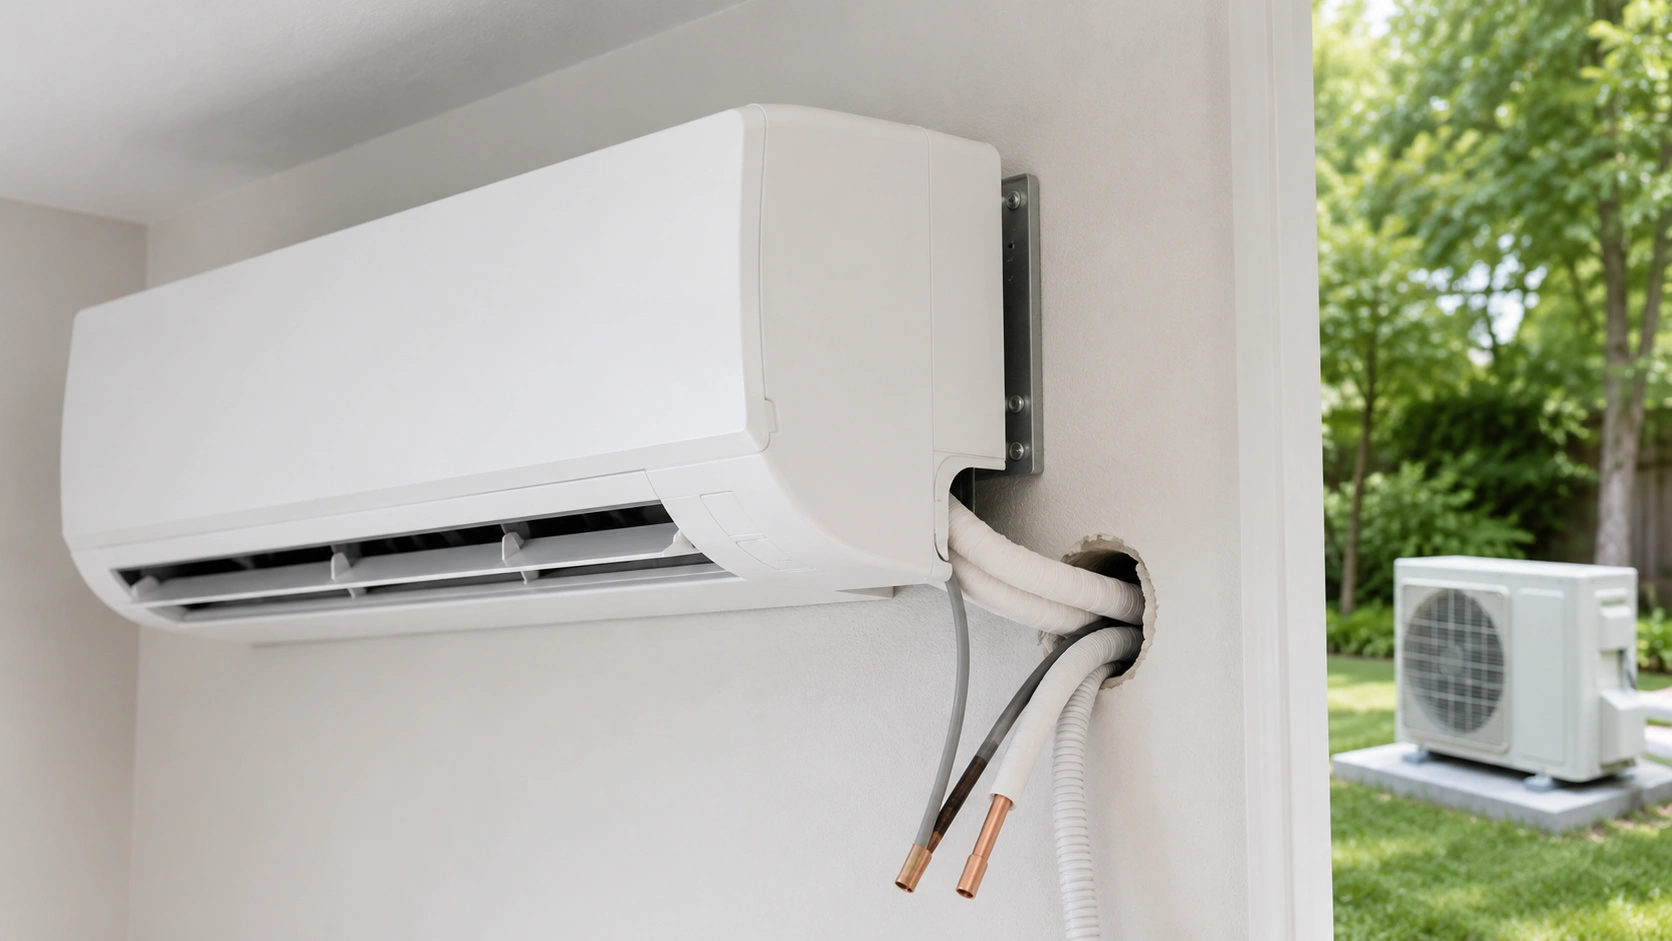
Mini-Split AC Installation
A ductless mini-split system offers superior efficiency and flexibility compared to window units, making it the preferred choice for older homes without existing ductwork, room additions, and targeted cooling. Modern inverter-equipped mini-splits and variable-speed compressors can achieve SEER ratings above 20, far surpassing standard window units. However, mini-split installation is significantly more complex and almost always requires professional installation.
Typical installation cost: $1,500–$4,000 for a single-zone system. Multi-zone systems with HVAC zoning capabilities can cost $3,500–$10,000+ depending on the number of indoor units.
- Select indoor unit location: Choose a wall with at least 4 inches of clearance on each side and 6 inches above. Avoid mounting directly above a door, bed, or in direct sunlight. The unit should be 7–10 feet above the floor for optimal air distribution. Review placement best practices.
- Mount the indoor unit bracket: Use a level to mark the mounting plate position on the wall. Drill into wall studs for secure anchoring. The bracket must support 30–50 lbs depending on the unit size.
- Drill the conduit hole: Drill a 2.5–3 inch hole through the exterior wall at a slight downward angle (to prevent rain from entering). This hole accommodates the refrigerant lines, power cable, and condensate drain.
- Install the outdoor condenser: Place the outdoor unit on a level concrete pad, wall bracket, or ground stand. Ensure at least 12 inches of clearance on all sides for proper airflow. Avoid placing it near bedrooms or under windows if noise is a concern — consider a quiet AC model if proximity is unavoidable.
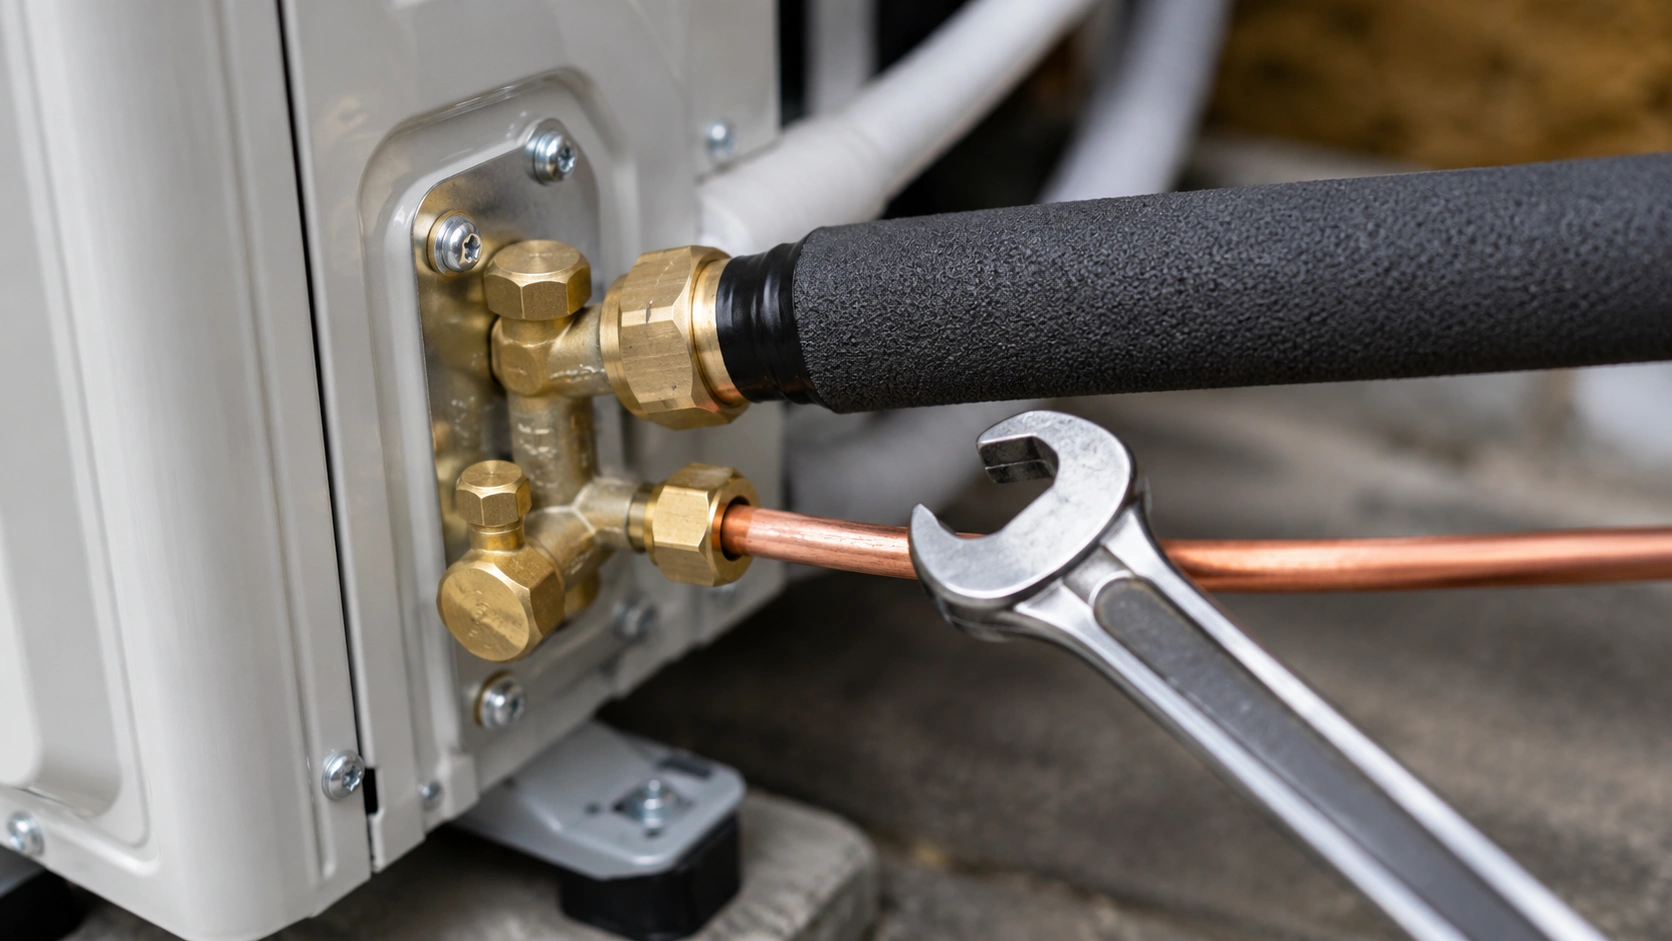
- Run the refrigerant lines: Connect the copper refrigerant line set between the indoor and outdoor units. The lines should follow a logical path with minimal bends. Proper refrigerant line set selection (correct diameter and length) is critical for system performance.
- Connect electrical wiring: Run the power cable from the indoor unit to the outdoor unit, and connect the outdoor unit to your electrical panel with a dedicated breaker. This step must comply with local electrical codes.
- Vacuum the lines: Using a vacuum pump, evacuate the refrigerant lines for at least 30 minutes to remove all moisture and non-condensable gases. This step is essential — skipping it can cause compressor failure. Learn the proper vacuum procedure.
- Open service valves and test: Open the service valves on the outdoor unit to release refrigerant into the system. Check for leaks using a leak detector or soap bubble solution. Power on and verify cooling performance.
Refrigerant handling during mini-split installation must comply with EPA refrigerant handling rules. Only EPA Section 608 certified technicians can legally open refrigerant circuits. DIY mini-split installation without certification is a federal violation and will void your warranty. Be aware of the ongoing R410A phase-out when selecting a new system — newer models may use R32 or R454B refrigerants.
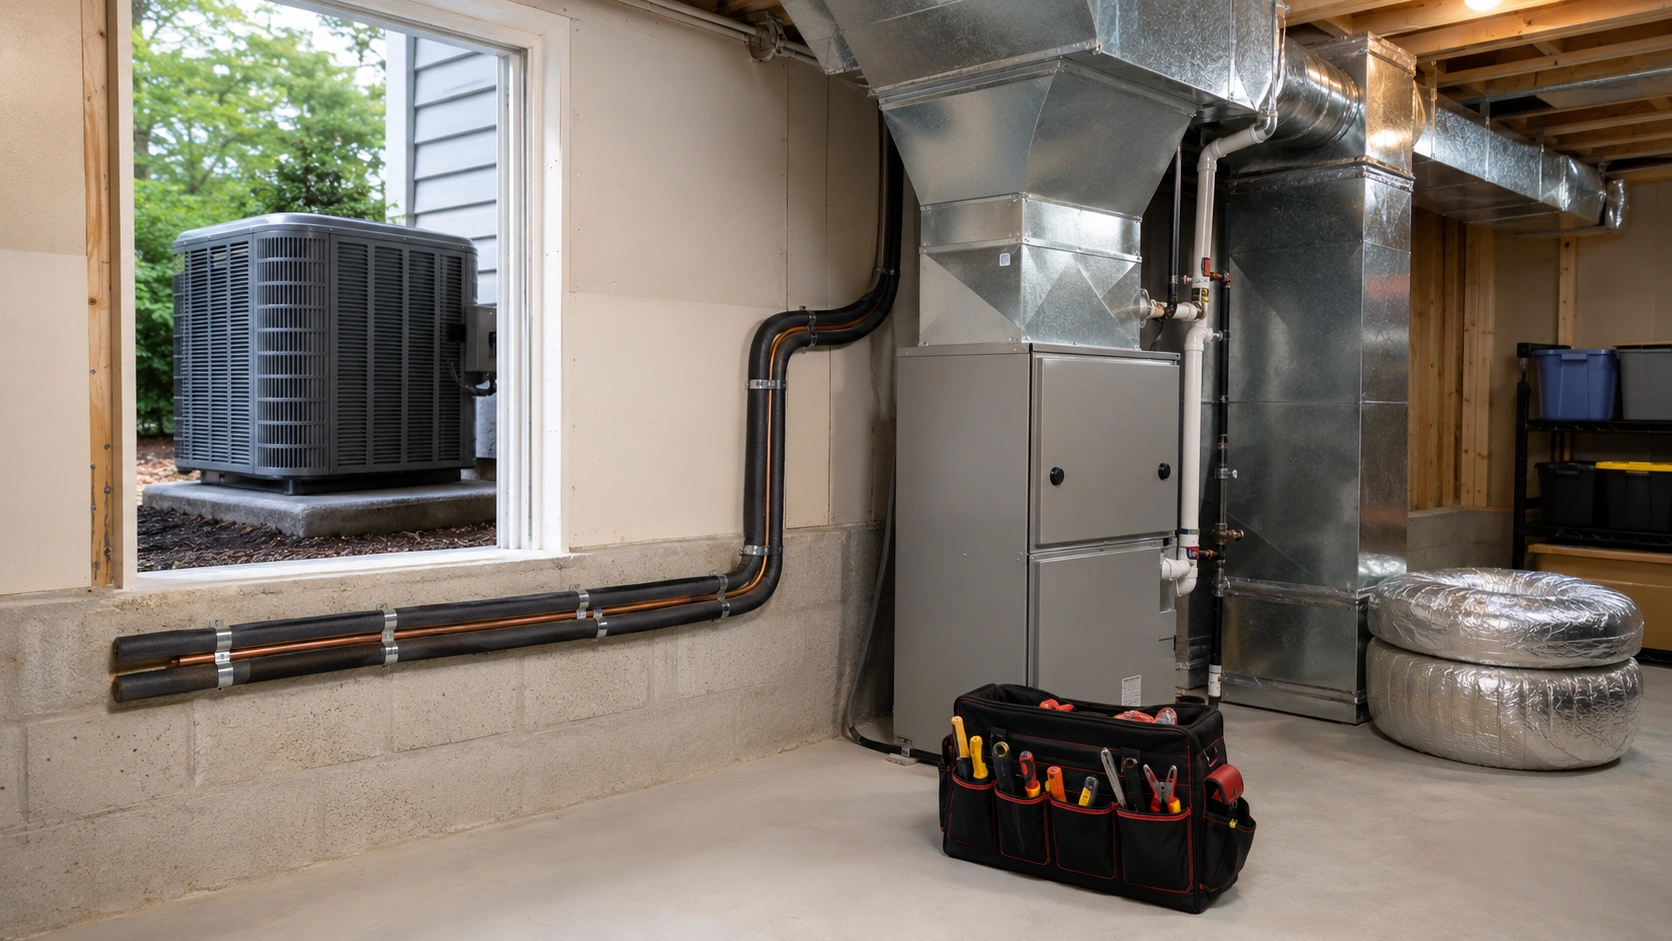
Central AC Installation
A central air conditioning system is the most comprehensive cooling solution, designed to cool an entire home through a network of ducts and vents. It's the standard choice for new construction and homes that already have existing ductwork from a forced-air furnace. Central AC is essential for large homes and multi-story homes where individual room units would be impractical.
Typical installation cost: $4,500–$12,500 including equipment and labor. If new ductwork is needed (as in a home without existing ducts), costs can reach $8,000–$15,000+. See the full cost estimate guide.
Central AC installation is a multi-day project that must be performed by a licensed HVAC contractor. Here's an overview of the process:
- Load calculation and system sizing: The contractor should perform a Manual J load calculation to determine the correct system size. An improperly sized system — whether too large or too small — causes significant efficiency and comfort problems.
- Ductwork assessment and modification: The contractor evaluates existing ductwork for adequacy. This may involve ductwork design modifications, adding return air paths, sealing leaks, or installing new runs. Properly sealed air ducts can improve efficiency by 15–20%.
- Install the outdoor condenser: Place the condenser unit on a pre-poured concrete pad (at least 2 inches above grade for drainage). Ensure proper clearance from walls, bushes, and other obstructions per manufacturer specifications.
- Install the evaporator coil: The indoor evaporator coil is installed in or above the furnace plenum. This requires cutting into the supply plenum and making sealed connections. In some systems, a ducted mini-split configuration may be used instead.
- Run refrigerant lineset: Connect copper refrigerant lines between the indoor coil and outdoor condenser. Insulate the suction line to prevent condensation and energy loss.
- Electrical connections: Install a dedicated disconnect box near the outdoor unit and run wiring from the electrical panel. A two-stage or variable-speed system may require specific wiring configurations.
- Install the thermostat: Mount the new thermostat (consider a Wi-Fi smart thermostat for enhanced control). Wire it according to the manufacturer's diagram and the system's configuration.
- Vacuum, charge, and test: Evacuate the system with a vacuum pump, release refrigerant, check for leaks with an electronic detector, measure superheat and subcooling, and verify proper airflow at all registers. The system should be thoroughly tested before the contractor leaves.
Look into HVAC tax credits and rebates when installing a new central AC system. The federal government and many utilities offer incentives for installing ENERGY STAR certified equipment. These credits can offset $300–$2,000 of your total cost. Also, consider the SEER2 standards that went into effect — choosing a compliant unit ensures long-term energy savings.
Through-the-Wall AC Installation
A through-the-wall air conditioner is similar to a window unit but is permanently installed through an exterior wall sleeve. This provides a cleaner look, doesn't block a window, and offers better security than window units. They're commonly found in hotels, apartments, and rooms where window installation isn't feasible.
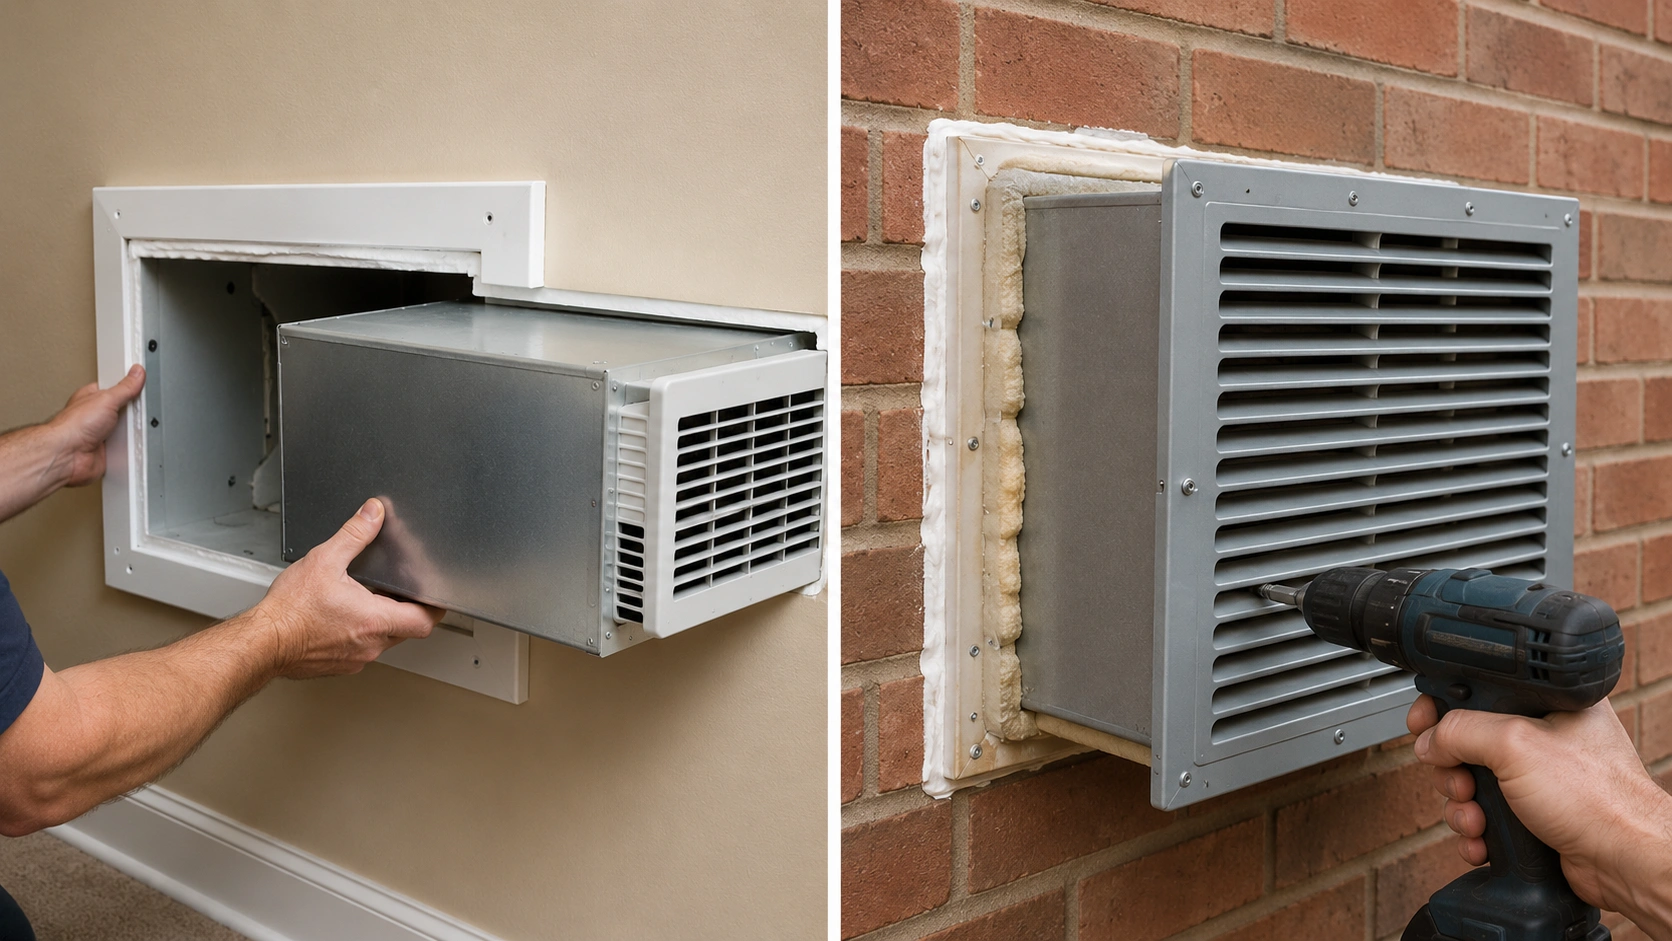
Installation cost: $300–$800 if a sleeve already exists. $600–$1,500 if a new wall opening needs to be created. This type of installation usually requires a permit due to the structural modification.
- Install or verify the wall sleeve: The sleeve (usually included or sold separately) must be installed slightly angled downward toward the exterior for proper drainage. If no sleeve exists, a rectangular opening must be cut through the wall — this requires a permit and often professional help.
- Seal around the sleeve: Apply caulk or spray foam insulation around the sleeve's exterior and interior perimeter to prevent air leaks and water intrusion.
- Slide the AC chassis into the sleeve: Most through-the-wall units have a separate chassis (the heavy part with the compressor) and decorative front panel. Slide the chassis into the sleeve first.
- Install the exterior grille: Attach the rear grille to protect the condenser coils from debris and weather damage.
- Mount the front panel: Snap or screw the front panel onto the chassis from inside the room.
- Plug in and test: Connect to a properly rated outlet and verify operation.
Portable AC Setup
A portable air conditioner requires no permanent installation, making it the best option for renters, temporary cooling needs, and rooms where window or wall mounting isn't possible. Setup is straightforward and typically takes under 15 minutes, but proper placement and venting are critical for effective cooling.

- Choose a location near a window: The unit must be within reach of a window for the exhaust hose. Avoid placing it in direct sunlight or near other heat sources.
- Install the window venting kit: Attach the window plate (included) to your window opening. Insert the exhaust hose connector into the plate and secure it. Seal any remaining gaps with the provided foam strips.
- Connect the exhaust hose: Attach one end of the hose to the unit's exhaust port and the other end to the window plate. Keep the hose as straight as possible — kinks and excessive length reduce cooling efficiency.
- Position the unit on a level surface: Use the included casters. Ensure the unit is level to prevent water drainage issues. Most portable ACs evaporate condensate automatically, but some require manual draining.
- Plug in and set the mode: Connect to a dedicated 115V outlet. Set your desired temperature and fan speed. Avoid using extension cords — if one is absolutely necessary, use a heavy-duty 14-gauge cord rated for the unit's amperage.
Never operate a portable AC without venting the exhaust hose outside. The unit works by removing heat from indoor air and exhausting it outside. Without venting, the heat simply recirculates back into the room, and the room may actually get warmer due to the heat generated by the compressor.
Indoor & Outdoor Unit Placement
Correct placement of both indoor and outdoor units has a significant impact on cooling performance, noise levels, and energy efficiency. Whether you're installing a mini-split, central AC, or packaged unit, following placement guidelines ensures optimal operation. Detailed guidance is available in our placement guide.

Indoor unit placement guidelines:
- Mount at 7–10 feet above the floor for even air distribution across the room
- Ensure at least 4 inches of clearance on each side and 6 inches above the unit
- Avoid mounting above beds, doors, or directly in the path of other air currents
- Keep away from direct sunlight — if unavoidable, consider sunroom-specific strategies
- Position where the air flow won't be blocked by furniture or curtains
- For a ceiling cassette, ensure adequate ceiling cavity depth
Outdoor unit placement guidelines:
- Maintain at least 12–24 inches of clearance on all sides (check manufacturer specs)
- Place on a level concrete pad, at least 2–4 inches above ground level
- Avoid areas with heavy debris (falling leaves, grass clippings, lint)
- Keep away from bedroom windows — even quiet models produce some noise
- Minimize direct sun exposure — north or east-facing walls are ideal
- Keep the outdoor unit within the maximum line set length specified by the manufacturer (typically 25–50 feet for standard systems)
- For garage installations, ensure the outdoor unit is protected from vehicle exhaust and chemicals
Refrigerant Line Set
The refrigerant line set is the critical connection between indoor and outdoor units in split-system ACs. It consists of two copper pipes — a larger suction line (low pressure, insulated) and a smaller liquid line (high pressure, uninsulated). Correct refrigerant line set selection and installation directly affects system performance and longevity.
Key considerations:
- Pipe diameter: Must match the manufacturer's specifications for your unit's capacity. Undersized lines restrict refrigerant flow and reduce capacity; oversized lines increase charge requirements.
- Line length: Every foot beyond the standard length (usually 15–25 feet) requires additional refrigerant charge. Excessive line length reduces efficiency. Some manufacturers allow up to 50–75 feet with proper adjustments.
- Insulation: The suction line must be thoroughly insulated with closed-cell foam insulation. Uninsulated suction lines lose cooling capacity and can sweat excessively, causing water damage.
- Bends: Minimize the number of bends. Use long-radius bends rather than tight elbows. Kinked lines restrict refrigerant flow and must be replaced — they cannot be repaired.
- Flare connections: Ensure properly made flare connections at both ends. Over-tightening cracks the flare; under-tightening causes leaks. Use a torque wrench for consistent results.
Vacuuming the AC System
Vacuuming the refrigerant lines is one of the most critical — and most often skipped — steps in split-system AC installation. The purpose is to remove moisture, air, and other non-condensable gases from the line set and indoor coil before introducing refrigerant. Even a small amount of moisture inside the system can cause acid formation, compressor failure, and reduced cooling capacity. Understanding the proper vacuum procedure is essential for any installer.
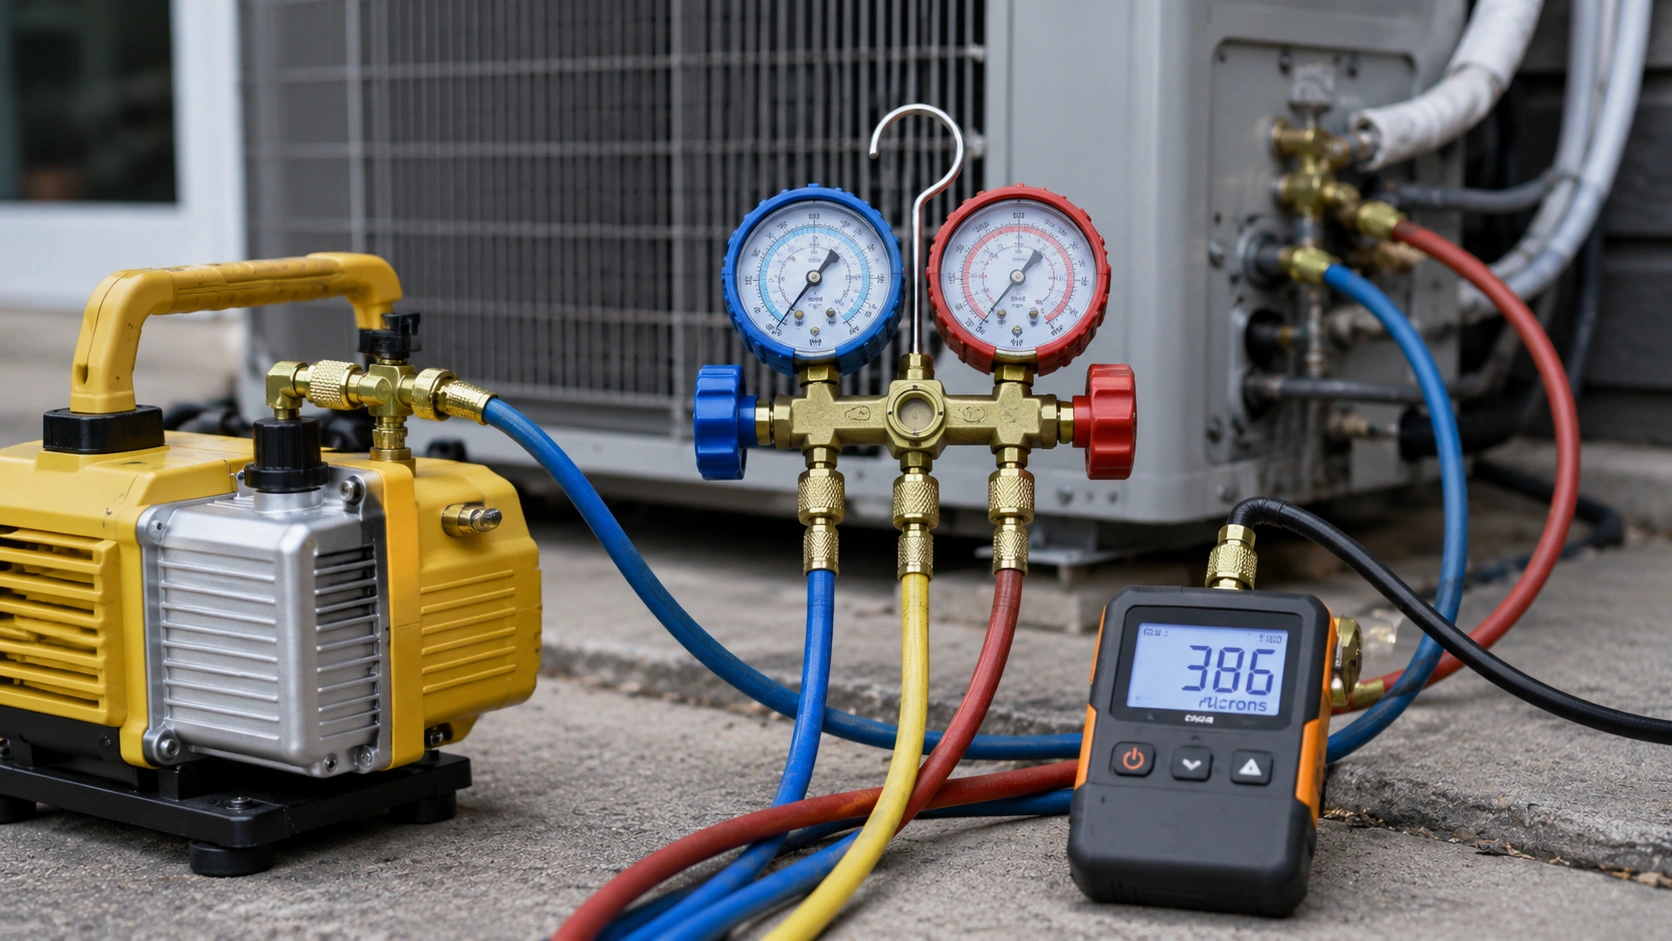
The vacuum process:
- Connect a manifold gauge set to the service valves on the outdoor unit.
- Connect a vacuum pump (minimum 2-stage, ideally 3-stage) to the center port of the manifold.
- Open both manifold valves and start the vacuum pump.
- Run the pump for a minimum of 30 minutes. For long line sets or humid conditions, run for 1–2 hours.
- Monitor the vacuum gauge — it should reach at least 500 microns. If it stabilizes at 500 microns or below, the system is dry. If it rises after closing the manifold valves, there may be a leak.
- Once the target vacuum is achieved and stable, close the manifold valves and turn off the pump.
- Open the service valves on the outdoor unit to release refrigerant into the system.
Some installers skip the vacuum step and instead use a "quick charge" method of releasing refrigerant to "push out" the air. This is incorrect and dangerous. It leaves moisture and non-condensables in the system, which will degrade performance and can cause premature compressor failure — one of the most expensive AC repairs ($1,500–$4,000+). Always insist on a proper vacuum before charging.
Common Installation Mistakes to Avoid
Even experienced installers can make mistakes that compromise system performance. Being aware of these common installation mistakes helps you supervise the process and ensure quality workmanship. Many of these errors are subtle but have long-term consequences.
Wrong System Sizing
Installing an oversized or undersized unit without a proper Manual J calculation. This leads to short-cycling, uneven temperatures, excess humidity, and higher energy bills.
Skipping the Vacuum Step
Not evacuating the refrigerant lines leaves moisture inside the system, causing acid formation, reduced cooling capacity, and eventual compressor failure.
Poor Ductwork Connections
Leaky duct connections can lose 20–30% of conditioned air. All joints should be sealed with mastic sealant and secured with mechanical fasteners.
Incorrect Refrigerant Charge
Overcharging or undercharging refrigerant by even 10% can reduce efficiency by 5–10% and cause compressor damage. Charge must be measured by superheat and subcooling.
Bad Outdoor Unit Placement
Installing the condenser in a confined space, under a deck, or in direct sunlight restricts airflow and forces the system to work harder, reducing efficiency and lifespan.
Not Getting a Permit
Skipping permits to save money can result in fines, forced removal of work, insurance claim denial, and complications when selling your home.
Uninsulated Refrigerant Lines
Leaving the suction line uninsulated causes condensation dripping, energy loss, and reduced cooling capacity. Use closed-cell foam insulation on the entire length.
No Post-Installation Test
Failing to properly test the new AC after installation means problems go undetected. Always verify temperature differential, airflow, and check for leaks before signing off.
After Installation
The installation isn't finished when the last screw is tightened. Proper post-installation steps ensure your system performs correctly from day one and that your warranty coverage is intact. Here's what to do during the first week after installation and beyond.

Test Your New AC System
Before the installer leaves, conduct these tests as outlined in our testing guide:
- Measure the temperature differential — the difference between supply air and return air should be 15–20°F for a properly functioning system
- Check airflow at every supply register to ensure balanced distribution
- Listen for unusual noises at both the indoor and outdoor units
- Verify the thermostat is reading accurately and communicating with the system
- Run the system for at least 15–20 minutes to confirm steady-state operation
- Check for refrigerant leaks at all connection points using an electronic leak detector
- Verify the condensate drain is flowing freely and not leaking inside
Register Your Warranty
Warranty registration is typically required within 30–60 days of installation to activate full coverage. Most manufacturers offer extended warranty periods (10 years on compressor, 10 years on parts) only if the unit is registered by an authorized dealer. Without registration, you may only receive the base warranty (typically 5 years). Keep all documentation including the installation invoice, warranty card, and model/serial numbers.

Questions to Ask Your Installer
Before the installer leaves, ask these critical questions to ensure you have everything you need:
- What is the correct temperature setting for optimal efficiency?
- How often should I replace the air filter, and what size do I need?
- When should I schedule the first professional maintenance visit?
- What does the annual service cost typically run?
- What is the recommended filter cleaning procedure between replacements?
- What should I do if I notice the AC not cooling properly or leaking water?
- Is there a maintenance plan available for ongoing service?
- How do I contact you for warranty service if needed?
Installation Cost Breakdown
Understanding the full cost breakdown helps you budget accurately and identify areas where you might save. Installation costs vary significantly by AC type, geographic location, and the complexity of the project. Use this reference to evaluate quotes from contractors and ensure you're getting fair pricing.

| AC Type | Equipment Cost | Installation Labor | Total Installed Cost | DIY Possible? |
|---|---|---|---|---|
| Window AC | $150–$600 | $0–$150 | $150–$750 | Yes |
| Portable AC | $250–$700 | $0 | $250–$700 | Yes |
| Through-the-Wall AC | $300–$800 | $300–$700 | $600–$1,500 | Limited |
| Mini-Split (Single Zone) | $700–$2,500 | $800–$1,500 | $1,500–$4,000 | No |
| Mini-Split (Multi-Zone) | $1,500–$5,000 | $2,000–$5,000 | $3,500–$10,000+ | No |
| Central AC (Replace) | $2,000–$5,500 | $2,500–$7,000 | $4,500–$12,500 | No |
| Central AC (New Ductwork) | $2,500–$6,000 | $5,500–$9,000 | $8,000–$15,000+ | No |
Additional costs to budget for:
- Permit fees: $50–$300
- Electrical panel upgrade: $500–$2,000 (if needed)
- Concrete pad for outdoor unit: $150–$400
- Refrigerant line set (long runs): $150–$500 additional
- Thermostat upgrade (smart thermostat): $100–$250
- Ductwork modifications: $500–$3,000
- Old equipment removal and disposal: $100–$300
Consider local HVAC contractors vs big box stores — local companies often provide better pricing, more personalized service, and faster response times. Schedule installation during off-peak seasons (fall or early spring) when contractors offer lower rates. The best time to buy an AC is typically September through November when demand drops and dealers clear inventory. Don't forget to check for available tax credits and rebates.
Frequently Asked Questions
Now that you understand the full installation process, explore our recommended products below — each selected for reliability, efficiency, and ease of installation by qualified professionals.
Browse Full Buying Guide