How to Vacuum an AC System: Complete Step-by-Step Guide
Proper vacuum evacuation removes moisture and non-condensables, preventing compressor failure and ensuring optimal cooling performance. Learn the exact procedure, tools needed, and how long to pull vacuum on your air conditioner.
Why Vacuuming Matters: After installing a new central air conditioning system or ductless mini-split AC, the refrigerant lines and indoor coil contain air and moisture. If not removed, moisture combines with refrigerant to form corrosive acids that destroy your compressor. A deep vacuum below 500 microns is the industry standard for a clean, dry system.
Essential Tools for Vacuuming an AC System
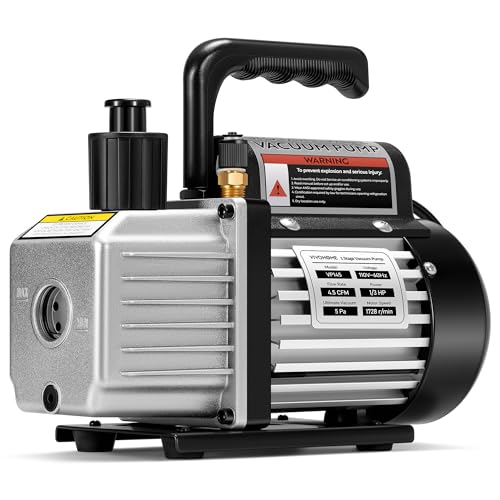
🔧 Vacuum Pump (CFM Rated)
3 CFM to 8 CFM pump for residential systems. Single-stage is sufficient, two-stage for faster evacuation.
Cost: $120–$350📏 Micron Gauge
Essential for measuring vacuum depth. Never rely on manifold gauges alone.
Cost: $80–$200🔄 Manifold Gauge Set
Compatible with R410A or R32 refrigerant. Includes hoses and fittings.
Cost: $60–$150🔩 Core Removal Tools
Optional but recommended for faster vacuum times by eliminating restriction at service valves.
Cost: $40–$80🧴 Nitrogen & Regulator
For pressure testing before vacuum (leak detection).
Cost: $60–$120 (regulator)🛠️ Wrenches & Hex Keys
For opening/closing service valves and accessing components.
Cost: $20–$50Step-by-Step AC Vacuum Procedure
1 Prepare the AC System for Evacuation
Ensure all refrigerant line connections are brazed and tightened. The service valves on the outdoor unit must remain closed during vacuum. Connect your manifold gauge set to the service ports: blue hose to low-pressure side (vapor line), red hose to high-pressure side (liquid line). The yellow center hose connects to your vacuum pump.
Before vacuum, perform a pressure test with dry nitrogen at 150-250 PSI to verify no leaks. This step saves hours of frustrating vacuum decay. If you’re unsure about refrigerant line set sizing or installation, review our complete installation guide first.
2 Connect and Start the Vacuum Pump
Open both manifold gauge valves fully. Start the vacuum pump. You'll hear the pump change pitch as air is removed. Watch your micron gauge (connected to the manifold or directly to the system). Initially, the reading will drop quickly from atmospheric pressure (~760,000 microns) to around 10,000-20,000 microns within minutes as bulk air is removed.
For inverter AC systems, the same procedure applies, but be extra careful with electronic expansion valves — never exceed 150 PSI on pressure test.
3 Monitor Micron Level and Perform Decay Test
Continue vacuuming until the micron gauge reads 500 microns or below. For systems under 50 feet of line set, this typically takes 30-60 minutes. Larger systems or those with moisture may require 2+ hours. Once at 500 microns, close the manifold valve to isolate the pump, then turn off the vacuum pump.
Perform the decay (rise) test: Wait 10-15 minutes while monitoring the micron gauge. The reading should not rise above 1,000-1,500 microns. If it rises quickly, you have a leak or remaining moisture. If the reading stabilizes below 1,000 microns, the system is ready for refrigerant release.
4 Release Refrigerant and Final Checks
With the system still under vacuum (valves closed at the pump), open the outdoor unit’s liquid line service valve (smaller line) slightly to let refrigerant into the lines. Listen for the hiss — this pressurizes the lines. Then fully open both the liquid and vapor service valves. Remove your manifold hoses quickly to prevent air ingress, or use low-loss fittings.
After refrigerant release, check system operation. Verify proper subcooling and superheat. For help with how to size an air conditioner or calculating proper refrigerant charge, see our buying guide.
Understanding Micron Levels: What's Acceptable?
| Micron Reading | Status | Action Required |
|---|---|---|
| Below 500 microns | Excellent | System is dry and tight. Proceed to refrigerant release. |
| 500 - 1,000 microns | Acceptable with decay test | Perform 10-min decay test. If holds under 1,500 microns → acceptable. |
| 1,000 - 2,000 microns | Marginal | Likely residual moisture. Continue vacuum or change vacuum pump oil. |
| Above 2,000 microns | Unacceptable | Check for leaks or contamination. Do not release refrigerant. |
Common AC Vacuum Mistakes to Avoid
- ❌ Skipping the micron gauge: Manifold gauges cannot measure deep vacuum accurately. You need an electronic micron gauge.
- ❌ Not changing vacuum pump oil: Old, contaminated oil absorbs moisture and prevents deep vacuum. Change oil before each use.
- ❌ Vacuuming through closed service valves: The service valves must be closed before starting vacuum, but the manifold must connect to the system side — many DIYers get this wrong.
- ❌ Ignoring Schrader core restriction: Core removal tools dramatically improve evacuation speed by eliminating valve core restriction.
- ❌ Releasing refrigerant before decay test: A system that quickly rises in microns after pump shutdown either leaks or still has moisture.
How Long Does Vacuuming an AC System Take?
Vacuum time depends on several factors: line set length, system size, presence of moisture, and vacuum pump CFM rating.
- Small system (mini-split, 25 ft lines): 20–40 minutes with 3 CFM pump
- Standard central AC (50 ft lines): 45–90 minutes with 5 CFM pump
- Large system (100+ ft lines or wet system): 2–4 hours, possibly overnight
Remember: time is secondary to micron reading. Some systems may reach 500 microns in 15 minutes; others need 3 hours. Always verify with a micron gauge.
If your AC is not cooling properly after installation, inadequate vacuum is a frequent cause. Improper evacuation leads to acid formation and eventual compressor failure — a $1,500–$3,000 repair. Taking the time to pull a proper vacuum is the single most important step for system longevity.
Should You Vacuum Your Own AC System or Hire a Pro?
Vacuum pump and micron gauge rental or purchase costs $150–$400 total. For a one-time DIY installation, renting equipment may be cost-effective. However, consider these factors:
DIY is suitable if: You have HVAC experience, own or can rent quality tools, and understand the decay test. Many DIYers successfully vacuum their own ductless mini-split AC systems.
Hire a professional if: You're uncomfortable with refrigerant handling, the system is large (over 3 tons), or you lack time to learn the nuances. Professional AC installation cost typically includes vacuuming and leak testing. A qualified HVAC contractor also ensures compliance with EPA refrigerant handling regulations.
Remember: A poor vacuum voids many equipment warranties. Brands like Mitsubishi, Daikin, and Carrier require documented vacuum below 500 microns for warranty validation.
✅ Vacuum Complete — Next Steps: After successful evacuation and refrigerant release, verify system performance. Check for proper airflow, temperature drop (15-20°F across the indoor coil), and listen for unusual noises. Schedule your first seasonal AC checklist within 30 days of installation to ensure everything operates efficiently.
For ongoing maintenance, learn how to clean AC filter regularly and understand what is SEER rating to maximize energy savings from your new system.