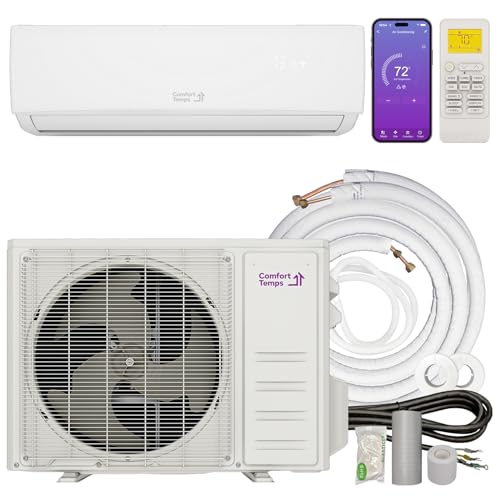
Full Installation of a Mini-Split Ductless Unit: Step-by-Step
Everything you need to know to install a ductless mini-split system correctly — from site preparation and mounting to wiring, vacuuming, and the first test run.
Why this guide matters: A mini-split ductless system is one of the most efficient ways to heat and cool a single room or an entire home without ductwork. However, the difference between a system that runs flawlessly for a decade and one that fails within a season often comes down to installation quality. This step-by-step guide walks you through the full installation process so you can understand what a professional installer does — and decide whether a DIY approach fits your skills and local regulations.
What a Mini-Split Ductless System Includes
Before starting, it helps to know the main components you will be working with. A typical single-zone mini-split kit contains:
- Indoor air handler unit — the wall-mounted head that blows conditioned air into the room.
- Outdoor condenser unit — the compressor/condenser section that releases or absorbs heat.
- Refrigerant line set — pre-insulated copper tubing that connects the two units.
- Communication and power wiring — control wires and the electrical supply to the outdoor unit.
- Drain hose — removes condensate water from the indoor unit.
- Mounting bracket and hardware — for the indoor unit and outdoor pad or bracket.
Multi-zone systems follow the same principles but add a branch box and multiple indoor heads. This guide focuses on the single-zone installation process, which is the foundation for all mini-split configurations. If you are still comparing system types, our overview of ductless mini-split AC systems is a useful starting point.
Tools and Materials You Will Need
Gather these tools before you begin. Missing equipment mid-installation is one of the most common reasons projects stall.
- Drill with masonry and wood bits
- Hole saw (typically 2.5–3 inches, sized to your line set)
- Torque wrench and adjustable wrenches
- Flaring tool and tube cutter
- Vacuum pump and manifold gauge set
- Nitrogen regulator (for pressure testing)
- Leak detector or soap solution
- Level, tape measure, and stud finder
- Wire strippers and electrical tape
- UV-resistant sealant and wall sleeve
- Drain hose, pipe insulation, and zip ties
Step-by-Step Installation Process
Plan the Layout and Confirm Clearances
Before drilling a single hole, decide where the indoor and outdoor units will go. The indoor unit should be mounted high on a wall, ideally 6–7 feet from the floor, with at least 6 inches of clearance above and 6–12 inches on each side for airflow. It should face the center of the room, not directly at seating areas.
The outdoor unit needs a solid, level surface — a concrete pad or wall bracket — with at least 12 inches of clearance behind it and 24 inches in front for airflow and service access. Keep the outdoor unit out of direct snow accumulation and away from dryer vents or other heat sources.
- Choose a wall location with accessible studs for the mounting bracket.
- Confirm the outdoor unit location is within the maximum line-set length and height difference specified by the manufacturer.
- Identify the shortest, cleanest route for the line set and drain hose between the two units.
- Check local codes for required setbacks and permit requirements.
Mount the Indoor Air Handler Bracket
Use the mounting plate supplied with the indoor unit as a template. Hold it against the wall at your chosen height and confirm it is level with a spirit level. Mark the stud locations and the mounting holes.
- Drill pilot holes into the wall studs.
- Secure the mounting plate with the supplied lag bolts or screws.
- Check again that the plate is level and firmly attached — the entire weight of the indoor unit hangs on it.
- Mark the location for the wall penetration hole for the line set and drain. The hole should be positioned so the line set exits the back of the indoor unit with a slight downward slope toward the outside.
Drill the Wall Penetration and Install the Sleeve
Use a hole saw sized to your line-set bundle — typically 2.5 to 3 inches. Drill through the wall at the marked location, keeping the drill level and slightly angled downward toward the exterior so the drain hose can slope out.
- Insert a wall sleeve through the hole to protect the line set and wiring from abrasion.
- Seal the gap around the sleeve with UV-resistant sealant on the exterior side.
- Stuff the remaining gap with insulation or expanding foam to prevent drafts and pests.
Prepare and Route the Line Set
Uncoil the line set carefully — never kink the copper tubing. If you are using a flare-connection line set, inspect the factory flares for damage. If you are cutting and flaring on site, use a proper tube cutter and flaring tool.
- Feed the line set, communication wire, and drain hose through the wall sleeve together, wrapping them with the supplied tape or sleeve where needed.
- Keep the ends of the copper lines capped until the moment you connect them to prevent moisture and dirt ingress.
- Route the line set along the wall using clamps or duct covers, maintaining a gentle slope toward the outdoor unit.
- Insulate any exposed copper and secure the bundle with UV-rated zip ties.
Mount the Outdoor Condenser Unit
Set the outdoor unit on a level concrete pad or a wall-mounted bracket rated for its weight. The unit should sit level to within a few degrees and be elevated slightly above ground level so water drains and debris does not accumulate.
- Use vibration-isolating pads under the feet to reduce noise transmission.
- Leave the recommended clearance around the unit for airflow and service access.
- If wall-mounted, ensure the bracket is anchored into structural framing, not just siding.
Connect the Drain Hose
Condensate must drain away from the indoor unit by gravity or with a condensate pump. Connect the drain hose to the indoor unit's drain port and route it through the wall sleeve with a continuous downward slope.
- Avoid loops or low points where water can collect.
- Terminate the drain where water will not pool near the foundation or cause damage.
- If gravity drainage is not possible, install a condensate pump rated for your unit's output.
Make the Refrigerant Line Connections
With the indoor unit hung on its bracket and the line set routed, connect the refrigerant lines. If the line set was supplied with flare nuts, use a torque wrench set to the manufacturer's specification — over-tightening crushes the flare, and under-tightening causes leaks.
- Apply a small amount of refrigerant oil to the flare face (if specified by the manufacturer).
- Hand-tighten the flare nut, then torque to spec.
- Repeat for both the liquid and suction lines at the indoor and outdoor units.
- Inspect each connection visually for alignment.
Wire the Indoor and Outdoor Units
Mini-split systems typically use three or four communication wires between the indoor and outdoor units, plus a line-voltage power feed to the outdoor condenser. Always disconnect power at the breaker before working on wiring.
- Verify the required wire gauge and breaker size from the installation manual and the unit's data plate.
- Connect the indoor unit's communication wires to the matching terminals on the outdoor unit — color coding must match on both ends.
- Connect the power feed to the outdoor unit's terminal block, including the ground wire.
- Use cable clamps or conduit connectors to secure all wiring and prevent strain on terminals.
Pressure Test and Vacuum the System
This is the most critical step for long-term reliability. The system must be free of moisture and air before refrigerant is released.
- Pressure test: Connect a nitrogen regulator to the service ports and pressurize the system to the level specified in the manual (often 300–500 psi). Let it sit for at least 15–30 minutes and watch for pressure drop.
- Leak check: Apply soap solution or use an electronic leak detector at every flare connection and service port. Bubbles indicate a leak that must be fixed before proceeding.
- Vacuum: Connect the vacuum pump to the service ports and evacuate the system to the manufacturer's target (commonly below 500 microns). Hold the vacuum for at least 15 minutes to confirm it holds.
- If the vacuum does not hold, there is a leak or moisture — do not release refrigerant until it is resolved.
Release Refrigerant and Perform the First Test Run
Once the vacuum holds, open the service valves on the outdoor unit to release the factory-charged refrigerant into the line set and indoor coil. Use a hex wrench and open them fully, then replace the caps.
- Restore power at the breaker.
- Turn on the system in cooling mode and let it run for 15–20 minutes.
- Check that the indoor unit blows cold air and the outdoor fan runs.
- Measure the temperature split between return and supply air (typically 15–20°F in cooling).
- Verify the drain is removing water properly.
- Listen for unusual noises and check for vibration.
The first week after installation is the best time to catch small issues. Our guide on the first week after AC installation covers what to monitor.
Installation Quality Tiers: What to Expect
Mini-split installations vary widely in quality. The table below describes what different installation tiers typically include, so you can evaluate quotes and DIY plans with clear expectations.
| Installation Tier | Typical Scope | Best For |
|---|---|---|
| Essential tier | Basic mounting, standard line-set routing, flare connections, vacuum, and functional test. Minimal extras. | Simple single-zone retrofits in accessible locations where the shortest routing is straightforward. |
| Balanced tier | Careful line-set routing with covers, vibration isolation, condensate pump if needed, full pressure test and vacuum hold, documented temperature split. | Most residential installs where long-term reliability and quiet operation matter. |
| High-end tier | Concealed line-set routing, custom brackets, surge protection, precise torque documentation, commissioning report, and post-install follow-up. | Premium systems, multi-zone setups, and homes where aesthetics and performance are top priorities. |
Whatever tier you choose, the core steps above — especially pressure testing and vacuuming — cannot be skipped. They are the difference between a system that lasts and one that does not. For high-efficiency models, pairing a quality installation with an ENERGY STAR certified mini-split maximizes long-term performance.
Pre-Startup Checklist
Confirm These Before the First Run
- Indoor unit bracket is level and anchored into studs
- Wall penetration is sealed and sleeved
- Line set is fully insulated with no kinks
- All flare connections are torqued to specification
- Drain hose slopes continuously away from the unit
- Communication wires match color-to-color on both ends
- Power feed and breaker size match the data plate
- System held pressure during the nitrogen test
- Vacuum held below the target micron level
- Service valve caps are replaced and tightened
- Outdoor unit has proper clearance and is level
Common Installation Mistakes to Avoid
- Skipping the pressure test. A system that seems to work on day one can leak slowly and fail months later.
- Insufficient vacuum time. Moisture left in the system damages the compressor over time.
- Over-tightening flare nuts. This deforms the flare and creates a leak path. Always use a torque wrench.
- Improper drain slope. Standing water in the drain line leads to mold and water damage.
- Kinked line set. Restricted refrigerant flow reduces capacity and can damage the compressor.
- Undersized electrical supply. Verify wire gauge and breaker size against the data plate, not guesswork.
If you prefer to have a professional handle the installation, our guide on how to choose an HVAC contractor explains what to ask and what documentation to request.
Frequently Asked Questions
Can I install a mini-split myself?
In many regions, homeowners can perform much of the mechanical work, but refrigerant handling and line-voltage electrical connections are regulated. Some manufacturers also require licensed installation to validate the warranty. Check your local rules and the warranty terms before deciding.
How long does a mini-split installation take?
A single-zone installation typically takes a professional crew 4–8 hours depending on wall construction, line-set routing difficulty, and electrical work. DIY installations often take a full weekend or more for first-timers.
Do I need a permit for a mini-split?
Requirements vary by jurisdiction. Many areas require an electrical permit and sometimes a mechanical permit. Our guide on how to get an AC permit walks through the typical process.
What size line set do I need?
The line-set size is determined by the manufacturer and is based on system capacity and the distance between units. Never substitute a different size — it affects refrigerant charge and performance.
How do I know the vacuum was successful?
Use a micron gauge at the service port. The system should pull down below the manufacturer's target (commonly 500 microns) and hold that level for at least 15 minutes after the pump is isolated.
Ready to Choose Your Mini-Split System?
Installation quality starts with the right equipment. Compare ductless mini-split options and verify efficiency ratings before you commit to a model. A well-installed system paired with the right unit delivers quiet, efficient comfort for years.