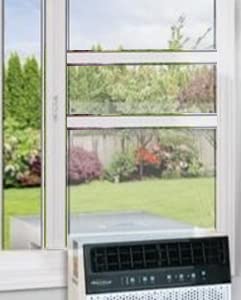
Plexiglass Casement Window Air Conditioner: The Complete Guide
Everything you need to know about installing a window air conditioner in a casement window using a custom plexiglass panel — from measuring and cutting to sealing and choosing the right unit.
JUMP TO INSTALLATION STEPSWhat You'll Learn
Why Use Plexiglass for a Casement Window AC?
Casement windows — those that swing open outward on a vertical hinge — present a unique challenge for air conditioning. Standard window AC units are designed for double-hung windows that slide up and down, where the unit can rest on the lower sash and be secured by closing the upper sash behind it. Casement windows don't offer that horizontal resting surface.
A plexiglass panel solves this problem elegantly. Instead of trying to balance a heavy AC unit on a swinging frame, you create a rigid, custom-fitted panel that fills the window opening. The panel holds the AC unit securely and seals the gap around it. Plexiglass (acrylic sheet) is the material of choice for several practical reasons:
- Light transmission: Plexiglass lets natural light through, so you don't lose daylight when the window is occupied by the AC setup.
- Strength-to-weight ratio: Acrylic is significantly lighter than glass yet strong enough to support the weight of a window AC unit when properly braced.
- Weather resistance: Quality acrylic resists UV degradation, moisture, and temperature fluctuations better than many alternatives.
- Workability: Plexiglass can be cut, drilled, and shaped with common workshop tools, making custom fabrication feasible for a determined DIYer.
- Safety: If it cracks under stress, acrylic tends to craze or split rather than shatter into dangerous shards like glass.
For homes with casement windows — common in older architecture, modern energy-efficient builds, and many apartment complexes — a plexiglass adapter is often the most practical route to window air conditioning without modifying the window frame permanently.
Quick note: Plexiglass is a brand name for acrylic sheet. You'll find equivalent products sold as "acrylic sheet," "Lucite," or "Perspex." Any of these work for this application, provided the thickness is adequate for the AC unit's weight.
How the Plexiglass Casement Window AC Setup Works
The core idea is straightforward: you replace the open portion of your casement window with a solid panel that has a rectangular cutout sized to your AC unit. The AC unit slides into the cutout, and the panel — supported by the window frame and additional bracing — bears the load.
Key Components of the Setup
- The plexiglass panel: Typically 1/4-inch to 1/2-inch thick acrylic, cut to fit the window opening with a cutout for the AC unit's chassis.
- Support bracket or sill support: A metal or wooden bracket that transfers the AC's weight to the window sill or wall, preventing the plexiglass from bearing the full load alone. Many window AC units include an L-bracket or support frame; for casement installations, an additional exterior support is strongly recommended.
- Weather sealing: Foam weatherstripping, silicone caulk, or specialized window AC foam seals the perimeter of the plexiglass and the gap around the AC unit.
- Retention hardware: Screws, window locks, or a tension system to hold the panel in place within the casement frame.
The AC unit itself must be the correct type for this orientation. Casement windows are vertical, and the AC unit sits in a vertical opening. Many standard window ACs can be mounted vertically in a casement application, but you need to confirm the unit's installation guide permits it. Some manufacturers specifically prohibit vertical mounting because the compressor and refrigerant system are designed for a specific orientation. Always check the manual before proceeding.
Measuring Your Casement Window Correctly
Accurate measurements are the foundation of a secure, leak-free installation. Measure the window opening in three places — top, middle, and bottom for width; left, middle, and right for height — and use the smallest dimension. Casement frames are rarely perfectly square.
Measurements You Need
- Window opening width: The clear distance between the left and right jambs.
- Window opening height: The clear distance from the sill to the top of the opening (with the sash fully open).
- Window frame depth: How deep the frame is from interior face to exterior face — this determines how much of the AC unit protrudes and how thick your panel can be.
- AC unit dimensions: The width, height, and depth of the specific air conditioner you plan to install, plus the required clearances around it for airflow.
Add the AC unit's required clearance to the cutout dimensions. For example, if the unit is 15 inches wide and the manual calls for 1 inch of clearance on each side, the cutout should be 17 inches wide. Remember that the panel must extend beyond the cutout on all sides to overlap the window frame for sealing and support.
Choosing the Right Air Conditioner for a Casement Window
Not every window AC is suitable for a vertical casement installation. The two most important factors are orientation compatibility and physical dimensions.
Orientation Compatibility
Some manufacturers offer purpose-built casement window air conditioners — slim, vertical units designed specifically for this window type. These are the safest choice because the manufacturer has already validated the vertical orientation. If you're using a standard window AC in a vertical mount, verify in the manual that vertical installation is permitted. Units that use a rotary compressor are generally more tolerant of vertical orientation than units with certain reciprocating compressor designs.
Sizing for the Room
Choosing the right cooling capacity matters as much as the mounting method. An undersized unit runs constantly and fails to cool; an oversized unit short-cycles, removing humidity poorly and wearing out components faster. Use a BTU sizing guide based on square footage, ceiling height, insulation, and sun exposure. As a starting reference, a 150–250 square foot room typically pairs with an 8,000–10,000 BTU unit, while 250–400 square feet calls for 12,000–14,000 BTU.
Physical Fit
Confirm that the AC unit's height fits within your window opening with room for the panel above and below. The unit's depth also matters: a deep unit may protrude awkwardly into the room or extend too far outside, depending on your window frame depth and any exterior restrictions (such as an HOA or apartment building facade rules).
Materials and Tools You'll Need
Gather everything before you start cutting. A single trip to the hardware store is better than three.
| Item | Purpose | Tier Guidance |
|---|---|---|
| Acrylic sheet (plexiglass) | The main panel; 1/4" minimum for small units, 3/8"–1/2" for larger units | Mid-range cast acrylic is a solid choice; extruded acrylic is an entry-level alternative |
| Support bracket / L-bracket | Transfers AC weight to the sill or wall | Heavy-duty steel bracket recommended for premium durability |
| Foam weatherstripping | Seals panel perimeter and AC gap | Closed-cell foam is the balanced tier for outdoor exposure |
| Silicone caulk (exterior grade) | Waterproofs the panel-to-frame joint | 100% silicone is the top-tier choice for weather sealing |
| Acrylic cutting tool / scoring knife | Cuts the panel to size | Scoring knife for straight cuts; jigsaw with acrylic blade for cutouts |
| Drill with bits for acrylic | Pilot holes and hardware mounting | Any standard drill works; use sharp bits and low speed |
| Measuring tape, square, marker | Layout and marking | Essential tier — accuracy matters more than tool grade |
| Safety glasses and gloves | Protection during cutting and drilling | Non-negotiable for any tier |
Step-by-Step Installation
This sequence assumes you've already selected a compatible AC unit and confirmed vertical mounting is permitted by the manufacturer. Work on a calm day, and have a helper available for lifting the AC unit into place.
1Prepare the Window Opening
Open the casement sash fully and clean the frame and sill. Remove any screens or obstructions. Inspect the frame for rot, loose hardware, or damage — the panel and AC will bear on this structure, so it needs to be sound. If the sill is uneven, note where shims will be needed.
2Cut the Plexiglass Panel
Using your cardboard template as a guide, mark the panel outline on the protective film of the acrylic sheet (leave the film on during cutting to reduce scratching). Score and snap straight edges for a clean line, or use a jigsaw with a fine-tooth acrylic blade for curves and the AC cutout. Cut the AC opening slightly larger than the unit's chassis to allow for weatherstripping and minor adjustment.
3Drill Mounting and Hardware Holes
Drill pilot holes for any screws or brackets. Use a drill bit designed for acrylic and run the drill at low speed to avoid melting or cracking the sheet. Support the acrylic firmly behind the drill point. Countersink holes if screw heads need to sit flush.
4Install the Support Bracket
Mount the exterior support bracket to the window sill or wall according to the bracket's instructions. The bracket should carry the AC unit's weight so the plexiglass is primarily a weather barrier and lateral stabilizer, not a load-bearing beam. For heavier units, use two brackets spaced evenly.
5Fit the Panel in the Window
Slide the plexiglass panel into the casement frame. It should rest against the frame stops with a small gap for weatherstripping. Check that the panel is plumb and that the AC cutout aligns with the support bracket below. Mark any trimming needed and adjust.
6Set the AC Unit in Place
With a helper, lift the AC unit through the cutout and rest it on the support bracket. Follow the unit's manual for any required slight tilt (usually toward the exterior for drainage). Confirm the unit is level side-to-side and that its weight is fully on the bracket, not on the acrylic.
7Seal and Insulate
Apply closed-cell foam weatherstripping around the AC chassis where it meets the plexiglass cutout. Seal the panel perimeter with weatherstripping against the window frame, then run a bead of exterior-grade silicone caulk along the exterior edges. On the interior, add foam strips or a removable insulation panel for additional draft control.
8Secure and Test
Install retention hardware — screws through the panel into the frame, window locks, or a tension bar — so the panel cannot shift. Turn on the AC and check for vibration, unusual noise, and air leaks around the panel. Adjust sealing as needed. Verify that condensation drains properly to the exterior.
Sealing and Insulation: Getting It Right
A casement window AC installation lives or dies by its seal. Gaps around the panel waste cooling, let humid air in, and can allow water intrusion during rain. Three layers of defense work best:
- Compression seal at the frame: Closed-cell foam weatherstripping compressed between the panel and the window frame stops air movement. Choose a thickness that compresses to about half its original depth when the panel is secured.
- Caulk at exterior joints: A continuous bead of exterior-grade silicone where the panel meets the frame on the outside blocks rain and drafts. Tool the bead smooth for a clean look and better adhesion.
- Insulation around the AC chassis: Foam strips or a purpose-made window AC seal fill the gap between the unit and the panel cutout. Some kits include removable side panels; if yours doesn't, cut foam to fit snugly without blocking the unit's side vents.
Check the seal after the first rainstorm and again after a few weeks of operation. Seasonal temperature changes can cause acrylic to expand and contract slightly, so inspect caulk lines annually and touch up as needed.
Alternatives to a Plexiglass Casement AC Setup
If the plexiglass route feels too involved, or if your window or lease rules make it impractical, several alternatives exist:
- Purpose-built casement window AC: Vertical units designed for casement openings eliminate the need for custom fabrication. They're often the most straightforward solution if you can find one that fits your window.
- Portable air conditioner with a casement window kit: A portable AC vents through a hose, and casement-specific window kits hold the hose in the vertical opening. This approach avoids heavy lifting and permanent panel fabrication. Explore portable air conditioner options for casement windows if this route appeals.
- Mini-split system: A ductless mini-split needs only a small hole through the wall for refrigerant lines, leaving the casement window free. It's a larger investment but delivers quiet, efficient cooling and doesn't block the window at all. If you're renovating or replacing an old system, new HVAC systems and current refrigerant standards are worth reviewing before you commit.
- Through-the-wall AC: If you have an exterior wall available and own the property, a through-the-wall unit avoids the window entirely. This is a permanent modification, so it's best suited to long-term ownership situations.
Frequently Asked Questions
Can any window air conditioner be installed vertically in a casement window?
No. Some manufacturers explicitly prohibit vertical installation because the compressor and oil management system are designed for horizontal orientation. Always check the installation manual. Purpose-built casement AC units are validated for vertical mounting and are the safest choice.
How thick should the plexiglass be?
For small units (5,000–6,000 BTU), 1/4-inch cast acrylic is generally adequate when used with a support bracket. For larger units, 3/8-inch to 1/2-inch acrylic provides more rigidity. Regardless of thickness, the AC unit's weight should be carried by a bracket, not by the acrylic alone.
Will plexiglass hold the weight of a window AC unit?
Acrylic is strong, but it should not be the primary load-bearing element. Use an exterior support bracket or sill support to transfer the unit's weight to the window sill or wall. The plexiglass panel then serves as a weather barrier and lateral stabilizer.
How do I keep rain from coming in around the plexiglass panel?
Seal the exterior perimeter of the panel with exterior-grade silicone caulk, compress closed-cell foam weatherstripping between the panel and the frame, and ensure the AC unit itself is tilted slightly toward the exterior for drainage. Inspect and refresh the caulk annually.
Can I remove the plexiglass panel and AC unit for the winter?
Yes. If you use removable retention hardware (such as a tension bar or screws that can be backed out), the panel and unit can be removed seasonally. Store the acrylic flat and away from heat. Removing the setup in cold months prevents heat loss through the panel and protects the unit from weather extremes.
What if my casement window opens outward and has a crank mechanism?
Outward-cranking casement windows are the most common type for this installation. You'll need to remove or bypass the crank arm so the panel can sit flush in the frame. Many installations remove the sash entirely for the season and reinstall it when the AC is removed. Keep all removed hardware labeled and stored safely.
Is a plexiglass casement AC setup allowed in apartments?
It depends on your lease and building rules. Some buildings prohibit window AC units entirely, while others restrict what's visible from the exterior. Check your lease and ask your landlord before installing. A portable AC with a casement window kit may be a more acceptable alternative in rental situations.
How do I size the AC unit for my room?
Start with square footage: 150–250 sq ft typically needs 8,000–10,000 BTU; 250–400 sq ft calls for 12,000–14,000 BTU. Adjust upward for high ceilings, poor insulation, or strong sun exposure, and downward for shaded, well-insulated rooms. Consult a BTU sizing guide for a more precise calculation.