Window AC Capacitor Replacement: Complete Step-by-Step Guide
A failed capacitor is one of the most common reasons a window air conditioner stops cooling. This guide explains how to diagnose, test, and safely replace a window AC capacitor so you can restore cold air without replacing the entire unit.
START THE REPLACEMENTWhat a Window AC Capacitor Does
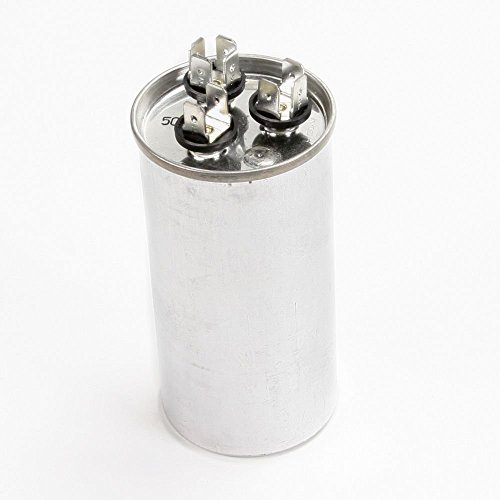
A capacitor is a small cylindrical electrical component that stores and releases energy to help the compressor and fan motor start and run smoothly. In a window air conditioner, the capacitor gives the compressor motor the extra surge of electricity it needs to overcome inertia at startup. Without a working capacitor, the compressor may hum briefly and then shut down, or the fan may fail to spin at all.
Most window AC units use one or two capacitors: a run capacitor that stays in the circuit during normal operation, and sometimes a start capacitor that provides an additional boost during startup. Many modern window units combine the fan and compressor functions into a single dual-run capacitor with three or four terminals. Understanding which type your unit uses is the first step toward a successful replacement.
If you are also dealing with broader cooling problems, our guide on why an AC unit is not blowing cold air can help you rule out other causes before focusing on the capacitor.
Symptoms of a Failing Window AC Capacitor
Capacitors degrade over time, especially in hot environments where the window unit runs continuously. Recognizing the signs early can save you from a more serious compressor failure. Here are the most common symptoms:
Compressor Hums But Does Not Start
The unit powers on, you hear a humming sound from the compressor, but no cold air comes out. This is the classic sign of a weak or failed run capacitor.
Fan Does Not Spin
The indoor or outdoor fan blade stays still even though the unit is receiving power. A dual-run capacitor may have a failed fan section.
Unit Clicks and Shuts Off
A clicking sound followed by the unit shutting down shortly after startup often indicates the capacitor cannot deliver enough starting torque.
Breaker Trips Repeatedly
A shorted capacitor can draw excessive current and cause the circuit breaker to trip soon after the AC turns on.
Inconsistent Cooling
The unit cools intermittently or takes much longer than usual to reach the set temperature because the compressor struggles to stay running.
Visible Bulging or Leakage
A capacitor that looks swollen, cracked, or has leaked oily residue is physically damaged and must be replaced immediately.
If your unit shows these symptoms alongside other issues, our article on things to check when AC is not cooling provides a broader troubleshooting checklist. For window units specifically, you may also find the window unit air conditioner maintenance guide useful for preventing future failures.
Capacitor Types and How to Identify Yours
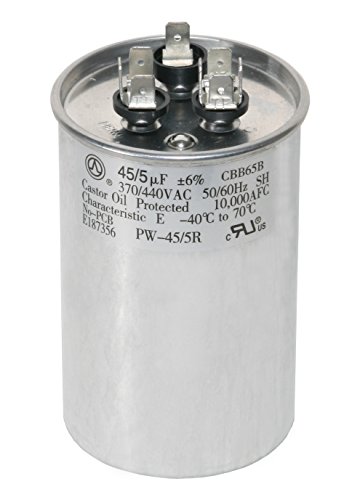
Before ordering a replacement, you must identify the exact capacitor in your unit. Window AC capacitors are rated by capacitance in microfarads (µF) and by voltage. Using a capacitor with the wrong rating can damage the compressor or create a safety hazard.
| Capacitor Type | Typical Terminals | Function | Best For |
|---|---|---|---|
| Single Run Capacitor | 2 terminals | Supports either the compressor or the fan motor | Entry-level and older window units |
| Dual Run Capacitor | 3 or 4 terminals | Supports both compressor and fan in one component | Mid-range and most modern window units |
| Start Capacitor | 2 terminals | Provides extra torque only during startup | High-end and heavy-duty window units |
| Hard Start Capacitor Kit | 2 terminals plus relay | Boosts starting torque for aging compressors | Premium and professional-grade retrofits |
To identify your capacitor, unplug the unit and remove the outer casing. The capacitor label lists the capacitance (for example, 25/5 µF, meaning 25 µF for the compressor and 5 µF for the fan), the voltage rating (commonly 370V or 440V), and the tolerance. Write down every number on the label before shopping for a replacement. Never install a capacitor with a lower voltage rating than the original.
If you are unsure whether replacing the capacitor is the right move versus calling a professional, our guide on licensed HVAC technicians explains when professional service is the safer choice.
Safety Precautions Before You Begin
A capacitor can hold a dangerous electrical charge even after the unit is unplugged. Always discharge the capacitor before touching it. Never touch the terminals with your bare hands. If you are not confident working with electrical components, stop and hire a licensed HVAC technician.
Follow these safety rules without exception:
- Unplug the unit from the wall outlet and wait at least five minutes before opening the casing.
- Discharge the capacitor using an insulated screwdriver across the terminals or a proper capacitor discharge tool.
- Wear insulated gloves and safety glasses throughout the job.
- Take a photo of the wiring before disconnecting anything so you can reconnect the new capacitor correctly.
- Work in a dry area and avoid touching metal parts with both hands at once.
For additional maintenance context, see our tips and maintenance section, which covers safe DIY practices for window units.
How to Test a Window AC Capacitor
Testing confirms whether the capacitor is actually faulty before you buy a replacement. You will need a multimeter with a capacitance setting. Here is the process:
- Disconnect power and discharge the capacitor. Unplug the unit, remove the casing, and discharge the capacitor terminals with an insulated tool.
- Label and disconnect the wires. Take a photo first, then gently pull the wires off the terminals. Note which wire goes to which terminal.
- Set your multimeter to capacitance mode. Select the µF range that covers the capacitor's rating.
- Touch the probes to the terminals. For a dual-run capacitor, test the compressor section (HERM to C) and the fan section (FAN to C) separately.
- Compare the reading to the label. A good capacitor reads within about 6% of its rated value. A reading of zero, OL, or a value far below the rating means the capacitor has failed.
If testing shows the capacitor is fine but the unit still does not cool, the problem may lie elsewhere. Our article on an air conditioner that runs but does not cool walks through the next diagnostic steps.
Step-by-Step Window AC Capacitor Replacement
Once you have confirmed the capacitor is bad and have the correct replacement in hand, follow these steps carefully:
- Unplug the unit and discharge the capacitor. This is non-negotiable. Wait several minutes after unplugging, then discharge the terminals.
- Remove the outer casing. Most window units have screws along the sides and back. Keep the screws in a small container so they do not get lost.
- Locate the capacitor. It is usually a metal cylinder near the compressor, mounted with a strap or bracket.
- Photograph the wiring. Take a clear photo of every wire connected to the capacitor before removing anything.
- Disconnect the wires. Gently pull each terminal off. If a terminal is stuck, use needle-nose pliers with insulated handles.
- Remove the mounting bracket. Unscrew or unclip the strap holding the capacitor in place.
- Install the new capacitor. Mount it in the same orientation and reconnect the wires exactly as shown in your photo. The HERM terminal goes to the compressor, FAN to the fan motor, and C is the common terminal.
- Double-check connections. Confirm every wire is firmly seated and no bare wire is touching another terminal.
- Reassemble the unit. Replace the casing and secure all screws.
- Test the unit. Plug it in and turn it on. The compressor should start smoothly and cold air should flow within a few minutes.
For homeowners who prefer to leave electrical work to the experts, our guide on questions to ask an installer can help you vet a technician before booking a repair visit.
Testing and Restarting the Unit
After reassembly, plug the unit in and set it to the coolest mode. Listen for the compressor to start within a few seconds. The fan should spin immediately, and cold air should begin flowing within two to three minutes. If the unit hums but does not start, unplug it immediately and re-check the wiring against your photo. A miswired capacitor can prevent startup or damage the compressor.
Once the unit is running, monitor it for the first hour. Check for unusual noises, vibrations, or a burning smell. If any of these occur, shut the unit down and investigate. For a broader view of what normal operation sounds like, our article on an outside AC unit making loud noise and not cooling covers common noise sources.
Regular maintenance extends the life of your new capacitor and the entire unit. Our HVAC system maintenance guide outlines a seasonal checklist that helps prevent repeat failures.
Need a Replacement Capacitor or a New Window Unit?
Browse our recommended window air conditioners and replacement parts below. Every unit is selected for reliability and ease of maintenance.
View RecommendationsFrequently Asked Questions
How do I know if my window AC capacitor is bad?
Can a bad capacitor prevent the window AC from cooling?
Is it safe to replace a window AC capacitor myself?
What happens if I install a capacitor with the wrong rating?
How long does a window AC capacitor last?
Where can I find the capacitor model number?
For more troubleshooting help, explore our rooms and spaces guides and our full recommendations hub.