Cleaning Air Conditioner Coils: The Complete DIY Guide
Dirty coils are one of the leading causes of poor cooling and premature AC failure. Learn how to clean evaporator and condenser coils safely and effectively to restore efficiency and extend the life of your system.
Why coil cleaning matters: Your air conditioner relies on two sets of coils to move heat from inside your home to the outdoors. When dust, dirt, and grime build up on these coils, the system has to work harder to achieve the same cooling output. Over time, this leads to higher energy consumption, reduced comfort, and mechanical wear. Regular coil cleaning is one of the most practical maintenance habits any homeowner can adopt.
Understanding the Two Sets of Coils
Before you start cleaning, it helps to understand what you are cleaning and why each coil set matters. An air conditioning system has two distinct coil assemblies that work together in a continuous refrigeration cycle.
Evaporator Coils (Indoor Unit)
The evaporator coil sits inside your home, usually in the air handler or furnace cabinet. Refrigerant enters this coil as a cold, low-pressure liquid and absorbs heat from the indoor air that blows across it. Because indoor air carries dust, pet dander, and lint, the evaporator coil is prone to accumulating a layer of grime. When that layer thickens, airflow drops and the coil can even freeze. If you notice weak airflow or ice forming on the indoor unit, a dirty evaporator coil is often the culprit. For a deeper walkthrough, see the guide on cleaning AC evaporator coils.
Condenser Coils (Outdoor Unit)
The condenser coil is located in the outdoor unit and releases the heat that was absorbed indoors. Because it sits outside, it collects pollen, leaves, grass clippings, and dust. A clogged condenser coil cannot shed heat efficiently, which forces the compressor to run longer and hotter. This is one of the most common reasons an AC struggles on hot days. The dedicated guide on condenser coils on an AC unit explains the anatomy in more detail.
Signs Your Coils Need Cleaning
Coils do not announce themselves when they are dirty, but the system gives clear signals. Watch for these symptoms:
- Reduced cooling output even when the thermostat is set low
- Longer run times and higher energy bills without a change in usage
- Weak airflow from the supply vents
- Ice forming on the indoor coil or refrigerant lines
- Musty or dusty odors when the system starts
- Visible dirt or matted debris on the outdoor coil fins
- Frequent short cycling or the system shutting off unexpectedly
If you recognize several of these signs, coil cleaning should move to the top of your maintenance list. Many of these symptoms overlap with other issues, so it also helps to review common AC problems to rule out unrelated faults.
Tools and Materials You Will Need
Coil cleaning does not require a professional workshop, but using the right tools prevents damage to the delicate aluminum fins. Gather these items before you begin:
- Coil cleaning solution (foaming or no-rinse formula designed for HVAC coils)
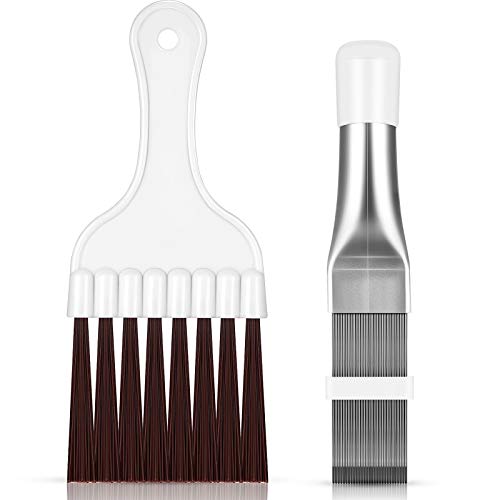
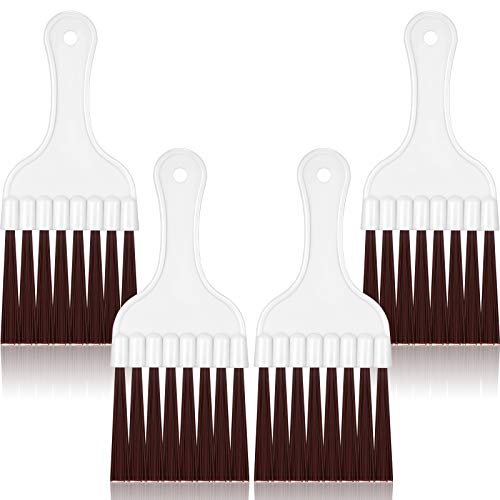
- Soft-bristle brush or coil brush
- Fin comb for straightening bent fins
- Garden hose with a spray nozzle (for outdoor coils)
- Pump sprayer (for indoor coils)
- Wet/dry vacuum with a soft brush attachment
- Protective gloves and safety glasses
- Drop cloth or plastic sheeting to protect flooring
- Adjustable wrench or screwdriver for access panels
Safety first: Always turn off power to the air conditioner at the thermostat and the circuit breaker before removing panels or touching any components. The outdoor unit contains capacitors that can hold a dangerous charge even after power is disconnected, so avoid touching electrical parts. If you are unsure about any step, call a licensed technician.
How to Clean Condenser Coils (Outdoor Unit)
Outdoor coil cleaning is the easier of the two tasks because the coil is accessible and water runoff is not a concern. Follow these steps for a thorough clean.
- Disconnect power. Turn off the AC at the thermostat and switch off the breaker that feeds the outdoor unit. Wait a few minutes before proceeding.
- Clear the area. Remove leaves, grass, and debris from around the unit. Maintain at least two feet of clearance on all sides so airflow is not restricted after cleaning.
- Remove the outer grille or fan guard. Most units have screws or clips that hold the top grille in place. Set the hardware aside in a container so nothing gets lost.
- Brush off loose debris. Use a soft brush or vacuum to remove dry dirt, pollen, and lint from the coil fins. Work gently in the direction of the fins to avoid bending them.
- Apply coil cleaner. Spray the cleaner evenly across the coil following the product instructions. Many foaming cleaners lift dirt as they expand; let the solution dwell for the recommended time.
- Rinse with a garden hose. Spray from the inside out where possible so debris is pushed out of the coil rather than deeper into it. Use moderate pressure and keep the nozzle moving to avoid bending fins.
- Straighten bent fins. Use a fin comb to gently realign any crushed fins. Good fin alignment is essential for heat transfer.
- Reassemble and restore power. Replace the grille, tighten the screws, and turn the breaker back on. Run the system and confirm that airflow and cooling have improved.
Pro tip: Clean the outdoor coil at the start of cooling season and again midway through summer if you live in a dusty or pollen-heavy region. A quick rinse between deep cleans keeps performance steady. For a broader routine, review cleaning coils on a central air conditioner.
How to Clean Evaporator Coils (Indoor Unit)
Indoor coil cleaning requires more care because the coil sits above or near finished spaces and is connected to ductwork and a drain pan. Take your time and protect the surrounding area.
- Turn off power. Shut down the system at the thermostat and the breaker. Confirm the blower is not running before you open any panels.
- Access the coil. Remove the access panel on the air handler or furnace. On some systems the coil is behind a separate cover plate. Keep screws organized.
- Protect the area. Place plastic sheeting or a drop cloth beneath the unit to catch drips and cleaning solution.
- Clean the drain pan. Before cleaning the coil, wipe out the drain pan and check that the drain line is clear. A clogged drain can cause water damage once you start rinsing. See cleaning the air conditioner drain for a step-by-step method.
- Brush the coil surface. Use a soft coil brush to loosen dust and lint from the fins. Work carefully and avoid pressing hard on the fins.
- Apply a no-rinse coil cleaner. Use a pump sprayer to apply a product formulated for indoor evaporator coils. These cleaners are designed to drain away with condensate, so no rinsing is required in most cases. Follow the label directions exactly.
- Let the cleaner work. Allow the recommended dwell time so the solution can break down grime. Condensate will carry the loosened dirt to the drain pan.
- Check the drain flow. Pour a small amount of water into the drain pan to confirm it drains freely. If it backs up, clear the line before restoring operation.
- Reassemble and test. Replace the panel, restore power, and run the system. Verify that airflow is strong and the coil is not icing.
If the coil is heavily soiled or you are uncomfortable working around the air handler, a professional cleaning is the safer choice. The article on cleaning service for air conditioners explains what a technician typically includes in a service visit.
Evaporator vs. Condenser Coil Cleaning at a Glance
| Factor | Evaporator Coil (Indoor) | Condenser Coil (Outdoor) |
|---|---|---|
| Location | Air handler or furnace cabinet | Outdoor condensing unit |
| Main contaminants | Dust, pet dander, lint | Pollen, leaves, grass, dirt |
| Cleaning method | No-rinse spray, brush, drain flush | Foaming cleaner and hose rinse |
| Difficulty | Moderate — requires panel access | Entry-level — accessible from outside |
| Frequency | Annually or as airflow drops | Twice per cooling season in dusty areas |
| Key risk | Water damage if drain is clogged | Bent fins from high-pressure spraying |
How Often Should You Clean AC Coils?
There is no single schedule that fits every home, but general guidance works well for most households:
- Outdoor coil: Inspect monthly during cooling season and clean at least twice per year. Homes near construction, farmland, or heavy pollen should clean more often.
- Indoor coil: Clean annually as part of spring maintenance. If you have pets or allergy sufferers in the home, consider a mid-season check.
- After major renovations: Drywall dust and sawdust settle on coils quickly, so clean both coils after any remodeling project.
Pair coil cleaning with filter changes for the best results. A clean filter reduces the amount of debris that reaches the evaporator coil in the first place. The guide on cleaning the filter of an air conditioner covers filter maintenance in detail. For a full seasonal routine, the AC maintenance guide ties all the tasks together.
Benefits of Regular Coil Cleaning
Consistent coil maintenance pays off in several measurable ways. Clean coils transfer heat more effectively, which means the compressor runs shorter cycles to reach the set temperature. That translates to lower energy use and a more comfortable home. Systems with clean coils also experience fewer breakdowns, because the compressor and fan motor are not subjected to prolonged high-load operation. Indoor air quality improves as well, since a clean evaporator coil does not harbor mold or circulate musty odors. Finally, regular cleaning supports a long-term investment in your HVAC equipment by delaying wear on expensive components.
Common Mistakes to Avoid
Coil cleaning is straightforward, but a few errors can cause damage or wasted effort:
- Using a pressure washer: High pressure crushes the delicate aluminum fins. Use a garden hose with moderate flow instead.
- Skipping the power disconnect: Always cut power at the breaker before opening any panels.
- Ignoring the drain pan: Rinsing an indoor coil without clearing the drain can flood the cabinet and surrounding area.
- Spraying from the wrong direction: On outdoor coils, rinse from the inside out so debris exits the coil rather than lodging deeper.
- Using household cleaners: Abrasive or acidic cleaners can corrode coil surfaces. Use products formulated for HVAC coils only.
- Forgetting the fins: Bent fins block airflow even after cleaning. A fin comb restores performance.
When to Call a Professional
Some situations call for a licensed technician rather than a DIY approach. If the indoor coil is difficult to access, if you suspect refrigerant leaks, or if the coil is severely clogged with hardened debris, professional service is the safer route. Technicians have coil cleaning equipment, gauges to verify system charge, and the experience to spot related problems such as a failing capacitor or a weak blower motor. The guide on when to call an HVAC technician helps you decide whether a problem is a DIY task or a job for a pro.
Frequently Asked Questions
Can I clean AC coils without removing them?
Yes. Both evaporator and condenser coils can be cleaned in place. Outdoor coils are accessible after removing the grille, and indoor coils can be cleaned through the access panel using a no-rinse spray. Removal is rarely necessary for routine maintenance.
What happens if I never clean my AC coils?
Dirty coils reduce cooling capacity and force the compressor to run longer. Over time this leads to higher energy use, frozen coils, compressor strain, and a shorter equipment lifespan. In severe cases the system may stop cooling entirely.
Is vinegar safe for cleaning AC coils?
Diluted white vinegar can help with light mineral deposits, but it is not a substitute for a proper coil cleaner. Acidic solutions left on aluminum fins can cause corrosion. Use a product specifically formulated for HVAC coils and follow the label directions.
How do I know if the evaporator coil is dirty?
Common signs include weak airflow, ice forming on the indoor unit, musty odors, and reduced cooling. A visual inspection through the access panel often reveals a matted layer of dust on the coil face.
Can dirty coils cause a burning smell?
Dirty coils themselves do not usually burn, but the added strain can overheat the blower motor or compressor. If you smell burning, turn the system off immediately and call a technician. The guide on AC smells bad covers possible causes.
Should I clean the coils before or after changing the filter?
Change the filter first. A clean filter prevents new debris from reaching the evaporator coil while you work, and it ensures airflow is unobstructed when you test the system afterward.
Keep Your System Running at Peak Efficiency
Cleaning air conditioner coils is one of the highest-impact maintenance tasks a homeowner can perform. With the right tools and a bit of patience, you can restore cooling performance, reduce energy use, and protect your equipment. If you prefer professional service, verify that your technician follows a complete coil cleaning procedure that includes the drain pan and fins.