Cleaning Air Conditioner Condenser Coils
A complete, practical guide to restoring your outdoor unit's cooling performance. Learn the tools, safety steps, and cleaning methods that keep your condenser coils working efficiently season after season.
START THE CLEANING PROCESS
Why this matters: The condenser coil is the part of your air conditioner that releases heat to the outside air. When dirt, pollen, and debris coat its fins, the system works harder, cools less effectively, and draws more electricity. A simple cleaning routine is one of the highest-impact maintenance tasks a homeowner can perform.
Understanding the Condenser Coil
The condenser coil sits inside the outdoor unit of a split or central air conditioning system. Refrigerant arrives at this coil as a hot, high-pressure gas. As outdoor air is pulled across the fins by the condenser fan, the refrigerant releases heat and condenses into a liquid before traveling back indoors. That heat-transfer process depends entirely on airflow across clean metal surfaces.
Over a single cooling season, the coil can accumulate a surprising amount of material: grass clippings, cottonwood fluff, pollen, dust, and pet hair. Even a thin layer of grime acts as insulation, blocking heat exchange. Homeowners often search for solutions when they notice the central air unit isn't blowing cold air, and dirty condenser coils are one of the most common and most fixable causes.
Cleaning the condenser coil is a routine task that most homeowners can handle with basic tools. It requires care around electrical components and delicate aluminum fins, but the process itself is straightforward. This guide walks through preparation, the cleaning steps, and how to know when the job calls for a certified HVAC technician.
Tools and Supplies You Will Need
Gather everything before you begin so the job runs smoothly. The table below lists the essentials and what each item is used for.
| Tool or Supply |
Purpose |
| Garden hose with spray nozzle |
Rinses loosened debris from the coil fins |
| Coil cleaning solution (foaming or no-rinse) |
Breaks down greasy film and embedded grime |
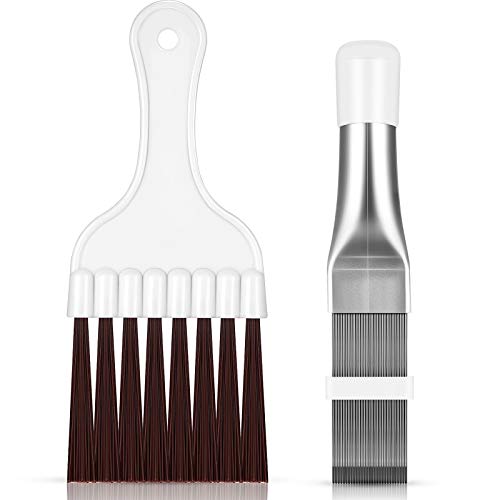
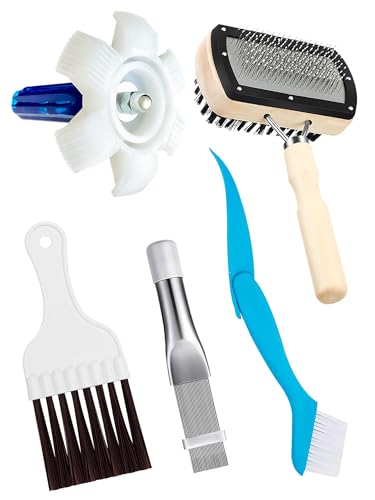
| Soft-bristle brush or fin comb |
Loosens debris and straightens bent fins |
| Wet/dry vacuum with soft brush attachment |
Removes dry debris from inside the cabinet |
| Adjustable wrench or nut driver |
Removes the unit's top grille or access panel |
| Work gloves and safety glasses |
Protects hands and eyes from sharp fins and spray |
| Fin comb |
Restores airflow through crushed or bent fins |
| Drop cloth or tarp |
Protects landscaping and keeps debris contained |
Safety first: Always switch off power to the outdoor unit at the disconnect box or the main breaker before removing any panel. The capacitor inside can hold a dangerous charge even after power is cut. If you are not comfortable working near electrical components, schedule professional service instead.
Step-by-Step Condenser Coil Cleaning
Follow these steps in order. Plan for roughly one to two hours for a thorough cleaning, depending on how much debris has built up.
-
Turn off the power
Locate the disconnect box near the outdoor unit and pull the disconnect, or switch off the dedicated breaker in your electrical panel. Confirm the unit is fully de-energized before proceeding. This step is non-negotiable for safety.
-
Clear the area around the unit
Remove leaves, grass, and mulch from the base of the unit. Keep at least two feet of clearance on all sides so air can flow freely. Trim back shrubs and vines that crowd the cabinet. Good airflow is as important as clean coils.
-
Remove the top grille or access panel
Use a nut driver or adjustable wrench to remove the screws holding the top grille. Lift the grille carefully and set it aside. On some models you can reach the coil without removing the fan, but on others the fan assembly comes off with the grille. Never pull on the fan wiring.
-
Vacuum loose debris
Using a wet/dry vacuum with a soft brush attachment, gently remove dry debris from the coil fins and the inside of the cabinet. Work from the inside out where possible. This step prevents mud from forming when you introduce water.
-
Brush the fins
Run a soft-bristle brush or fin comb vertically along the fins to loosen stuck material and straighten any bent fins. Bent fins restrict airflow and reduce efficiency. A fin comb is a worthwhile addition to any homeowner's toolkit.
-
Apply coil cleaner
Spray a foaming or no-rinse coil cleaner evenly across the fins, following the product instructions. Let it dwell for the recommended time. The foam lifts grime out of the fins so it can be rinsed away. Avoid over-spraying onto electrical components or the fan motor.
-
Rinse thoroughly
Rinse the coil with a garden hose using moderate pressure. Spray from the inside of the coil outward so debris is pushed out rather than driven deeper into the fins. Work top to bottom. Do not use a pressure washer, which can crush the fins and damage the coil.
-
Inspect and reassemble
Look over the coil for remaining debris, bent fins, or signs of corrosion. Straighten any bent fins with the comb. Reinstall the top grille and fan assembly, tightening screws snugly but not over-tightening. Wipe down the cabinet exterior.
-
Restore power and test
Reinsert the disconnect or switch the breaker back on. Listen for normal fan operation and check that the unit produces cool air within a few minutes. If the system behaves unusually, common AC problems may be at play, and a service call is appropriate.
How Often Should You Clean the Coils?
The right schedule depends on your local environment. Use the table below as a starting point and adjust based on what you observe.
| Environment |
Suggested Cleaning Frequency |
| Clean suburban area with little dust or pollen |
Once per cooling season |
| Urban area or near a busy road |
Twice per cooling season |
| Rural area with fields, trees, or cottonwood fluff |
Twice per season, with quick visual checks monthly |
| Home with pets or heavy landscaping near the unit |
Every 4 to 6 weeks during peak use |
| Coastal area with salt air |
Twice per season, plus a rinse after storms |
Between deep cleanings, do a quick visual check each month. If you can see a visible layer of dust or plant material on the fins, it is time for a rinse. Scheduling this maintenance alongside other tasks keeps the system efficient and can extend the life of the equipment.
Signs Your Condenser Coils Need Attention
Dirty coils often announce themselves through performance changes rather than visible dirt. Watch for these warning signs:
- Rising electricity usage without a change in habits or weather
- Longer cooling cycles or a system that runs constantly
- Weak airflow from indoor vents or warm air at the registers
- The outdoor unit feels unusually hot or shuts off unexpectedly
- Visible debris on the fins when you inspect the unit
- Ice forming on the indoor coil or refrigerant lines
Many of these symptoms overlap with other issues. If cleaning the condenser coil does not resolve the problem, consult a professional to rule out refrigerant leaks, compressor faults, or thermostat problems. The article on a central air unit that turns on but doesn't cool covers additional diagnostics.
Common Mistakes to Avoid
Cleaning the condenser coil is simple, but a few missteps can cause damage or wasted effort:
- Using a pressure washer. High pressure crushes the soft aluminum fins and can puncture the coil. Stick to a garden hose.
- Spraying electrical components. Keep water away from the fan motor, contactor, and wiring. Cover sensitive parts with plastic if needed.
- Cleaning from the outside only. Pushing debris inward packs it deeper into the coil. Rinse from the inside out whenever possible.
- Skipping the power-off step. Never work inside the cabinet with the unit energized.
- Neglecting the indoor coil. The evaporator coil indoors also needs attention. The guide on cleaning AC evaporator coils explains how to handle that side of the system.
When to Call a Professional
Most condenser coil cleaning is within reach for a careful homeowner. Call a licensed technician when:
- The coil is heavily corroded or physically damaged
- You suspect a refrigerant leak or notice oil residue near fittings
- The fan motor, capacitor, or contactor shows signs of failure
- You are uncomfortable working near electrical components
- The system still underperforms after a thorough cleaning
Professional maintenance visits often include coil cleaning alongside refrigerant checks, electrical inspections, and airflow measurements. If you would rather hand off the task, look for a certified HVAC provider with positive local reviews. Related maintenance tasks, such as cleaning the outside air conditioning unit and cleaning the AC drain line, pair well with condenser coil service on the same visit.
Frequently Asked Questions
Can I clean the condenser coil without removing the top grille?
On some units you can reach the coil from the sides, but removing the top grille generally provides the best access and lets you rinse from the inside out. Always turn off power before opening the cabinet.
Is it safe to use household cleaners on the coil?
Use a cleaner formulated for HVAC coils. Household degreasers and acidic cleaners can corrode the aluminum fins. A dedicated foaming or no-rinse coil cleaner is the safest choice.
How long does condenser coil cleaning take?
A thorough cleaning typically takes one to two hours, including setup, drying, and reassembly. Heavy buildup or a unit that has not been serviced in years may take longer.
Will cleaning the coils lower my energy use?
Clean coils restore heat transfer and reduce the workload on the compressor. Many homeowners notice more consistent cooling and steadier performance after maintenance.
What if the fins are bent or crushed?
Minor bends can be straightened with a fin comb. Large crushed areas or punctured coils may need professional repair or replacement of the coil assembly.
Should I clean the condenser coil before or after the cooling season?
Late spring, just before the cooling season begins, is ideal. A second cleaning in late summer helps in dusty or high-pollen areas. Pair the task with filter cleaning for best results.
Ready for a Cooler, More Efficient Home?
Cleaning the condenser coil is one of the simplest ways to protect your cooling system. Explore our recommended air conditioners and maintenance essentials below.
EXPLORE RECOMMENDED PRODUCTS