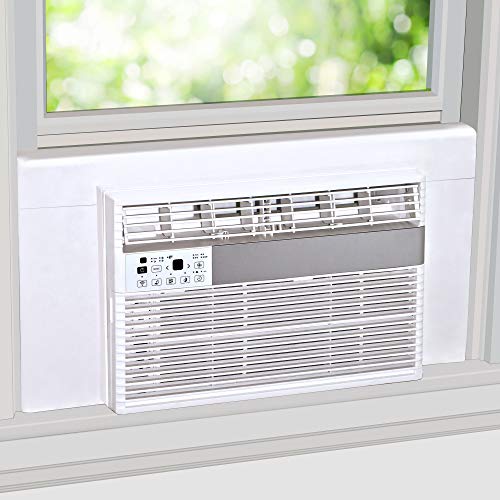
Air Conditioners for Casement Windows Installation
Casement windows open outward from the side, which makes them incompatible with standard window AC units. This guide explains the specialized equipment, installation methods, and alternatives that let you cool a room safely and efficiently without compromising the window or the wall.
Why casement windows need special attention: A casement window is hinged on one side and swings outward on a crank mechanism. Unlike a double-hung window, it does not have a sliding sash that can be lowered onto an AC unit. This structural difference means a traditional window air conditioner cannot simply rest in the frame.
Fortunately, several proven solutions exist: purpose-built casement window AC units, conversion kits that adapt select vertical-window models, and alternative cooling systems such as portable units or ductless mini-splits. The right choice depends on your window dimensions, building regulations, and how much cooling capacity the room requires.
Understanding Casement Windows and Cooling Constraints
Casement windows are common in modern homes, apartments, and older buildings that favor outward-swinging ventilation. They offer excellent airflow and a tight seal when closed, but their geometry creates two specific challenges for air conditioning:
- No horizontal sash to support a unit. A standard window AC relies on the lower sash pressing down on the unit's top rail. Casement windows have no sash that moves vertically.
- The opening is vertical and narrow. The clear opening of a casement window is typically taller than it is wide, which limits the width of any unit that can pass through.
- The crank mechanism occupies space. The hinge and crank hardware sit inside the frame, so any mounting solution must avoid obstructing the opening and closing mechanism.
Because of these constraints, a standard horizontal window air conditioner is not suitable. Instead, you need a unit or kit explicitly designed for vertical window openings. Understanding this distinction early prevents returns, unsafe installations, and wasted effort.
If your window opening is unusually narrow, you may also want to review options for air conditioners for small window openings before committing to a specific model.
Air Conditioner Options for Casement Windows
There are four practical approaches to cooling a room with a casement window. Each has distinct installation requirements and trade-offs.
1. Purpose-Built Casement Window AC Units
These are the most direct solution. Manufacturers design them specifically for vertical window openings, with a tall, narrow chassis and a mounting system that secures to the window frame rather than resting on a sash. Most include a support bracket that transfers the unit's weight to the exterior wall or window sill.
Key characteristics of casement-specific units:
- Vertical orientation with a slim profile that fits between the window jambs.
- Included mounting kit with a filler panel to close the remaining opening.
- Typically available in capacities suited to single rooms rather than whole-home cooling.
- Often positioned as entry-level or mid-range models in the window AC category.
2. Conversion Kits for Select Vertical-Window Models
Some manufacturers offer a casement conversion kit that adapts a compatible window AC model for vertical installation. The kit usually contains a reinforced bracket, a custom filler board, and sealing strips. This approach works only with models the manufacturer explicitly lists as compatible, so verify compatibility before purchase.
A conversion kit can be a solid choice when you already own a compatible unit or when the specific model you want is available in a kit-supported configuration. For a broader look at units that fit unusual frames, see air conditioners for windows that open sideways.
3. Portable Air Conditioners
A portable AC does not mount in the window at all. Instead, it sits on the floor and exhausts hot air through a hose that vents through a window opening. A window sealing kit closes the gap around the hose, so the casement window can remain partially open without sacrificing cooling performance.
Portable units are a practical choice for renters, historic buildings, and situations where drilling or permanent mounting is not allowed. They are generally easier to relocate between rooms. However, they typically have lower efficiency than window-mounted units and require regular condensate drainage. You can explore the category further through air conditioners that do not need a window if your window situation is especially restrictive.
4. Ductless Mini-Split Systems
A ductless mini-split uses an indoor air handler mounted on a wall or ceiling and an outdoor compressor unit connected by refrigerant lines. It requires only a small hole through the wall for the line set, so the casement window remains fully functional and unobstructed.
Mini-splits are the highest-performing option in this list. They deliver strong cooling, operate quietly, and often include inverter technology for efficient part-load operation. They are also the most involved to install and generally sit in the premium tier of residential cooling equipment. For homes without ductwork, they are frequently the best long-term investment. Learn more in air conditioning options for homes without ductwork.
Comparison of Cooling Solutions for Casement Windows
The table below summarizes how each option performs across the factors that matter most during the research phase. Descriptors are based on market position and capability rather than numeric figures.
| Solution | Installation Effort | Cooling Performance | Window Usability | Best For | Market Tier |
|---|---|---|---|---|---|
| Casement Window AC | Moderate — bracket and filler panel required | Good for a single room | Window blocked while installed | Owners who want a permanent, window-mounted solution | Entry-level to mid-range |
| Conversion Kit + Vertical AC | Moderate — depends on kit design | Good for a single room | Window blocked while installed | Owners with a compatible unit already or a specific model preference | Entry-level to mid-range |
| Portable AC | Low — hose and sealing panel only | Moderate; sensitive to room layout | Partially usable with sealing kit | Renters, temporary setups, historic buildings | Starter tier to mid-tier |
| Ductless Mini-Split | High — professional installation recommended | Excellent; quiet and consistent | Fully usable; no window obstruction | Long-term whole-room or multi-room cooling | Premium to high-end tier |
Editorial note: The "market tier" column describes relative positioning within the category. A mid-range casement window AC can still deliver excellent comfort for a bedroom; the tier reflects features, build quality, and efficiency rather than suitability.
Choosing the Right Cooling Capacity
Correct sizing matters more than any single feature. An undersized unit runs constantly and never reaches the set temperature. An oversized unit cools the air quickly but short-cycles, leaving the room humid and uncomfortable. For a detailed walkthrough, read how to size an air conditioner.
As a general framework for a standard room with average ceiling height and insulation:
- Small bedrooms and home offices: units in the entry-level capacity range are usually sufficient.
- Medium living rooms and master bedrooms: mid-capacity models provide a better balance of cooling and runtime.
- Open-plan spaces and sunny rooms: higher-capacity units or a mini-split are more appropriate.
Adjust upward for south- or west-facing windows, vaulted ceilings, kitchens, and rooms with many occupants. Adjust downward for heavily shaded rooms and basements. If you are unsure, use a BTU calculator by room size as a starting point, then consult a professional for confirmation.
Step-by-Step Installation Process
The following process applies to a purpose-built casement window AC or a compatible conversion kit. Portable and mini-split installations follow different procedures described earlier.
- Measure the window opening precisely. Record the clear width and height between the window jambs, plus the depth of the sill. Compare these measurements with the unit's minimum and maximum window dimensions. Leave a small margin for the filler panel and weatherstripping.
- Check the unit's support requirements. Casement AC units are heavier on the exterior side. Confirm whether the included bracket mounts to the sill, the exterior wall, or both. If the bracket requires drilling into masonry or siding, plan the appropriate fasteners and sealant.
- Prepare the window frame. Clean the sill and jambs. Remove the crank handle if it interferes with the filler panel, and store it safely so the window can be restored later. Inspect the frame for rot, loose hinges, or damaged weatherstripping and repair any issues before proceeding.
- Install the exterior support bracket. Follow the manufacturer's template. The bracket must be level and firmly anchored. For upper-floor installations, verify that the bracket is rated for the unit's weight and that local rules permit exterior mounting.
- Set the unit into the opening. With a helper, lift the unit onto the bracket and slide it into the window opening. The unit should sit level or with a slight downward tilt toward the exterior so condensate drains correctly. Never tilt the unit toward the interior.
- Fit the filler panel and secure the frame. Cut the filler panel to match the remaining opening. Most kits include a panel sized for standard casement widths, which can be trimmed. Secure the panel to the unit and the window frame using the supplied brackets or screws.
- Seal the perimeter. Apply closed-cell foam weatherstripping along the frame contact points. On the exterior, run a bead of exterior-grade silicone caulk around the panel edges. This step is critical for preventing drafts, moisture intrusion, and insect entry.
- Test operation and drainage. Plug the unit in, set it to a cooling mode, and confirm that air flows strongly from the front grille. Check that condensate drains toward the exterior and does not pool inside the window frame. If water accumulates, recheck the tilt.
Installation tip: If the window frame is aluminum or vinyl, use fasteners with rubber washers to avoid galvanic corrosion and cracking. If the frame is wood, pre-drill pilot holes to prevent splitting.
Sealing and Weatherproofing Best Practices
A casement window installation is only as good as its seal. Gaps around the filler panel waste energy, let humid air in, and can allow water to reach interior surfaces. Follow these practices for a durable result:
- Use rigid filler material. A properly cut board or panel provides structural support and a stable surface for weatherstripping. Foam alone is not sufficient.
- Layer the weatherstripping. Apply closed-cell foam tape to the panel edges and the window jamb contact points. Compress it slightly when the panel is secured for a reliable seal.
- Caulk the exterior. Use exterior-grade silicone or polyurethane caulk on all outside seams. Smooth the bead with a caulk tool for a clean finish that sheds water.
- Check the interior side. If drafts persist, add a removable interior seal such as a foam strip or a magnetic window insulator. Removable seals make seasonal removal easier.
- Inspect after storms. Reapply caulk if you notice cracking or separation, especially after freeze-thaw cycles.
Proper sealing also supports efficiency. A well-sealed installation lets the unit run closer to its rated performance, which reduces runtime and wear over the cooling season. For related guidance, see air duct sealing if your home also has ducted cooling components.
Safety, Permits, and Building Rules
Window-mounted air conditioners involve structural, electrical, and sometimes regulatory considerations. Address them before installation:
- Weight and support. A casement AC unit plus bracket can be heavy. Verify that the window frame and exterior wall can support the load. Upper-floor installations may require additional bracing.
- Electrical capacity. Confirm that the circuit can handle the unit's amperage. Avoid extension cords for permanent installations. If the circuit is shared with other heavy appliances, consult an electrician.
- Building and HOA rules. Many apartment buildings and homeowner associations restrict exterior modifications or visible window units. Obtain written approval before installing.
- Permits. Some jurisdictions require a permit for any exterior-mounted equipment or for wall penetrations associated with mini-splits. Check with your local building department.
- Security. A window-mounted unit can create an entry point if the installation is not secure. Ensure the unit and panel cannot be removed from outside.
When in doubt, consult a licensed HVAC contractor. Professional installation is a worthwhile investment for mini-splits and for any installation where the bracket or electrical work is uncertain.
Maintenance for Long-Term Performance
Regular maintenance keeps a casement window AC working efficiently and extends its service life. A simple seasonal routine is sufficient for most homes:
- Clean or replace the filter monthly during peak season. A clogged filter reduces airflow and forces the compressor to work harder.
- Inspect the exterior bracket and sealant each spring. Tighten fasteners, remove debris, and reapply caulk where needed.
- Clean the condenser coils annually. Use a soft brush or coil cleaner and rinse gently. Ensure power is off before servicing.
- Check condensate drainage. Verify that the unit tilts slightly toward the exterior and that the drain path is clear.
- Remove the unit before winter. In cold climates, store the unit indoors and reinstall the window screen or a storm panel to protect the frame.
For a full seasonal routine, see air conditioner service and maintenance. If you notice weak cooling, unusual noises, or water intrusion, address the issue promptly through air conditioner service and repair before the problem escalates.
Frequently Asked Questions
Can you put a regular window air conditioner in a casement window?
No. A standard double-hung window AC requires a vertical sash to press down on the unit. Casement windows do not have that sash. You need a purpose-built casement AC unit, a compatible conversion kit, or an alternative such as a portable or mini-split system.
What is the best air conditioner for a casement window?
The most practical solution is a purpose-built casement window AC unit. If building rules prohibit exterior window mounting, a ductless mini-split is the strongest alternative for long-term comfort. Portable units are a reasonable choice for renters and temporary setups.
Do casement window air conditioners need a special kit?
Yes. Most installations require a mounting kit with a support bracket, a filler panel for the remaining window opening, and weatherproofing materials. Some manufacturers sell the kit separately, so confirm what is included before purchase.
How do I seal a casement window around an air conditioner?
Install a rigid filler panel cut to fit the opening, apply closed-cell foam weatherstripping along the frame contact points, and run exterior-grade caulk around the outside edges. This combination blocks drafts, moisture, and insects while keeping the panel secure.
Can I install a casement window AC on an upper floor?
Yes, but weight and support are critical. Use the manufacturer's bracket and verify that the window frame can carry the load. Many building codes and associations restrict upper-floor exterior mounting, so confirm the rules before installing. A professional installer is advisable for upper-floor work.
Will a casement window AC fit every casement window?
No. Casement windows vary widely in width, height, and sill depth. Measure your clear opening carefully and compare it with the unit's specified window range. If your opening is unusually narrow, review options for small window openings or consider a portable unit.
Final Thoughts
Cooling a room with a casement window is entirely achievable. The key is matching the solution to the window's vertical geometry and your building's rules. Purpose-built casement units and conversion kits handle the job for many owners, while portable ACs and mini-splits cover cases where window mounting is impractical or prohibited.
Whichever route you choose, invest time in measuring, sealing, and sizing. A well-installed unit in the right capacity will cool reliably for years and avoid the common pitfalls of drafts, short cycling, and premature wear. Use the product section below to compare models that suit casement window installations, and revisit this guide whenever you need installation or maintenance details.