Flexible Ducting for HVAC: The Complete Guide to Selection, Sizing, and Installation
Everything you need to know about flexible ductwork for HVAC systems — types, R-value ratings, sizing, installation best practices, and how to avoid the most common mistakes that silently drain your system's efficiency.
START LEARNINGWhy Flexible Ducting Matters: The ducts in your HVAC system are like the veins of your home's comfort network. If they're poorly selected, undersized, or improperly installed, even the most efficient air conditioner or heat pump will underperform. Flexible ducting is the most common duct material in American homes — and also the most frequently misinstalled. This guide helps you understand the material deeply so you can make informed decisions, whether you're planning a new installation, a retrofit, or simply troubleshooting airflow problems.
What Is Flexible Ducting for HVAC?
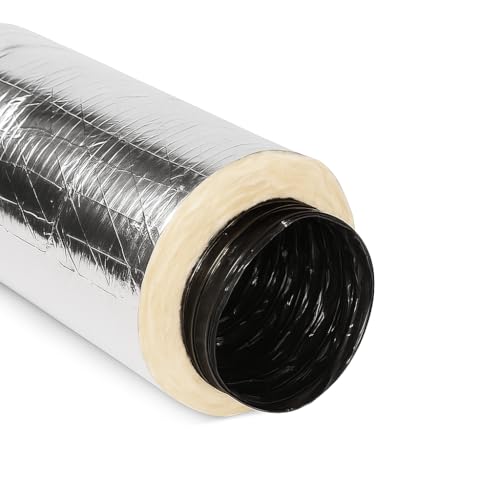
Flexible ducting — commonly called flex duct — is a round, factory-made air conduit used to distribute conditioned air from the air handler or main trunk to individual rooms. Its construction consists of three layers: a flexible inner core (usually a reinforced polyester or aluminum foil laminate supported by a steel wire helix), a layer of fiberglass insulation, and an outer vapor barrier (usually polyethylene or aluminum foil).
Because it can be bent and routed around joists, plumbing, and other obstacles, flexible duct has become the default choice in residential HVAC, particularly in attics, crawlspaces, and tight mechanical chases. Its ability to reduce vibration transmission and simplify installation makes it attractive to contractors — but the same flexibility that makes it convenient can also create serious efficiency problems if the material is not properly specified and installed.
Key Insight: Flexible duct is not "one size fits all." The difference between a well-designed flex duct system and a poorly executed one can be 20–30% in airflow performance. Understanding R-value, diameter, and installation technique is essential for anyone making HVAC decisions.
Types of Flexible Ducting
Flexible duct products fall into several categories based on construction, insulation level, and intended application. Understanding these distinctions helps you match the product to your specific installation environment.
1. Standard Flexible Duct (Insulated)
The most common type, constructed with a wire-reinforced inner core, fiberglass insulation, and a plastic or foil outer jacket. Available in R-values from R-4.2 to R-8. This is the workhorse for residential supply and return runs in unconditioned spaces. Higher R-values are recommended for colder climates and longer runs through unconditioned attics.
2. Uninsulated Flexible Duct
A single-layer wire-reinforced core without insulation or outer jacket. Used in conditioned spaces where thermal loss is not a concern, or as a connector between rigid duct sections and diffusers. Not suitable for attics, crawlspaces, or exterior walls.
3. Sound-Attenuating Flexible Duct
Designed with an acoustically absorptive inner liner to reduce noise transmission from the air handler and turbulent airflow. Often used in high-end residential and commercial applications where quiet operation is a priority. These products may have slightly higher friction losses and should be sized accordingly.
4. High-Temperature Flexible Duct
Constructed with heat-resistant materials for applications near heating elements, kitchen exhaust, or light commercial equipment. Not typically used in standard residential HVAC distribution.
5. Flexible Duct Connectors (Transition Pieces)
Short, uninsulated sections used to connect rigid ductwork to air handlers, plenums, or diffusers. These are not intended for long runs and are typically used to isolate vibration and simplify final connections.
R-Value Ratings: Choosing the Right Insulation Level
R-value measures thermal resistance — the higher the R-value, the better the duct resists heat transfer between the conditioned air inside and the surrounding environment. For flexible ducting, R-value is one of the most important specifications, especially when the duct runs through unconditioned spaces like attics, crawlspaces, or garages.
| R-Value | Typical Application | Best For | Notes |
|---|---|---|---|
| R-4.2 | Conditioned spaces, short runs | Entry-level residential | Minimum code in some warm climates; not recommended for unconditioned attics |
| R-6 | Attics, crawlspaces, garages | Mid-range residential | Common baseline for most US climate zones; good balance of performance |
| R-8 | Cold climates, long attic runs | Premium residential | Recommended in colder climate zones and for ENERGY STAR compliant installations |
| R-12+ | Extreme climates, commercial | Top-tier / commercial-grade | Specialty products for high-performance or commercial applications |
For most homes, R-6 is a solid middle ground, while R-8 is the recommended choice when ducts run through unconditioned attics in colder regions. If you are pursuing ENERGY STAR qualified air conditioners or a high-performance system, upgrading duct insulation to R-8 is a worthwhile investment that pays back through reduced thermal loss over the life of the system.
How to Size Flexible Ducting Correctly
Duct sizing is about matching airflow capacity to the room's heating and cooling load. Undersized ducts restrict airflow, raise static pressure, and force the blower to work harder — which can reduce system lifespan and increase energy consumption. Oversized ducts, on the other hand, can lead to low velocity, poor air mixing, and uncomfortable temperature stratification.
The Room-by-Room Sizing Approach
Proper sizing starts with a room-by-room load calculation (often called a Manual J calculation). Once you know the cubic feet per minute (CFM) required for each room, you can size the branch duct using standard duct-sizing tables or a ductulator. Flexible duct has higher friction loss than rigid metal duct, so sizing must account for the additional resistance — typically by selecting one nominal size larger than you would for smooth rigid duct carrying the same CFM.
Typical CFM Capacities for Flexible Duct
| Nominal Diameter | Typical CFM Range | Best For |
|---|---|---|
| 4 inch | ~20–30 CFM | Small bathrooms, closets |
| 5 inch | ~40–55 CFM | Small bedrooms, powder rooms |
| 6 inch | ~75–110 CFM | Standard bedrooms, small living areas |
| 7 inch | ~110–150 CFM | Larger bedrooms, small kitchens |
| 8 inch | ~160–220 CFM | Living rooms, master suites |
| 10 inch | ~250–350 CFM | Main trunk branches, large open areas |
| 12 inch | ~400–550 CFM | Main trunks, return air runs |
These are approximate ranges and assume moderate static pressure. Always consult a professional HVAC designer or use industry-standard sizing software for final specifications, especially for systems with complex layouts or high-performance requirements.
Installation Best Practices for Flexible Ductwork
Even a top-tier flexible duct product will underperform if installed incorrectly. The following practices separate professional-grade installations from entry-level workmanship.
1. Keep Runs Short and Direct
Flexible duct creates more friction than rigid metal duct, and every bend adds resistance. Keep each branch run as short and straight as possible — ideally under 25 feet. If a longer run is unavoidable, increase the duct diameter to compensate for the additional friction loss. Avoid unnecessary loops, sharp turns, and multiple 90-degree bends in a single run.
2. Support the Duct Properly
Support flexible duct at intervals no greater than 4 to 5 feet using wide hangers or saddles that cradle the duct without compressing the insulation. Never use narrow wire, metal straps, or zip ties that dig into the outer jacket — these create pinch points that reduce airflow and create thermal bridges. Sagging duct is one of the most common efficiency killers in residential HVAC.
3. Make Tight, Sealed Connections
All connections between flexible duct and rigid duct, plenums, or diffusers should be sealed with mastic or UL-181 rated foil tape — not standard duct tape, which degrades over time. The inner core should be mechanically fastened (with a tie or clamp) before sealing. Leaky connections can waste a significant portion of conditioned air before it ever reaches the room.
4. Avoid Sharp Bends and Kinks
Flexible duct should be bent gently, with a radius of at least one duct diameter. Sharp 90-degree bends or kinks collapse the inner core and severely restrict airflow. If the routing requires a tight turn, use a rigid metal elbow instead and connect short flex sections on either side.
5. Keep the Inner Core Fully Extended
When cutting and installing flex duct, extend the inner core fully so the wire helix is stretched and the interior is smooth. A compressed or bunched inner core creates turbulence and reduces effective diameter. The outer insulation should also be pulled taut and secured neatly.
6. Protect Ducts in Unconditioned Spaces
Ducts running through attics, crawlspaces, or garages should be insulated to the appropriate R-value and supported off the ground or ceiling. Avoid routing flex duct through areas where it can be stepped on, crushed, or exposed to sunlight, which degrades the outer jacket over time.
Common Mistakes to Avoid
Even experienced installers occasionally cut corners. Being aware of these common pitfalls helps you evaluate installation quality and ask the right questions.
- Using flex duct everywhere: While convenient, flexible duct is not ideal for every run. Long trunk lines and high-CFM branches often perform better with rigid metal duct or duct board.
- Undersizing for the run length: A 6-inch flex duct that works for a 10-foot run may be inadequate for a 30-foot run. Account for equivalent length and friction loss.
- Skipping the load calculation: Guessing at duct sizing based on room dimensions alone often leads to comfort complaints and efficiency losses.
- Poor sealing at connections: Unsealed joints leak conditioned air into attics and crawlspaces, wasting energy and reducing delivered airflow.
- Compressing insulation: Over-tightened supports or sharp bends that compress the insulation reduce the effective R-value.
- Ignoring return air: Return ducts are often overlooked, but undersized or poorly routed returns cause pressure imbalances that affect the entire system.
Maintenance and Longevity of Flexible Ductwork
Flexible duct is designed to last 15–25 years under normal conditions, but its lifespan depends heavily on installation quality and the environment it operates in. Routine maintenance and periodic inspection can catch problems before they affect comfort or efficiency.
Check ducts annually for sagging, disconnected joints, torn outer jackets, and signs of pest intrusion. In attics and crawlspaces, look for condensation or moisture stains that indicate a compromised vapor barrier. If you notice uneven airflow or rooms that never seem to reach the thermostat setpoint, a duct inspection should be part of your troubleshooting process.
For homeowners pursuing a comprehensive efficiency strategy, pairing well-installed flexible ductwork with an ENERGY STAR mini-split heat pump or a high-efficiency central system maximizes the return on your HVAC investment. Likewise, if you are considering a ductless option, understanding the trade-offs between flexible ductwork for HVAC and ductless systems helps you choose the right path for your home's layout and budget.
When Should Flexible Ducting Be Replaced?
Flexible duct is not a forever material. Consider replacement or significant repair when you observe any of the following:
- Visible tears, holes, or crushed sections in the outer jacket or inner core
- Persistent condensation or moisture damage on the duct or surrounding surfaces
- Ducts that have collapsed or sagged significantly, reducing airflow
- Pest damage or contamination that cannot be cleaned effectively
- Age approaching 20 years, especially in harsh attic environments
- Persistent comfort complaints despite a properly functioning HVAC unit
If you are planning a larger HVAC upgrade, such as a system replacement, it is often the right moment to evaluate the entire duct system. A professional can assess whether flexible ductwork remains appropriate or whether rigid duct or a hybrid approach would better serve your home's performance goals.
Flexible Duct vs Rigid Duct: A Balanced Comparison
Flexible duct is not inherently better or worse than rigid duct — it is a tool with specific strengths and limitations. Understanding the trade-offs helps you make an informed decision for your application.
| Factor | Flexible Duct | Rigid Metal Duct |
|---|---|---|
| Installation speed | Fast, fewer fittings | Slower, requires fabrication |
| Routing flexibility | Excellent around obstacles | Limited by fittings |
| Friction loss | Higher | Lower |
| Noise transmission | Good vibration isolation | Can transmit blower noise |
| Durability | Susceptible to crushing and tears | Very durable |
| Best use case | Branch runs, retrofits, tight spaces | Trunk lines, high-CFM runs, exposed installations |
Many high-performance HVAC designs use a hybrid approach: rigid metal duct for the main trunk and high-demand branches, with flexible duct for the final connections and runs through difficult spaces. This combines the durability and low friction of rigid duct with the installation flexibility of flex.
Professional Installation vs DIY: What You Should Know
Flexible duct installation may look straightforward, but the details matter enormously for performance and longevity. A professional HVAC contractor brings load calculation expertise, proper sizing tools, and familiarity with local code requirements. Poorly sized or installed ductwork can undermine even a top-tier HVAC system, leading to comfort complaints and higher energy consumption.
That said, homeowners can and should educate themselves about the basics — R-value, proper support, sealing, and sizing principles — so they can have informed conversations with contractors and evaluate the quality of work being performed. If you are planning a larger HVAC project, understanding flexible ductwork for HVAC in detail helps you ask the right questions and avoid costly mistakes. For installation scenarios that involve complex routing or high-performance requirements, professional design is strongly recommended.
Key Takeaways
- R-value matters: Choose R-6 or R-8 for unconditioned spaces; R-4.2 is acceptable only in conditioned areas.
- Size correctly: Flexible duct has higher friction than rigid duct — size up and keep runs short.
- Install with care: Proper support, gentle bends, and sealed connections are non-negotiable for performance.
- Consider the hybrid approach: Rigid trunk + flex branches often delivers the best balance of performance and practicality.
- Maintain and inspect: Annual checks catch problems before they affect comfort and efficiency.
- Know when to replace: Damaged, sagging, or aged duct should be replaced rather than patched indefinitely.
Frequently Asked Questions
What is flexible ducting for HVAC?
Flexible ducting is a round air conduit made from a wire helix encased in a flexible inner core, covered with insulation and an outer vapor barrier. It connects the air handler or main trunk to individual supply registers and return grilles, allowing for bends and routing around structural obstacles. It is the most common duct material in residential HVAC.
What R-value do I need for flexible ductwork?
R-value requirements depend on your climate zone. In most US climate zones, R-6 or R-8 is recommended for supply ducts in unconditioned spaces such as attics and crawlspaces. R-4.2 may be acceptable in conditioned spaces, but always check local building codes and ENERGY STAR guidelines for your specific area.
How long can a flexible duct run be?
Most HVAC design guidelines recommend keeping each flexible duct run as short and direct as possible, ideally under 25 feet. Longer runs increase static pressure and reduce airflow. If longer runs are unavoidable, the duct diameter may need to be increased to compensate for friction losses.
Can flexible ducting be used for both supply and return air?
Yes, flexible ducting can be used for both supply and return air distribution. However, return ducts typically require larger diameters and should be sized according to the system's return air requirements. Always follow the manufacturer's specifications and local code requirements.
How do I prevent flexible duct from sagging?
Support flexible duct at intervals no greater than 4 to 5 feet using wide hangers or saddles. Avoid using narrow wire or metal straps that can compress the insulation. Keep the duct as straight and taut as possible, and avoid sharp bends that restrict airflow.