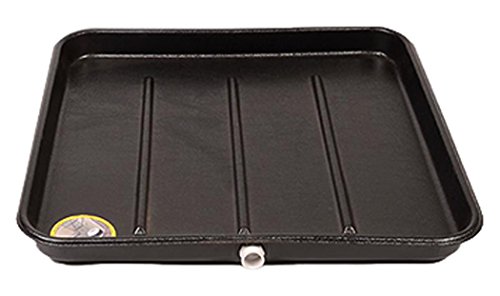
HVAC Drain Pan Replacement: What to Expect and How to Plan
Your HVAC drain pan quietly collects condensate every time your system runs. When it rusts, cracks, or starts overflowing, it can damage ceilings, floors, and ductwork. This guide explains the warning signs, replacement options, and how to plan the job before you hire a professional.
Plan Your ReplacementWhy the Drain Pan Matters More Than You Think
Every air conditioner removes moisture from the air as it cools. That moisture condenses on the evaporator coil and drips into a drain pan, which then routes the water out through a condensate line. It is a simple component, but when it fails, the consequences are rarely simple. A pan that leaks inside an attic or above a finished ceiling can lead to stained drywall, warped flooring, mold growth, and even structural damage.
According to HVAC technicians, drain pan problems are among the most common causes of water-damage callouts during cooling season. In many cases, the pan itself has been slowly rusting for years before it finally gives way. Understanding how the pan works and what accelerates its decline helps you decide when replacement makes more sense than a patch-up. If you want a broader foundation on how condensate and moisture are managed in a system, our overview of HVAC and air conditioning is a good starting point.
Quick answer: A residential drain pan replacement typically falls into the mid-range or high-end tier of HVAC service work, depending on pan material, access difficulty, and whether the drain line or air handler needs modification. Most jobs are completed in a few hours, but attic installations and complex retrofits can take longer.
Signs Your HVAC Drain Pan Needs Replacement
Not every drain pan problem requires a new pan. Sometimes the issue is a clogged condensate line, a faulty pump, or an air handler that is not level. But certain signals strongly suggest the pan itself is at the end of its service life.
Visual and physical warning signs
- Rust and corrosion: Metal pans often rust from the inside out. Flaking rust, pinholes, or a rough, pitted surface are clear indicators of deterioration.
- Visible cracks: Plastic pans can become brittle with age and develop hairline cracks that widen over time.
- Standing water: Water pooling in or around the pan usually means it is not draining properly or has lost its integrity.
- Water stains: Ceiling stains below an attic unit or moisture marks near a closet-mounted air handler are red flags.
- Musty odors: A persistent damp smell near the HVAC unit can indicate mold growth in or around the pan.
- Frequent clogs: If the condensate line clogs repeatedly, sediment or algae may be building up in a deteriorating pan.
Performance-related signs
Some drain pan failures show up as system behavior rather than visible damage. If your unit shuts off unexpectedly, trips a float switch, or leaves humidity levels higher than usual, the drain pan or its outlet may be involved. Our guide to HVAC not cooling properly covers related symptoms and helps you separate drain issues from refrigerant or compressor problems.
Safety note: Water and electricity are a dangerous combination. If you see standing water inside an air handler cabinet or near electrical components, turn the system off at the breaker and call a qualified technician before touching anything.
Repair or Replace? How to Decide
Technicians sometimes seal small cracks with epoxy or use a pan liner as a short-term fix. These approaches can buy time, but they are rarely a permanent solution. A rusted or cracked pan will continue to degrade, and the risk of water damage remains. Replacement is generally the more reliable choice when the pan shows structural damage, when the unit is older, or when the pan has already caused water issues.
The decision also depends on the pan material. Metal pans are durable but prone to rust in humid environments. Plastic pans resist corrosion but can become brittle. Some modern systems use pans with built-in slopes and secondary drain connections that improve drainage and reduce standing water. If your current pan is a basic flat metal design, upgrading to a sloped or corrosion-resistant pan can be a smart long-term improvement.
Drain Pan Options by Tier
Drain pans are not a one-size-fits-all component. The right choice depends on your system type, installation location, and how long you plan to keep the equipment. The table below uses tier descriptors rather than numeric figures, so you can compare options by their market position and intended use.
| Tier | Material & Build | Best For | Key Considerations |
|---|---|---|---|
| Entry-level | Standard plastic or basic galvanized metal | Older systems, like-for-like replacement, short-term planning | Functional and straightforward; may have limited slope and fewer drain connection options |
| Mid-range | ABS plastic or corrosion-resistant coated metal with pre-sloped design | Most residential replacements, attic and closet installations | Better drainage, improved durability, and compatibility with secondary drain lines |
| Premium | Heavy-duty composite or stainless steel, engineered drainage channels | High-humidity climates, premium systems, long-term ownership | Excellent corrosion resistance, reinforced construction, and features that reduce standing water |
For most homeowners, a mid-range pan offers the best balance of durability and practicality. Premium pans make sense when the system is newer or when the installation location is difficult to access and you want to minimize future service calls. If you are also considering broader equipment upgrades, our HVAC buying guide explains how to evaluate system-level decisions.
What Affects the Scope of a Drain Pan Replacement
Two drain pan replacements can look identical on paper but play out very differently in practice. The scope of the job depends on several factors that technicians assess during an inspection.
- Access and location: A pan in a garage or utility closet is easier to reach than one in a cramped attic or above a finished ceiling. Access alone can significantly change the time and complexity of the job.
- Air handler configuration: Some systems require the air handler to be lifted or partially disassembled to remove the old pan. Others allow the pan to slide out with minimal disruption.
- Drain line condition: If the condensate line is clogged, damaged, or improperly sloped, it may need to be cleaned, repaired, or rerouted during the replacement.
- Secondary drain and float switch: Many modern installations include a secondary drain pan or a float switch. These safety components should be checked and, if necessary, replaced or upgraded at the same time.
- Local building codes: Some jurisdictions require specific drain pan materials, secondary protection, or permit approval. Our overview of HVAC building codes explains why local rules matter.
- System age and condition: If the system is nearing the end of its expected service life, replacing the pan may be part of a larger conversation about repair versus replacement.
How to Plan the Replacement: A Practical Step-by-Step Approach
Planning ahead helps you avoid surprise complications and ensures the job is done correctly. The following sequence reflects how a professional technician typically approaches a drain pan replacement.
- Inspect and diagnose: Confirm that the pan is the actual problem. Check for clogs, proper slope, and float switch operation before assuming replacement is necessary.
- Determine the correct pan size and type: The new pan must match the air handler footprint and drain configuration. A poorly fitted pan can cause the same problems as a damaged one.
- Review access and safety: Identify whether the air handler needs to be lifted, whether electrical components must be isolated, and whether the work area needs protection.
- Check the drain line and safety components: Clean or replace the condensate line as needed. Verify that the float switch and secondary drain are functional.
- Install and test: After installation, the technician should run the system, confirm proper drainage, and check for leaks at all connections.
- Document and maintain: Keep a record of the replacement and schedule regular maintenance. Our HVAC maintenance guide covers routine tasks that extend pan life.
Pro tip: Ask the technician to photograph the old pan and the new installation. Photos are useful for warranty records and for future service visits, especially in attic installations where access is limited.
Hiring the Right Professional
Drain pan replacement is not a DIY job for most homeowners. It involves electrical safety, refrigerant components, and precise drainage work. Choosing a qualified contractor protects your investment and ensures the job meets local requirements.
What to look for in a contractor
- Licensing and insurance: Verify that the company holds the required licenses and carries liability and workers' compensation insurance. Our guide to HVAC license and insurance explains what to check.
- Experience with your system type: Ask whether the contractor regularly works on your brand and configuration, especially if you have a heat pump or a high-efficiency system.
- Clear written estimate: The estimate should describe the pan type, labor, drain line work, and any safety component upgrades. Avoid vague verbal agreements.
- Warranty terms: Confirm the warranty on the pan and the labor. A written warranty is a sign of a professional operation.
- Local reputation: Reviews and referrals matter. If you are still searching, our guide to finding an HVAC contractor near me outlines a practical vetting process.
It is also wise to ask whether the contractor will perform a broader inspection while the system is open. A failed drain pan can be a symptom of poor drainage, improper installation, or neglected maintenance. Addressing those root causes during the same visit can prevent repeat problems. For related service topics, see our overview of HVAC repair and service.
Related Components to Check During Replacement
A drain pan does not work in isolation. Several components interact with it, and checking them during replacement can save you a second service call later.
- Condensate pump: If your system uses a pump to move water to a distant drain, inspect it for wear and test its operation. Our guide to the HVAC condensate pump explains common failure signs.
- Evaporator coil: A dirty coil can increase condensate production and stress the pan. Coil cleaning may be recommended during the visit; see our page on HVAC evaporator coil cleaning for details.
- Drain line: The condensate line should be flushed and checked for proper slope. A clogged line is a common reason pans overflow.
- Float switch: This safety device shuts off the system if water levels rise too high. Test it during replacement and replace it if it is unreliable.
How to Extend the Life of a New Drain Pan
A new pan can last many years with basic care. The most important habits are simple: keep the condensate line clear, change air filters regularly, and schedule professional maintenance before each cooling season. Our HVAC maintenance services page explains what a typical maintenance visit includes. Keeping humidity in check also reduces the workload on the pan, and our guide to HVAC dehumidification covers humidity control strategies.
If you notice water stains or dampness between service visits, do not wait. Early intervention is far less disruptive than repairing water damage after a pan fails completely.
Frequently Asked Questions
Most residential replacements take a few hours. Jobs that require lifting the air handler, modifying the drain line, or working in tight attic spaces can take longer, sometimes a full day. The technician should give you a realistic time estimate after inspecting the installation.
Common signs include visible rust or cracks, standing water around the air handler, water stains on ceilings or floors, musty odors, and frequent condensate drain clogs. If you notice any of these, have the system inspected promptly.
Small cracks are sometimes sealed as a temporary measure, but a cracked or rusted pan usually needs replacement. A failed pan can cause water damage, so replacement is the more reliable long-term solution.
Permit rules vary by location. Many like-for-like replacements do not require a permit, but some jurisdictions require one when the drain line or air handler is modified. Check local building codes before work begins.
It is not recommended. The job involves electrical safety, refrigerant components, and precise drainage work. Improper installation can cause leaks or system damage. A qualified technician has the tools and experience to do the job safely and correctly.