Installing Air Conditioning in a House Without Ducts
A practical, no-nonsense guide to cooling a home that has no existing ductwork. Compare ductless mini-splits, portable units, and window air conditioners, then follow a clear installation roadmap for each option.
Explore Your OptionsWhat This Guide Covers
Why Many Homes Have No Ductwork
Older homes, historic properties, manufactured homes, and many renovated apartments were built without central ductwork. In some regions, homes were heated with radiators, baseboard heaters, or wood stoves, so cooling was never part of the original design. Retrofitting ductwork into these homes can be invasive, requiring wall openings, ceiling chases, and significant structural work.
Fortunately, modern cooling technology no longer depends on a duct network. Ductless systems, portable units, and window air conditioners can deliver effective comfort without tearing a home apart. The right choice depends on how many rooms need cooling, whether you own or rent, and how much installation work you are comfortable with.
Best Cooling Options for Ductless Homes
There are three primary pathways for cooling a house without ducts. Each occupies a different position in the market, from entry-level portable units to premium multi-zone mini-splits.
Ductless Mini-Split System
Mini-splits are the closest ductless equivalent to central air. An outdoor compressor connects to one or more indoor air handlers through small refrigerant lines, so each room can be cooled independently. They are the strongest option for whole-home comfort and long-term efficiency.
- Best for: whole-home or multi-room cooling
- Installation: professional installation strongly recommended
- Efficiency: among the highest in the ductless category
Portable Air Conditioner
Portable units roll from room to room and exhaust hot air through a window or wall opening. They are the easiest option for renters and for rooms where permanent modifications are not allowed. Dual-hose and inverter models sit at the higher end of this category.
- Best for: single rooms, renters, temporary cooling
- Installation: minimal, no structural changes
- Efficiency: lower than mini-splits, but improving with inverter technology
Window Air Conditioner
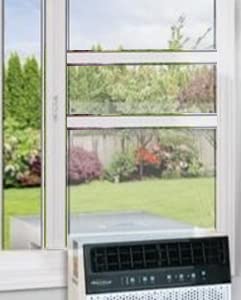
Window units are the most direct solution for a single room. They sit in a double-hung window or a wall sleeve and cool the space immediately. They are a solid choice for bedrooms and small apartments, though they block part of the window view.
- Best for: bedrooms, studios, single-room cooling
- Installation: straightforward DIY for most double-hung windows
- Efficiency: varies widely; inverter window models are the top of this tier
Side-by-Side Comparison
| Option | Tier | Best For | Installation Effort | Rooms Covered |
|---|---|---|---|---|
| Ductless Mini-Split | Premium Tier | Whole-home or multi-zone cooling | Professional | 1 to 5+ zones |
| Portable AC | Mid-Range Tier | Renters and single rooms | Minimal DIY | 1 room |
| Window AC | Essential Tier | Bedrooms and small spaces | Moderate DIY | 1 room |
| Ducted Retrofit | High-End Tier | Full central air conversion | Major construction | Whole home |
If your goal is to cool an entire house and you plan to stay long term, a ductless mini-split system is usually the most balanced investment. If you only need comfort in one or two rooms, a portable or window unit gets the job done with far less disruption.
Installing a Ductless Mini-Split System
Mini-split installation involves refrigerant plumbing and electrical work. While DIY kits exist, most homeowners should work with a licensed HVAC technician. Understanding the steps helps you evaluate quotes and prepare your home.
- Assess the home and choose zones. Decide which rooms need cooling and whether a single-zone or multi-zone system fits your layout. A load calculation determines the right capacity for each zone.
- Select indoor and outdoor locations. Indoor air handlers are typically mounted high on a wall, while the outdoor unit needs clearance for airflow and a stable base.
- Prepare the wall penetration. A small hole is drilled through the wall for refrigerant lines, drain pipe, and electrical cable. Line hide covers keep the exterior tidy.
- Mount the indoor and outdoor units. Brackets are secured, the units are leveled, and the line set is routed between them.
- Connect refrigerant and electrical lines. The technician flares connections, pressure-tests the system, and vacuums the lines to remove moisture and air.
- Charge and test. Refrigerant is released or adjusted, and the system is tested for cooling performance, drainage, and noise.
Installing a Portable Air Conditioner
Portable units are the least invasive option. Installation mainly involves routing the exhaust hose to a window. For a step-by-step walkthrough, see our guide on installing a portable air conditioner in a crank-out window or the casement window version if that matches your window style.
- Position the unit. Place it near the window on a level surface, leaving clearance for airflow around the unit.
- Attach the exhaust hose. Connect the hose to the unit and the window kit adapter. Shorter, straighter hose runs work best.
- Seal the window opening. Use the window kit panel and foam insulation to minimize hot air leaking back in. An insulated hose cover further improves efficiency.
- Connect drainage. Most units collect condensate. Either empty the tank regularly or connect a continuous drain hose.
- Test and adjust. Run the unit, confirm the exhaust is flowing outside, and set your target temperature.
If your space has no suitable window at all, review installing a portable air conditioner without a window for venting alternatives.
Installing a Window Air Conditioner
Window units are ideal for single rooms and are the most common entry-level ductless solution. Installation is manageable for most homeowners, provided the window and unit are compatible.
- Check window compatibility. Most units fit double-hung windows. For other styles, review AC options that do not need a window or consider a through-the-wall approach.
- Measure the opening. Confirm the unit fits the window width and that the window can close securely above it.
- Install support brackets. Use the manufacturer's bracket or a sturdy support to prevent the unit from shifting.
- Seal the gaps. Insulate the sides and top with foam or weatherstripping to keep hot air out. Our guide on insulating a window AC unit covers this in detail.
- Secure and test. Lock the window, check for wobble, and run the unit through a full cooling cycle.
Common Installation Mistakes
Oversizing the unit. A unit that is too powerful cools too quickly without removing enough humidity, leaving rooms feeling clammy. Match capacity to the room, not to the biggest model available.
Poor sealing. Gaps around window kits and exhaust hoses let hot outdoor air back in, forcing the unit to work harder. Sealing is the single most effective efficiency improvement for portable and window installations.
Ignoring drainage. Condensate has to go somewhere. Blocked or missing drainage leads to water damage and mold. Plan the drain path before installation day.
Skipping permits and codes. Mini-split and through-the-wall installations often require permits or inspections. Confirm local requirements before work begins to avoid complications later.
Underestimating electrical needs. Larger units may need a dedicated circuit. Check the amperage requirements and have an electrician assess your panel if needed.
Frequently Asked Questions
Can you install central air conditioning in a house without ducts?
What is the best air conditioning option for a house without ducts?
Do ductless mini-splits require professional installation?
How many rooms can a ductless system cool?
Are portable air conditioners suitable for whole-house cooling?
Ready to Choose Your Ductless Cooling Solution?
Compare ductless mini-splits, portable air conditioners, and window units in our curated selection. Each option is chosen for reliability and strong performance within its tier.
View Recommended Units