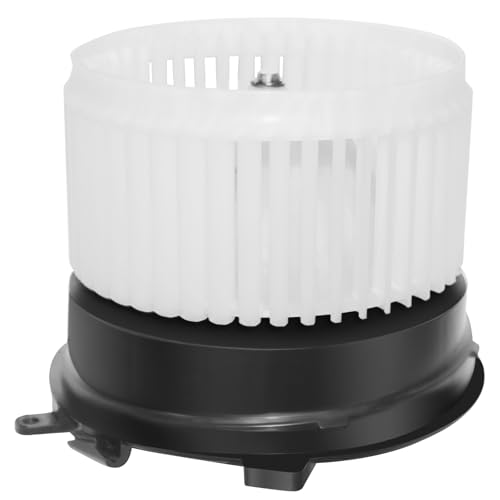
Replacing Blower Motor in an AC Unit: Complete Step-by-Step Guide
Understand the warning signs of a failing blower motor, learn the safe replacement procedure, and decide whether this is a job for you or a licensed HVAC technician.
What a Blower Motor Does in Your AC Unit
The blower motor is the component responsible for moving conditioned air through your ductwork and into your living space. Whether you have a residential central air conditioning system or a more compact setup, the blower motor is the heart of air distribution. Without a functioning blower, your system may run but deliver little to no airflow.
The blower motor sits inside the air handler or furnace cabinet. It spins a squirrel-cage fan wheel that pushes air across the evaporator coil, through the supply ducts, and out into your rooms. At the same time, it draws return air back into the system. When the motor weakens or fails, the entire comfort cycle breaks down: rooms become stuffy, humidity rises, and the compressor may overheat because heat is not being carried away efficiently.
Blower motors come in two main electrical configurations: PSC (permanent split capacitor) motors and ECM (electronically commutated motor) motors. ECM motors are more energy-efficient and are common in modern high-end tier systems, while PSC motors are typical in older or entry-level equipment. Knowing which type your unit uses matters because replacement parts and wiring procedures differ.
Symptoms of a Failing Blower Motor
Catching a failing blower motor early can save you from a complete comfort breakdown during peak cooling season. Watch for these signs:
Weak or No Airflow
Vents feel barely active even when the thermostat calls for cooling. Air may trickle out instead of blowing steadily.
Grinding or Squealing Noises
Worn bearings produce metallic grinding, squealing, or rattling sounds coming from the air handler cabinet.
Burning Smell
A hot, acrid odor near the indoor unit often indicates motor windings overheating or electrical arcing.
Intermittent Operation
The blower starts and stops unpredictably, sometimes requiring a tap on the cabinet to restart—a classic sign of a sticking motor.
Thermostat Calls But Fan Won't Run
The compressor may run outdoors while the indoor fan stays silent, leading to frozen coils and no cooling indoors.
Tripped Breaker or Blown Fuse
A shorted motor winding can trip the circuit breaker or blow the furnace control-board fuse repeatedly.
Before assuming the motor is the problem, rule out simpler causes. Check the air filter—a severely clogged filter restricts airflow and can mimic motor failure or cause the motor to overheat. Inspect the capacitor; a failed run capacitor prevents the motor from starting even when the motor itself is healthy. Confirm the thermostat is set correctly and that the control board is sending voltage to the motor. If you are unsure how to test these components safely, consult a technician.
Common Causes of Blower Motor Failure
Understanding why blower motors fail helps you prevent repeat problems. The most frequent culprits include:
- Dirty air filters: Restricted airflow forces the motor to work harder and run hotter, accelerating bearing wear and winding degradation.
- Lack of lubrication: Many modern motors are sealed and cannot be lubricated, but older motors with oil ports benefit from periodic oiling. Neglect leads to bearing seizure.
- Worn bearings: Even sealed bearings wear over time, producing noise and eventually preventing rotation.
- Electrical faults: A failing capacitor, loose wiring, or a control board delivering incorrect voltage stresses the motor.
- Overheating: Restricted airflow from dirty coils, crushed ducts, or a clogged filter traps heat inside the motor housing.
- Age-related wear: Most blower motors last 10 to 15 years. As the system approaches the end of its service life, motor failure becomes more likely.
- Moisture intrusion: In humid climates or when condensate drainage fails, moisture can corrode motor components.
If your system is older and you are weighing whether to repair or replace the entire unit, our guide on replacing an air conditioner walks through the decision factors, including efficiency gains and system age.
Tools and Materials You Will Need
Gather everything before you start. Having the right tools on hand shortens the job and reduces the risk of injury or damage.
| Tool / Material | Purpose |
|---|---|
| Nut drivers (1/4", 5/16") | Removing screws that secure the cabinet panels and motor mount |
| Adjustable wrench and socket set | Loosening the fan wheel hub and motor mounting bolts |
| Multimeter | Verifying power is off and testing capacitor and motor windings |
| Replacement blower motor (matching specifications) | Direct-fit or universal replacement; must match voltage, horsepower, speed, and rotation direction |
| New run capacitor (if applicable) | Recommended to replace alongside the motor as preventive maintenance |
| Wire connectors and electrical tape | Splicing and insulating wiring connections if the new motor's leads differ |
| Work gloves and safety glasses | Protection from sharp sheet-metal edges and debris |
| Flashlight or headlamp | Illuminating the interior of the air handler cabinet |
| Labeling tape or marker | Marking wire positions before disconnection |
Step-by-Step Replacement Procedure
The following steps describe a typical PSC or ECM blower motor replacement in a residential air handler. Exact procedures vary by manufacturer, so consult your unit's service manual for model-specific details.
- Turn off all power to the unit Flip the circuit breaker feeding the air handler and the outdoor condenser. If a service disconnect switch is mounted near the unit, switch it to OFF as well. Use a multimeter to confirm no voltage is present at the motor leads before proceeding.
- Remove the access panels Using the appropriate nut driver, remove the screws holding the blower compartment panel and, if necessary, the upper coil panel. Keep screws organized in a container so you can reassemble them correctly.
- Document the wiring Before disconnecting anything, take a photograph of the motor wiring and label each lead with tape. Note the color codes, capacitor connections, and the orientation of the motor's control plug. This step prevents costly mistakes during reassembly.
- Disconnect the motor electrical connections Unplug the motor harness from the control board or disconnect the wire nuts joining the motor leads to the unit wiring. If the motor has a capacitor, discharge it safely and disconnect its leads. Label the capacitor wires as well.
- Remove the blower assembly On many units, the blower and motor are mounted on a slide-out rail. Loosen the mounting screws and carefully slide the assembly out. On others, you may need to remove the entire blower housing. Support the assembly as you remove it—these parts are heavier than they appear.
- Detach the fan wheel from the old motor Loosen the set screw on the fan wheel hub (usually accessible through an opening in the housing) and slide the wheel off the motor shaft. Inspect the wheel for cracks, dirt buildup, or imbalance; clean or replace it if needed. Mark the wheel's orientation on the shaft so you can reinstall it at the correct depth.
- Remove the old motor from its mount Unbolt the motor from the mounting bracket or belly-band. Note the orientation of the motor body, the position of the mounting feet, and the direction of rotation. Compare these details with your replacement motor to confirm compatibility.
- Install the new motor Mount the new motor in the same orientation as the old one. Tighten the mounting bolts securely but do not overtighten—excessive torque can distort the motor housing. Verify the motor's rotation direction matches the old unit; some motors are reversible and must be wired accordingly.
- Reattach the fan wheel Slide the fan wheel onto the new motor shaft to the same depth you marked earlier. Tighten the set screw firmly against the flat side of the shaft. Spin the wheel by hand to confirm it rotates freely without rubbing against the housing.
- Reinstall the blower assembly Slide the blower and motor assembly back into the cabinet and secure the mounting screws. Reconnect the motor wiring according to your labels and photograph. Install the new capacitor if you are replacing it, connecting the leads to the correct terminals.
- Restore power and test Replace the access panels, then restore power at the breaker and service switch. Set the thermostat to call for fan-only operation first, then cooling. Observe the blower for smooth operation, correct airflow direction, and absence of unusual noises.
If your system uses an ECM motor, the wiring procedure may involve a multi-pin plug and a control module that must be programmed or matched to the unit. ECM replacements are less forgiving of mismatched part numbers, so verify compatibility with the manufacturer's parts diagram before ordering.
Testing the New Blower Motor
After reassembly, a brief commissioning check confirms the job was done correctly:
- Airflow check: Hold a tissue or anemometer at several supply registers. Airflow should be steady and noticeably stronger than before the replacement.
- Amperage draw: Use a clamp meter to compare the motor's current draw against the nameplate rating. A significantly higher reading suggests a wiring fault, restricted airflow, or an incorrect motor.
- Noise and vibration: Listen for grinding, squealing, or rattling. Minor airflow noise is normal; mechanical noise is not. Check that the fan wheel is balanced and the cabinet panels are tight.
- Temperature split: Measure the air temperature at the return and supply registers after 15 minutes of cooling operation. A properly functioning system typically shows a temperature difference within the manufacturer's specified range.
- Capacitor check: If you installed a new capacitor, verify its microfarad reading with a multimeter to rule out a defective part.
If the motor runs but airflow remains weak, recheck the fan wheel orientation, the blower housing seals, and the duct system for disconnections or blockages. Our article on sealing air ducts for efficiency explains how leaks undermine even a perfectly installed blower.
DIY vs Professional Replacement
Replacing a blower motor is within reach for a confident DIYer with electrical experience, but it is not a beginner task. Consider these factors when deciding:
| Factor | DIY Replacement | Professional Replacement |
|---|---|---|
| Skill requirement | Moderate—comfort with electrical wiring and hand tools | None—technician handles everything |
| Time investment | 2–4 hours including diagnosis and cleanup | 1–2 hours on site |
| Warranty impact | May void manufacturer warranty if the unit is still covered | Preserves warranty when using authorized service |
| Risk of misdiagnosis | Higher—capacitor, control board, or duct issues may mimic motor failure | Lower—technician tests the full system |
| Parts sourcing | You must match part numbers and specifications yourself | Technician supplies the correct OEM or equivalent part |
If your unit is under warranty, or if you are uncomfortable working with 240-volt circuits and capacitors, a licensed HVAC technician is the safer choice. The same logic applies if diagnostics point to a failed control board or a refrigerant issue rather than the motor itself. For broader system-level concerns, our overview of replacing heating and air conditioning systems helps you evaluate whether a motor replacement is the right investment in an aging unit.
Not Sure the Motor Is the Only Problem?
Explore our detailed guides on related AC components and system-level upgrades before committing to a repair.
Replacing a Coil in an AC UnitPreventing Future Blower Motor Problems
Extend the life of your new blower motor with these maintenance habits:
- Replace air filters on schedule: Every 1–3 months is typical for standard filters. Homes with pets or high dust levels may need more frequent changes. Follow our seasonal AC checklist for a complete maintenance calendar.
- Keep the blower compartment clean: Dust and debris that bypass the filter accumulate on the fan wheel and motor, causing imbalance and overheating.
- Schedule annual HVAC servicing: A technician can measure motor amperage, check capacitor health, lubricate serviceable bearings, and catch early signs of wear. Our guide on servicing an HVAC system explains what a thorough tune-up includes.
- Address airflow restrictions promptly: Crushed ducts, closed registers, and dirty coils force the motor to work harder. Treat unusual airflow as a warning sign rather than an inconvenience.
- Monitor electrical components: Weak capacitors are a leading cause of motor failure. Ask your technician to test the capacitor during annual maintenance.
Frequently Asked Questions
How do I know if my AC blower motor is failing?
Watch for weak or absent airflow from vents, grinding or squealing noises, a burning smell near the indoor unit, intermittent fan operation, or a blower that will not start even when the thermostat calls for cooling. A multimeter test of the motor windings and capacitor can confirm the diagnosis. Rule out a clogged filter and thermostat issues first.
Can I replace an AC blower motor myself?
Yes, if you have moderate DIY experience, comfort working with electrical connections, and the right tools. The job involves shutting off power, removing panels, documenting wiring, unbolting the motor, transferring the fan wheel, and installing the replacement. If you are unsure at any point—especially around capacitors and control boards—hire a licensed HVAC technician.
How long does a blower motor replacement take?
A professional technician typically completes the replacement in 1 to 2 hours. A DIYer should plan for 2 to 4 hours, including diagnosis, parts verification, and testing. Unusual cabinet designs or rusted fasteners can extend the job.
What causes a blower motor to fail prematurely?
The leading causes are dirty air filters and restricted airflow that cause overheating, worn bearings, failed capacitors, electrical faults, and moisture intrusion. Regular filter changes and annual HVAC maintenance dramatically reduce the risk of premature failure.
Should I replace the capacitor when replacing the blower motor?
Yes, it is good practice. Capacitors are relatively inexpensive and a failed capacitor can damage a new motor. Replacing both together ensures reliable starting and reduces the chance of a repeat service call.
Can a bad blower motor cause the AC to freeze up?
Absolutely. When the blower fails to move enough air across the evaporator coil, the coil temperature drops below freezing, causing condensation to freeze on the coil. This reduces cooling capacity and can eventually damage the compressor. If you notice ice on the indoor coil, turn the system off and investigate airflow and blower operation.