What Is an Outdoor AC Mounting Bracket?
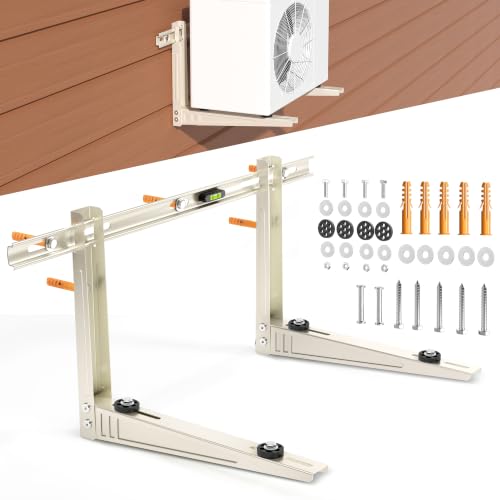
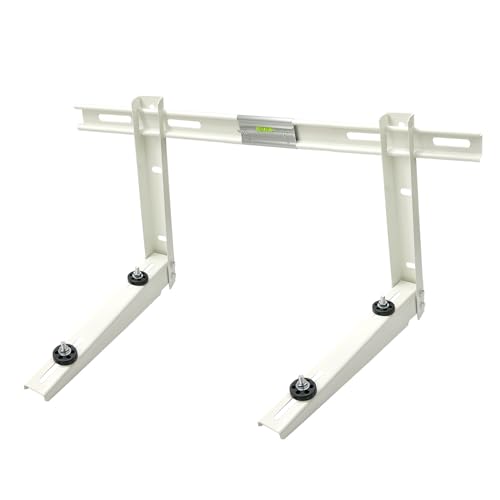
An outdoor AC mounting bracket is a structural support system designed to hold the condenser unit — the large outdoor component of a split or central air conditioning system — securely in place. Rather than resting the condenser directly on the ground or on a simple concrete pad, a bracket elevates and stabilizes it, keeping the unit level, off the soil, and protected from moisture, debris, and snow accumulation.
Brackets come in two main configurations: wall-mounted brackets that attach to the exterior of a building and cantilever the condenser away from the wall, and ground-mounted brackets or stands that sit on a stable base. Both serve the same core purpose: to keep the condenser level, reduce vibration, and extend the service life of the equipment. For a broader look at how the outdoor unit fits into the overall system, see our guide on air conditioner condenser units.
It is worth distinguishing the bracket from the condenser itself. The bracket is a passive structural element, but its quality directly affects how well the condenser performs. A unit that is not level can experience refrigerant flow issues, compressor strain, and noisy operation. A unit that sits directly on the ground may corrode faster or become a home for pests. The bracket is a small component with an outsized role in long-term reliability.
Why the Right Bracket Matters
Homeowners often treat the mounting bracket as an afterthought, but the consequences of a poor mounting setup are real and often appear months or years after installation. Here is why the bracket deserves careful attention:
- Level operation: Condensers are designed to sit level. A tilted unit can cause oil to migrate away from the compressor, leading to premature failure. It can also cause the fan blade to wobble and the condensate to drain improperly.
- Vibration control: Compressors and fans generate continuous vibration. A solid bracket with rubber isolators reduces vibration transfer to the building structure, which means quieter operation and less wear on refrigerant lines.
- Weather protection: Elevating the unit off the ground keeps it away from standing water, snow, leaf litter, and lawn equipment. This slows corrosion and keeps the coil clear for proper airflow.
- Safety: A condenser can weigh several hundred pounds. A bracket that is under-rated or poorly anchored is a falling hazard, particularly in high-wind regions or on upper floors.
- Service access: A well-planned bracket leaves clearance around the unit for technicians to service the coil, fan, and refrigerant connections. If you have ever dealt with a system that is running but not cooling, you know how important service access is.
In short, the bracket is a long-term investment in the reliability of your entire cooling system. It is not a place to cut corners.
Types of Outdoor AC Mounting Brackets
There are several bracket families on the market, each suited to different installation scenarios. The table below summarizes the main options using neutral tier descriptors rather than figures.
| Bracket Type | Typical Tier | Best For | Key Considerations |
|---|---|---|---|
| Wall-mounted cantilever bracket | Essential to mid-range | Homes with limited ground space, upper-floor installations, urban properties | Requires solid wall anchoring; must match wall material and unit weight |
| Ground-mounted stand | Entry-level to mid-range | Most residential installations with stable soil and good drainage | Needs a level concrete pad or footings; keep coil clear of debris |
| Heavy-duty commercial-grade bracket | Professional-grade to commercial-grade | Large condensers, rooftop or high-wind installations, multi-family buildings | Higher load ratings; requires engineered anchoring and inspection |
| Adjustable or universal bracket | Mid-range to high-end tier | Retrofit jobs and units with non-standard footprints | Confirm adjustment range and locking mechanism quality |
| Vibration-isolating bracket with pads | High-end tier | Quiet-focused installations, units near bedrooms or shared walls | Rubber or spring isolators must be rated for the unit weight |
Within each family, quality varies. A premium wall bracket typically uses thicker gauge steel and a more robust powder coating than an entry-level model. If your condenser sits near a living space, the vibration-isolating feature is worth prioritizing — it is one of the most effective ways to reduce the loud noise inside the house that many homeowners attribute to the wrong cause.
Wall-Mounted vs Ground-Mounted Brackets
Wall-Mounted Brackets
Wall brackets attach to the exterior wall of the building and hold the condenser a short distance away from the surface. They are the standard choice in dense urban areas, for upper-floor apartments, and anywhere ground space is limited. The main advantages are that the unit stays clear of snow, standing water, and ground pests, and it frees up yard or patio space.
The critical requirement is the wall itself. Wall brackets must be anchored into solid masonry, structural framing, or engineered mounting points. A bracket bolted into siding or a thin veneer is a serious hazard. If you are unsure about your wall construction, have a qualified installer assess it before mounting. For homes where the condenser must be mounted on the wall, it is also worth reviewing our guide on an air conditioner mounted on the wall to understand clearance and drainage requirements.
Ground-Mounted Brackets and Stands
Ground stands are the most common solution for single-family homes. They sit on a level concrete pad or footing and hold the condenser at a comfortable service height. Ground mounting simplifies anchoring, makes service access easier, and generally handles heavier units without the structural concerns of wall mounting.
The trade-off is exposure to ground conditions. The stand should keep the unit at least a few inches above the pad so water drains away, and the pad itself must be level and stable. In cold climates, a ground stand should raise the unit above expected snow depth. If your installation involves an attic or vertical configuration, the same principles of level support and drainage apply — our article on an air conditioner in the attic covers related considerations.
Load Capacity and Safety Margins
Every bracket has a rated load capacity, and choosing the right one is the single most important safety decision in this project. The rating must exceed the operating weight of your condenser — not just its dry weight. Operating weight includes refrigerant charge, and in some cases snow or ice accumulation. As a general practice, select a bracket rated well above the unit's weight to leave a safety margin for wind loading, vibration, and long-term material fatigue.
Bracket ratings are typically grouped into tiers rather than exact figures:
- Entry-level brackets: Suitable for small condensers in mild climates with sheltered installation.
- Mid-range brackets: The practical default for most residential split systems; usually built from heavier gauge steel with a durable coating.
- High-end and professional-grade brackets: Designed for larger units, exposed locations, and installations where inspection and code compliance are strict.
Do not rely on the bracket rating alone. The anchoring method matters just as much. A high-end bracket attached with undersized fasteners into weak material will fail before an entry-level bracket properly anchored into structural masonry. When in doubt, consult a licensed installer — our guide on air conditioner installers explains what credentials to look for.
Materials and Weather Resistance
Outdoor brackets live in a punishing environment: rain, UV exposure, temperature swings, and salt air in coastal regions. Material quality is therefore a primary differentiator between tiers.
- High-grade steel: The most common structural material. Look for thick gauge and a clear specification of the steel grade.
- Powder-coated or galvanized finish: Protects against rust. A rust-proof finish is essential in humid and coastal climates; a thin painted finish will chip and corrode within a few seasons.
- Stainless steel hardware: Fasteners are often the first component to fail. Stainless or hot-dip galvanized bolts and washers are a mark of a well-specified bracket.
- Rubber or elastomeric isolators: These damp vibration and protect the condenser base from metal-to-metal contact. Check that the isolator material is UV-stable.
Durable construction is not a luxury here — it is the difference between a bracket that lasts the life of the condenser and one that needs replacement in a few years. When comparing options, weight the finish and hardware quality heavily; they are usually the clearest signals of overall build quality within a given tier.
Installation Essentials
Bracket installation is within reach of a confident DIYer for simple ground stands, but wall-mounted installations on upper floors and any work involving structural anchoring should be handled by a professional. The following checklist covers the essentials regardless of who does the work:
- Confirm the unit weight and bracket rating. Match the bracket to the condenser with a generous safety margin.
- Check the mounting surface. Masonry, structural framing, or an engineered pad. Never anchor into siding, drywall, or thin veneer.
- Verify level. Use a spirit level in both directions. A tilted condenser strains the compressor and drains poorly.
- Respect clearance requirements. Leave space for airflow, service access, and refrigerant line routing. Manufacturers specify minimum clearances.
- Use the correct fasteners. Match anchor type to the wall material — sleeve anchors for masonry, structural screws for framing — and use stainless hardware outdoors.
- Install vibration isolators. Place them between the condenser and the bracket to reduce noise and wear.
- Check drainage. Ensure condensate drains away from the building and does not pool under the unit. If you notice water where it should not be, see our guide on an air conditioner leaking water solution.
- Inspect after installation. Confirm the unit is secure, level, and that refrigerant lines are properly supported and not stressed by the bracket position.
If the installation involves replacing an existing setup, disconnect power at the breaker before any work. Refrigerant handling is regulated; line set work should be left to a certified technician.
Maintenance and Inspection
A mounting bracket needs very little ongoing attention, but a brief inspection once or twice a year will catch problems before they become failures. Include the following in your seasonal routine:
- Check fasteners: Look for loose bolts, rusted hardware, or backing out. Re-torque or replace as needed.
- Inspect the finish: Touch up any chipped coating to prevent corrosion from spreading.
- Clear debris: Remove leaves, pollen, and snow from around the base and from the coil. Blocked airflow forces the system to work harder and can contribute to an air conditioner freezing outside.
- Verify level: Over time, ground stands can settle. Re-level if the unit has shifted.
- Check isolators: Rubber pads degrade with UV exposure. Replace cracked or hardened isolators.
Combining bracket inspection with routine coil cleaning and filter changes keeps the whole system efficient. Our broader AC maintenance guide covers the full seasonal checklist.
Common Mistakes to Avoid
- Under-rating the bracket. Choosing a bracket at or below the unit weight leaves no margin for wind, vibration, or snow.
- Anchoring into the wrong surface. Siding, drywall, and thin veneer cannot support a condenser. This is the most common cause of bracket failure.
- Skipping vibration isolators. Without isolators, vibration transfers into the wall and the refrigerant lines, accelerating wear and creating noise complaints.
- Ignoring clearance. Cramming the condenser against a wall or fence restricts airflow and reduces efficiency.
- Poor drainage. A bracket that traps water under the unit invites corrosion and ice damage. Elevate the unit and direct drainage away.
- Neglecting the finish. A small rust spot left untreated can compromise a bracket over a few seasons, especially in coastal climates.
Most of these mistakes trace back to treating the bracket as an accessory rather than a structural component. A few minutes of planning at the selection stage avoids expensive corrective work later.
How to Choose the Right Bracket
Use this step-by-step approach to narrow down the right bracket for your situation:
- Identify your condenser's weight from the manufacturer label or manual. Add a margin for refrigerant and, if applicable, snow load.
- Decide between wall and ground mounting based on space, code, climate, and service access.
- Check the mounting surface and choose a bracket compatible with it. For wall mounting, confirm the wall can take structural anchors.
- Select a tier that matches your exposure: entry-level for sheltered, mild-climate setups; mid-range for typical residential use; professional-grade for large units, coastal, or high-wind locations.
- Prioritize finish and hardware quality — powder coating, rust-proof finish, and stainless fasteners.
- Confirm vibration isolation if the unit is near a bedroom, shared wall, or living space.
- Plan the installation with clearances, drainage, and line routing in mind, and hire a professional for wall mounting or any structural anchoring you are unsure about.
A bracket is a long-term investment in the reliability of your cooling system. Choosing a well-specified model within the right tier, and installing it correctly, is far more important than chasing the lowest-tier option. If you are also evaluating the condenser itself, our guides on air conditioner condenser and air handler and air conditioner HVAC explain how the outdoor and indoor components work together.
Ready to Secure Your Condenser?
Browse our curated selection of outdoor AC mounting brackets and check availability for models that match your condenser weight and installation type.
View Bracket OptionsFrequently Asked Questions
What is an outdoor AC mounting bracket?
An outdoor AC mounting bracket is a structural support that holds the condenser unit securely against a wall or on a ground platform. It keeps the unit level, elevates it off the ground, and reduces vibration transfer to the building.
How much weight can a wall-mounted AC bracket hold?
Ratings vary by tier. Mid-range wall brackets generally support a typical residential condenser, while high-end and professional-grade models are built for larger units and higher safety margins. Always choose a bracket rated above your unit's operating weight and confirm the wall can take structural anchors.
Should I use a wall bracket or a ground bracket?
Choose a wall bracket when ground space is limited, the unit would sit in snow or flood-prone areas, or local rules restrict ground equipment. Choose a ground stand when you have stable soil, good drainage, and want simpler service access. Wall mounting requires a structural assessment of the wall.
Do I need vibration isolators with my bracket?
Vibration isolators are strongly recommended for any installation, and they are essential when the condenser is near a bedroom, shared wall, or living space. They reduce noise and protect refrigerant lines and the building structure from continuous vibration.
How often should I inspect the bracket?
Inspect the bracket at least twice a year, ideally before summer and before winter. Check fasteners for looseness or rust, look for chipped coating, clear debris, and verify the unit is still level. Coastal installations benefit from more frequent checks.
Can I install a wall bracket myself?
Simple ground stands are within reach of a careful DIYer. Wall-mounted installations, especially on upper floors or into structural masonry, should be handled by a professional. Incorrect anchoring is a serious safety hazard and can void equipment warranties.