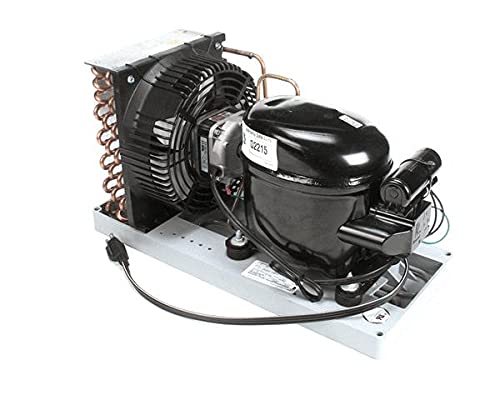
What Is a Condensing Unit in HVAC?
A condensing unit is the outdoor section of a split HVAC system. In a typical residential air conditioning setup, the system is divided into two main parts: the indoor unit (evaporator coil and air handler or furnace) and the outdoor unit (the condensing unit). Together, they circulate refrigerant to move heat from inside your home to the outside environment.
The condensing unit is often called the "outdoor AC unit," "condenser unit," or simply "the condenser." It contains the compressor, the condenser coil, the condenser fan motor, and various electrical and refrigerant controls. When your thermostat calls for cooling, the compressor pressurizes refrigerant gas, sending it to the condenser coil where heat is released into the outdoor air before the refrigerant cycles back indoors.
If you are exploring how the outdoor unit fits into the broader system, the guide on condensing unit fundamentals provides a helpful foundation. You may also want to understand how the condenser in an air conditioner interacts with the evaporator coil and metering device to complete the refrigeration cycle.
Key Components Inside a Condensing Unit
Although the condensing unit looks like a simple metal box with a fan on top, it contains several precision components working together. Understanding each part helps you recognize symptoms, communicate with technicians, and plan maintenance.
Compressor
The heart of the condensing unit. It compresses low-pressure refrigerant gas into high-pressure, high-temperature gas so heat can be rejected outdoors. Compressor type and condition heavily influence efficiency and lifespan.
Condenser Coil
A network of copper or aluminum tubes with fins. Hot refrigerant gas flows through the coil while the fan pulls outdoor air across the fins, releasing heat. Dirty coils reduce heat transfer and strain the compressor.
Condenser Fan
The fan blade and motor mounted on top of the unit. It draws air through the coil to accelerate heat rejection. A failing fan motor can cause overheating and compressor shutdowns.
Electrical Controls
Contactors, capacitors, and control boards manage compressor and fan operation. These components are common failure points and are relatively straightforward to diagnose during service calls.
Refrigerant Lines
The liquid and suction lines connect the outdoor condensing unit to the indoor evaporator coil. Proper line sizing, insulation, and leak-free connections are essential for efficient operation.
Service Valves & Ports
Service valves allow technicians to isolate the unit during repair or evacuation. Service ports provide access for pressure readings and refrigerant charging.
Why Component Quality Matters
Entry-level condensing units often use standard-efficiency compressors and basic fan motors, while mid-range models typically add more robust coils and improved electrical protection. Premium and top-tier condensing units commonly feature variable-speed compressors, corrosion-resistant coil coatings, and advanced diagnostic controls. The tier of the unit affects durability, sound levels, and long-term energy performance.
For a deeper look at the compressor specifically, the resource on HVAC compressor technology explains how compressor design influences the performance of the entire condensing unit. You can also review compressor options for AC units to compare reciprocating, scroll, and variable-speed designs.
How the Condensing Unit Works: The Refrigeration Cycle
Understanding the refrigeration cycle clarifies why the condensing unit is so important. The cycle has four main stages, and the condensing unit is responsible for two of them: compression and condensation.
- Evaporation: Inside the evaporator coil, low-pressure liquid refrigerant absorbs heat from indoor air and turns into gas. The air handler then distributes cooled air through your ductwork.
- Compression: The compressor in the condensing unit draws in low-pressure refrigerant gas and compresses it, raising its pressure and temperature significantly.
- Condensation: The hot gas enters the condenser coil. The condenser fan moves outdoor air across the coil, removing heat and causing the refrigerant to condense back into a liquid.
- Expansion: The liquid refrigerant passes through an expansion valve or metering device, which drops its pressure and temperature before it re-enters the evaporator coil.
This continuous cycle is what allows a split system to cool your home. Any inefficiency in the condensing unit — restricted airflow, dirty coils, or a failing compressor — reduces the overall capacity of the system and increases energy consumption.
Condensing Unit vs. Other Outdoor HVAC Equipment
Homeowners sometimes confuse the condensing unit with other outdoor equipment. The table below clarifies the differences between common outdoor HVAC terms.
| Equipment | Primary Function | Typically Contains | Used In |
|---|---|---|---|
| Condensing Unit | Rejects heat outdoors from the refrigeration cycle | Compressor, condenser coil, fan | Split AC and heat pump systems |
| Heat Pump Outdoor Unit | Reverses cycle to heat or cool | Compressor, coil, reversing valve | Year-round heating and cooling |
| Packaged Unit | Complete heating and cooling in one cabinet | Compressor, both coils, blower | Rooftop or ground-level installations |
| Condenser (Standalone) | Heat rejection only (refrigeration context) | Coil and fan (no compressor) | Commercial refrigeration, process cooling |
If you are comparing outdoor unit styles for a home without ductwork, the article on mini-split condensers explains how ductless systems differ from traditional split condensing units. For homes that rely on a full ducted system, understanding the components of a central air conditioning system provides useful context about how the indoor and outdoor units cooperate.
Sizing a Condensing Unit: What You Need to Know
Correct sizing is one of the most important factors in condensing unit performance. An oversized unit cools the space too quickly, leading to short cycling, poor humidity control, and premature wear. An undersized unit runs continuously, struggling to maintain the set temperature and consuming more energy over time.
Professional sizing uses a Manual J load calculation that considers:
- Square footage and ceiling height of the conditioned space
- Window area, orientation, and glazing type
- Insulation levels in walls, ceilings, and floors
- Local climate and design temperature
- Occupant count and internal heat gains from appliances
- Air infiltration and duct leakage
Many homeowners start with a simplified BTU-per-square-foot estimate, but this should only be a rough starting point. A qualified HVAC contractor should perform a full load calculation before recommending a condensing unit capacity. The guide on how to size an air conditioner walks through the sizing process in detail, and the BTU calculator by room size can help you estimate baseline requirements.
Efficiency Ratings for Condensing Units
Condensing unit efficiency is primarily measured by SEER (Seasonal Energy Efficiency Ratio) and, more recently, SEER2 under updated DOE standards. Higher SEER ratings indicate that the unit converts electricity into cooling more effectively. EER (Energy Efficiency Ratio) measures efficiency at a single peak test condition, while HSPF applies to heat pump heating performance.
Entry-level condensing units generally meet minimum federal standards, mid-range models offer better seasonal efficiency, and premium or top-tier units may include two-stage or variable-speed compressors for superior part-load performance and humidity control. If efficiency is a priority, the article on what a SEER rating means explains how to interpret these values. You can also review SEER vs. SEER2 standards to understand the current regulatory landscape.
Installation Considerations for HVAC Condensing Units
Proper installation has a direct impact on condensing unit lifespan and efficiency. Key considerations include:
- Clearance: Maintain at least 18–24 inches of clearance around the unit for airflow. Avoid enclosing the unit with fences, shrubs, or walls that restrict air intake and discharge.
- Level Pad: The unit should sit on a sturdy, level pad — concrete, composite, or approved plastic — that keeps it above grade and prevents water pooling.
- Sun Exposure: While shade can slightly improve efficiency, the unit should not be boxed in. A shaded location with free airflow is ideal.
- Electrical Service: Condensing units require a dedicated circuit with proper breaker sizing and disconnect. Verify your electrical panel capacity before installation.
- Refrigerant Lines: Line length, elevation, and insulation must meet manufacturer specifications. Improper line sizing can reduce capacity and efficiency.
- Permits: Many jurisdictions require permits for HVAC replacements. Confirm local requirements before work begins.
For guidance on selecting an installer, the resource on companies that install air conditioners offers practical tips on vetting contractors. If you are weighing repair versus replacement, the article on replace vs. repair provides a decision framework.
Maintenance Tips to Extend Condensing Unit Life
Regular maintenance keeps the condensing unit operating efficiently and helps prevent breakdowns. Homeowners can handle some tasks, while others require a licensed technician.
- Clean the condenser coil annually: Dirt and debris on the coil reduce heat transfer. Rinse gently with a garden hose after removing surface debris. For deeper cleaning, review condenser coil cleaning best practices.
- Clear debris around the unit: Remove leaves, grass clippings, and cottonwood fluff from the fins and base. Keep landscaping trimmed back.
- Straighten bent fins: Use a fin comb to restore airflow through damaged coil fins.
- Check the fan blade: Look for wobbling, cracks, or unusual noise. A damaged fan blade can stress the motor.
- Inspect electrical components: A technician should check contactors, capacitors, and wiring for wear or corrosion during annual service.
- Verify refrigerant charge: Low refrigerant indicates a leak. Only licensed technicians should check and adjust refrigerant levels.
- Schedule professional tune-ups: Annual service before cooling season helps catch problems early. The article on HVAC tune-up explains what a proper maintenance visit includes.
For more detail on the condenser fan specifically, the guide on condenser fan operation and troubleshooting is a useful reference.
Common Condensing Unit Problems and Fixes
Many condensing unit issues produce recognizable symptoms. Understanding these can help you decide when to call a professional.
Unit Won't Turn On
Check the thermostat setting, circuit breaker, and disconnect switch first. A failed contactor or capacitor is a common electrical culprit.
Fan Not Spinning
A seized fan motor or failed capacitor often prevents the fan from starting. The compressor may run briefly before overheating.
Frozen Coil or Ice Buildup
Low refrigerant, restricted airflow, or a failing blower can cause icing. Turn the system off and call a technician.
Loud or Unusual Noise
Grinding, buzzing, or rattling may indicate a failing compressor, loose fan blade, or worn motor bearings.
Short Cycling
Frequent on-off cycles can stem from an oversized unit, low refrigerant, or a faulty pressure switch. Short cycling wears out the compressor.
Refrigerant Leak
Poor cooling, ice formation, or hissing sounds may indicate a leak. Leak repair requires EPA-certified technicians.
If you suspect a compressor issue, the guide on compressor not working diagnostics covers common failure modes. For more serious problems, the article on when to call an HVAC technician helps you decide when DIY troubleshooting is no longer safe or practical.
Condensing Unit Replacement: When and How
Most condensing units last between 12 and 20 years, depending on usage, climate, and maintenance. Signs that replacement may be the better path include:
- Frequent repairs, especially compressor or coil failures
- Refrigerant type no longer available or extremely hard to source (e.g., R-22 systems)
- Rising energy consumption despite regular maintenance
- Corrosion or physical damage to the coil or cabinet
- Parts availability becoming limited for older models
When replacing a condensing unit, the indoor coil should generally be matched to the new outdoor unit for optimal performance and to preserve warranty coverage. Replacing only the outdoor unit with a mismatched indoor coil can reduce efficiency and reliability. For a fuller discussion of replacement costs and considerations, see the guide on condenser replacement.
Condensing Unit Tier Comparison
The table below summarizes how condensing units differ across market tiers. This classification uses neutral tier descriptors rather than figures, and it should help you frame conversations with contractors.
| Tier | Typical Features | Best For | Maintenance Demand |
|---|---|---|---|
| Entry-level | Single-stage compressor, standard coil, basic controls | Occasional cooling, mild climates, tight installation budgets | Standard annual service |
| Mid-range | Two-stage or scroll compressor, improved coil, better sound insulation | Most homes with year-round cooling needs | Standard annual service plus seasonal checks |
| Premium | Variable-speed compressor, corrosion-resistant coil, smart diagnostics | Homes prioritizing comfort, quiet operation, and efficiency | Proactive maintenance recommended |
| Top-tier / commercial-grade | High-end variable-speed, advanced controls, heavy-duty cabinet | Large homes, light commercial spaces, harsh environments | Scheduled professional maintenance |
Frequently Asked Questions
What is the difference between a condenser and a condensing unit?
A condenser refers specifically to the heat-rejection coil and fan assembly. A condensing unit is the complete outdoor package that includes the compressor, condenser coil, fan, and electrical controls. In residential HVAC, the terms are often used interchangeably, but technically the condensing unit is the broader term.
How long does an HVAC condensing unit last?
With proper installation and annual maintenance, most residential condensing units last 12 to 20 years. Coastal environments, heavy usage, and deferred maintenance shorten lifespan.
Can I replace just the outdoor condensing unit?
It is possible, but generally not recommended unless the indoor coil is a compatible match. Mismatched components can reduce efficiency, void warranties, and shorten equipment life. Most contractors recommend replacing the outdoor unit and indoor coil together.
Why is my condensing unit running but not cooling?
Common causes include low refrigerant, a dirty condenser coil, a failing compressor, or restricted airflow. Start by checking the air filter and thermostat, then call a technician if the problem persists.
Should I cover my condensing unit in winter?
For a cooling-only system in a mild climate, a breathable cover can keep debris out. However, never wrap the unit tightly, and remove the cover before the cooling season. Heat pumps should not be covered because they operate year-round.
How often should a condensing unit be serviced?
Once per year, ideally in spring before cooling season. Homes in dusty environments or with heavy usage may benefit from twice-yearly service.
What size condensing unit do I need?
Sizing depends on the home's load calculation, not just square footage. A qualified contractor should perform a Manual J calculation based on insulation, windows, climate, and occupancy before recommending capacity.
Does the condensing unit contain refrigerant?
Yes. The refrigerant charge is distributed between the indoor coil, outdoor unit, and line set. The exact charge depends on line length and system design, and it should only be adjusted by an EPA-certified technician.
What is the most common condensing unit failure?
Electrical component failures — capacitors, contactors, and fan motors — are among the most common. Dirty coils and low refrigerant are also frequent causes of reduced performance.
Can I install a condensing unit myself?
HVAC installation requires refrigerant handling certification, electrical work, and specialized tools. Most jurisdictions require permits and licensed contractors. DIY installation is not recommended and may void manufacturer warranties.