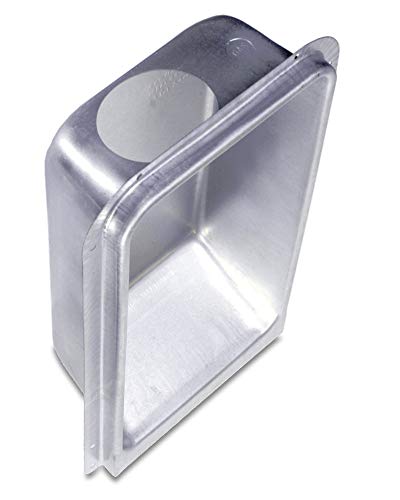
Dryer Vent in Wall: The Complete Homeowner's Guide
Understand how in-wall dryer venting works, which materials are safe and code-compliant, how to plan a short and efficient duct run, and how to keep the system clean for years of reliable drying performance.
Explore Vent TypesWhy this guide matters: A dryer vent that runs through a wall cavity is one of the most overlooked parts of a laundry setup. When it is designed and maintained correctly, it protects your home from lint buildup, excess moisture, and fire risk while keeping drying times short. When it is done poorly, it becomes a hidden hazard. This guide walks you through the essentials so you can plan, install, or evaluate an in-wall dryer vent with confidence.
What Is a Dryer Vent in Wall System?
A dryer vent in wall system is a ducting configuration in which the exhaust from a clothes dryer travels through a concealed wall cavity before terminating at an exterior hood or louver. Instead of running a visible duct across a laundry room, the installer creates a clean, recessed connection point — often called a dryer vent wall box — that connects the dryer to a rigid duct inside the wall.
This arrangement is common in modern homes where the laundry area is located against an exterior wall, or where the dryer is placed in a closet, hallway, or stacked configuration. The in-wall approach keeps the laundry space tidy, but it also places the ductwork out of sight — which means the quality of the installation and the discipline of regular cleaning matter even more.
If you are still comparing broader ducting options, the guide on dryer air duct configurations provides useful context on how in-wall runs fit alongside other venting layouts.
Types of In-Wall Dryer Vent Configurations
There is no single "in-wall dryer vent" product. The right setup depends on the wall construction, the distance to the exterior, and the dryer's exhaust requirements. The four categories below cover the most common approaches.
Recessed Wall Box with Short Rigid Duct
The most straightforward configuration. A recessed box sits flush in the wall, the dryer hose connects to it, and a short section of rigid 4-inch duct passes through the wall to an exterior hood. Best for laundry rooms directly against an exterior wall.
Best for: Simple installations with a very short duct run and easy access for inspection.
In-Wall Duct with One or Two Elbows
A rigid duct travels inside the wall cavity and turns once or twice to reach the exterior termination. This is common when the dryer is offset from the exterior wall. Elbows add resistance, so the run must be planned carefully and kept as short as possible.
Best for: Laundry areas that are a few feet from the exterior wall but still within the dryer manufacturer's equivalent-length limit.
Periscope or Telescoping In-Wall Vent
A space-saving option for dryers pushed close to the wall. A periscope-style connector fits between the dryer outlet and the wall box, reducing the need for a long flexible hose behind the appliance. It is often paired with a rigid in-wall duct section.
Best for: Tight laundry closets and stacked dryer setups where rear clearance is limited.
Engineered In-Wall Duct with Booster Fan
For long or complex runs, an engineered layout may include smooth rigid ducting, sealed joints, and a compatible booster fan. This approach requires careful design, verification of airflow, and strict adherence to the dryer and fan manufacturer instructions.
Best for: Challenging layouts where the dryer is far from the exterior wall and standard passive venting cannot meet performance requirements.
Whatever configuration you choose, the underlying duct material should be rigid metal. Flexible foil and plastic ducts are not appropriate for concealed in-wall runs because they can sag, accumulate lint, and undermine fire safety. The article on dryer vent duct replacement explains how to swap out an unsuitable duct for a compliant rigid one.
Comparing In-Wall Dryer Vent Options
The table below summarizes how the main configurations differ in practical terms. The "Tier" column uses market-position descriptors rather than any numeric figures, so the comparison stays useful over time.
| Configuration | Tier | Best For | Key Consideration |
|---|---|---|---|
| Recessed wall box with short rigid duct | Essential tier | Dryer directly against an exterior wall | Keep the run as short and straight as possible |
| In-wall rigid duct with elbows | Balanced tier | Dryer offset a few feet from the exterior wall | Count elbows against the equivalent-length limit |
| Periscope / telescoping connector | High-end tier | Tight closets and stacked dryers | Verify rear clearance and secure connections |
| Engineered duct with booster fan | Professional-grade | Long or complex runs | Confirm airflow and compatibility with the dryer |
Materials and Code Requirements
In-wall dryer venting is governed by a combination of the dryer manufacturer's installation manual and local building codes. While specific requirements vary by jurisdiction, several principles are widely accepted in North America:
- Use rigid metal duct. Galvanized steel or aluminum duct with a smooth interior is the standard for concealed runs. Flexible foil, vinyl, and plastic ducts are generally not permitted inside walls.
- Keep the duct as short and straight as possible. A common guideline is a maximum equivalent length of 25 feet for a 4-inch duct, with each elbow reducing the allowable length. Always confirm the exact limit in your dryer's manual.
- Terminate outdoors with a proper hood. The exterior termination should have a backdraft damper and be located away from windows, doors, and intake vents. It should not terminate in an attic, crawlspace, garage, or any enclosed area.
- Seal joints and transitions. Use metal foil tape or UL-listed clamps. Avoid screws that protrude into the duct, because they catch lint.
- Support the duct. Rigid duct should be supported so it does not sag or separate inside the wall cavity.
- Do not conceal flexible transition hose. The short flexible connector between the dryer and the wall box should remain accessible and should be kept as short as practical.
If your installation requires a transition between the dryer and a wall-mounted connection point, the guide on crank out window kit for portable air conditioner is not directly relevant, but it illustrates how sealing and fit matter for any exhaust-style appliance. For the dryer itself, always prioritize the manufacturer's manual over general advice.
Step-by-Step Installation Overview
The following steps describe a typical in-wall dryer vent installation. This is an overview for planning and evaluation; complex installations should be handled by a qualified professional.
- Plan the route and measure. Identify the exterior termination point and sketch the duct path. Measure the total run and count every elbow. Compare your plan against the dryer manufacturer's equivalent-length limit before cutting anything.
- Choose a compliant wall box and duct. Select a recessed dryer vent wall box designed for in-wall use and rigid metal duct of the correct diameter (commonly 4 inches). Confirm that all components are compatible with your dryer.
- Cut and frame the wall openings. Mark the opening for the wall box and the exterior termination. Cut carefully to avoid electrical wires, plumbing, and structural members. Frame the opening as needed so the box and duct are properly supported.
- Install the exterior hood. Mount the exterior termination hood with the damper opening outward and seal the perimeter against weather. Ensure the hood is not blocked by shrubs, fencing, or other obstructions.
- Assemble the rigid duct run. Connect the duct sections with metal foil tape or UL-listed clamps. Keep the interior smooth, avoid protruding screws, and support the duct so it does not sag inside the cavity.
- Install the wall box and connect the dryer. Secure the wall box in the opening and connect the dryer using a short, accessible transition hose. Keep bends gentle and the connection tight.
- Test airflow and check for leaks. Run the dryer on air-only or low heat, confirm that the exterior damper opens fully, and check for air leaks at joints. If airflow seems weak, recheck the run length, elbow count, and for any crushed or disconnected duct.
- Document and schedule maintenance. Note the duct route, length, and component model numbers. Set a reminder to inspect and clean the vent at least annually.
If your home has other ducted systems that need attention, the guide on duct sealing covers general principles that also apply to keeping dryer duct joints tight and efficient.
Cleaning and Maintaining an In-Wall Dryer Vent
Because the duct is hidden, maintenance is where many in-wall systems fail. Lint accumulation reduces airflow, extends drying times, and increases fire risk. A consistent routine is the best defense.
Routine Checks You Can Do Yourself
- Clean the lint filter before every load. This is the single most effective habit for reducing lint entering the duct.
- Inspect the exterior hood monthly. Confirm the damper opens freely and that no lint or debris is blocking the termination.
- Watch for warning signs. Longer drying times, clothes that feel unusually hot, a burning smell, or excess lint around the lint trap all suggest restricted airflow.
- Check the transition hose. The short connector behind the dryer should be intact, uncrushed, and securely attached at both ends.
Professional Cleaning
An in-wall duct should be cleaned by a professional on a regular schedule — commonly every one to two years for typical households, and more often for high-use laundry rooms or homes with pets. A technician uses rotary brushes and vacuum equipment designed for ductwork, and can also verify airflow and inspect for disconnected or damaged sections. The article on dryer vent cleaning explains what a proper service visit includes, while dryer vent cleaning hose covers the tools used for the job.
If you prefer to find local help, the guide on dryer vent cleaning in my area outlines how to vet providers, and dryer vent cleaning company discusses what to look for in a reputable service.
Common Mistakes to Avoid
- Using flexible foil or plastic duct inside the wall. These materials sag, trap lint, and are generally not code-compliant for concealed runs.
- Exceeding the equivalent-length limit. Every elbow adds resistance. A long, winding run can starve the dryer of airflow even if the duct is clean.
- Terminating in the attic, crawlspace, or garage. Moisture and lint must be exhausted outdoors. Indoor termination creates humidity, mold risk, and a fire hazard.
- Crushing the transition hose behind the dryer. A pinched hose restricts airflow immediately. Use a periscope connector or adjust the dryer position if clearance is tight.
- Skipping regular cleaning. An in-wall duct is out of sight, but it is not maintenance-free. Annual inspection is the minimum sensible baseline.
- Ignoring the exterior damper. A stuck or missing damper lets pests and weather into the duct and can signal airflow problems.
When to Call a Professional
Some in-wall dryer vent situations are best handled by a qualified technician or contractor. Consider professional help when:
- The duct route passes through multiple wall cavities or requires significant framing changes.
- The total run approaches or exceeds the dryer manufacturer's equivalent-length limit.
- You notice reduced airflow that persists after basic cleaning.
- There is evidence of a disconnected duct, crushed section, or moisture damage inside the wall.
- You are unsure whether the existing installation meets local code.
A professional can verify the duct route, confirm airflow, and recommend whether a booster fan or a redesigned route is appropriate. For related guidance on evaluating service providers, the article on dryer vent cleaning company offers practical criteria.
Ready to Choose the Right In-Wall Vent Setup?
Review the recommended products below to compare compliant wall boxes, rigid duct kits, and accessory options for your laundry room.
View Recommended ProductsFrequently Asked Questions
What is a dryer vent in wall system?
How long can an in-wall dryer vent be?
Can I use flexible foil or plastic duct inside a wall?
How often should an in-wall dryer vent be cleaned?
Does a dryer vent in wall need a booster fan?
Can the dryer vent terminate in the garage or attic?
For broader context on maintaining healthy indoor air and moisture levels in the laundry area, the guide on decreasing humidity in house discusses related strategies that complement a properly vented dryer.