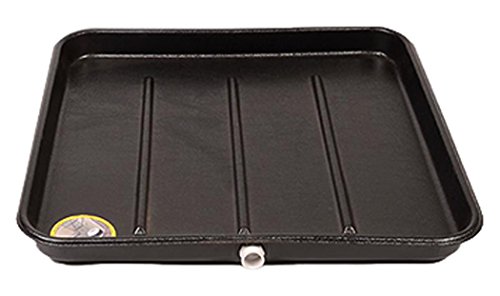
How to Replace an AC Drain Pan: Step-by-Step Guide
The condensate drain pan sits under the indoor coil and catches the water your air conditioner removes from the air. When it rusts through, cracks, or stops draining properly, water can damage ceilings, walls, and the air handler itself. This guide explains how to tell when the pan needs replacement and how to plan the job safely.
Quick answer: Replacing an AC drain pan usually requires turning off power to the air handler, disconnecting the drain lines, removing the old pan, installing a new pan of the correct size and material, and reconnecting the drain with a proper slope. Because the pan sits inside the air handler cabinet, most homeowners should plan on a licensed HVAC technician performing the work, while handling only the simpler preparation steps themselves.
When to Replace the AC Drain Pan
A drain pan that is still intact and draining freely usually only needs cleaning. Replacement becomes necessary when the pan can no longer do its job, either because the material has failed or because the design no longer matches the system.
1 Rust Through or Cracks
Rust spots that have become holes, or visible cracks along the pan seam, allow water to drip past the pan and into the cabinet. Once the pan leaks, it must be replaced.
2 Standing Water That Never Drains
If water pools in the pan after cleaning the drain line, the pan may be pitched incorrectly, warped, or blocked by debris that cannot be cleared.
3 Overflow Damage
Evidence of past overflow — water stains, rust streaks, or a tripped float switch — often means the pan or the drain line has been failing for some time.
4 Aging or Obsolete Material
Older metal pans may be at the end of their service life. Replacement pans are often made from plastic or polymer materials that resist corrosion.
5 Upgrading the Drain System
Some homeowners replace the pan while installing a secondary drain pan, a float switch, or a condensate pump. This is a natural time to upgrade the whole drain strategy.
6 Wrong Size or Fit
A pan that does not properly cover the coil or does not align with the drain outlet will overflow even when new. Replacement with the correct size is the fix.
Tools and Materials to Gather
Whether you are preparing for a technician or performing the simpler tasks yourself, having the right tools on hand keeps the job moving. The list below covers a typical replacement.
Preparation Checklist
- Correctly sized replacement drain pan (plastic or polymer preferred for corrosion resistance).
- Replacement drain line and fittings as needed.
- PVC primer and cement if connecting new drain pipe.
- Adjustable wrench and screwdrivers for access panels.
- Shop vacuum for clearing standing water and debris.
- Towels and a bucket for spill control.
- Flashlight or headlamp for inspecting the cabinet interior.
- Work gloves and eye protection.
- New float switch if the existing one is aging.
Step-by-Step Replacement Outline
The steps below describe the typical replacement sequence. Work that touches refrigerant lines, electrical connections inside the cabinet, or the coil itself should be handled by a licensed technician. Homeowners can safely handle power-down, water cleanup, and access preparation.
1 Turn Off Power and Cooling
Set the thermostat to "off" and turn off the breaker that feeds the air handler. Confirm the blower has stopped before opening any panels.
2 Remove Standing Water
Use a shop vacuum to remove water from the pan and the cabinet. Dry the surrounding area so you can see the pan's condition clearly.
3 Disconnect the Drain Line
Disconnect the primary drain line and any secondary or overflow line from the pan. Note the routing and slope so the new pan can be reconnected the same way.
4 Access and Remove the Old Pan
Depending on the air handler, the pan may slide out after removing the front access panel, or it may require loosening the coil or cabinet components. If the coil must be moved, a licensed technician should perform this step.
5 Install the New Pan
Seat the new pan so it fully covers the coil footprint and aligns with the drain outlet. Confirm the pan is level or pitched correctly toward the drain per the manufacturer's instructions.
6 Reconnect and Slope the Drain
Reconnect the primary drain with a continuous downward slope. Install or replace the float switch, and confirm any secondary drain is clear and routed to a visible location.
7 Test the Drain
Pour water into the new pan and confirm it flows freely out the drain without pooling. Check for leaks at every joint and connection.
8 Restore Power and Monitor
Restore the breaker and set the thermostat back to cooling. Monitor the first few cooling cycles for overflow or dripping.
Safety note: Working inside an air handler exposes you to electrical components, sharp sheet metal, and refrigerant lines. Turn off power at the breaker before opening panels. Do not bend refrigerant lines or attempt to recover refrigerant yourself — those tasks require EPA Section 608 certification. If the coil must be moved to replace the pan, call a licensed HVAC technician.
Repair or Replace: How to Decide
Not every pan problem requires a full replacement. The table below groups common situations so you can decide whether to repair or replace.
| Situation | Recommended Action | Project Tier | Best For |
|---|---|---|---|
| Surface rust, pan still holds water | Clean, dry, and monitor | Essential tier | DIY cleaning and inspection |
| Slow drain with intact pan | Clear the drain line | Essential tier | DIY drain clearing |
| Cracked or holed pan | Replace the pan | Mid-tier | Licensed technician |
| Pan removed only by moving the coil | Replace pan and inspect coil | Professional-grade | Licensed HVAC technician |
| Overflow damage to ceiling or wall | Replace pan and repair surrounding damage | Professional-grade | Technician plus contractor |
| Repeated overflow despite clearing | Full drain system inspection | Mid-tier | Licensed technician |
Preventing Future Drain Pan Problems
A new pan only stays reliable if the drain system around it stays clear. A simple seasonal routine keeps water moving and prevents overflow.
- Flush the drain line at the start of cooling season and again mid-season.
- Replace or clean the air filter monthly during heavy use to reduce debris reaching the pan.
- Inspect the pan and the area below the air handler for moisture during routine filter changes.
- Test the float switch periodically to confirm it shuts the system off when water rises.
- Keep the condensate pump (if present) clean and confirm it runs during the cooling cycle.
For broader upkeep guidance, see the HVAC maintenance guide, the HVAC inspection checklist, and consider a maintenance plan that includes condensate drain service.
Related AC Problems Worth Checking
Drain pan problems often overlap with other symptoms. These focused guides can help you narrow the diagnosis:
- Cleaning the air conditioner drain — resolve slow drainage before replacing the pan.
- Common AC problems — a broad overview that includes water leaks.
- Central air conditioner stopped cooling — when overflow is accompanied by a cooling failure.
- Air conditioner running but not cooling the house — a diagnostic walkthrough for cooling complaints.
- My AC is not cooling my house — homeowner-level troubleshooting.
Not Comfortable Doing This Yourself?
Replacing a drain pan can require moving the coil, working around refrigerant lines, and reconnecting the drain with the correct slope. A licensed technician can complete the job safely and confirm the entire drain system is working before leaving.
Find a Qualified HVAC Contractor