Recharging Auto AC System: Complete Step-by-Step Guide
Understand refrigerant types, leak diagnosis, DIY versus professional service, and the correct procedure for restoring cold air in your vehicle's cabin.
Why this guide matters: A car air conditioning system that blows warm air usually means the refrigerant charge has dropped — either through a slow leak or a component failure. Recharging restores cooling only when it is done correctly and only after the leak is addressed. This guide walks you through the full process so you can decide whether to handle it yourself or book a professional service.
How an Auto AC System Works
An automotive air conditioning system is a sealed refrigerant circuit with four main components: the compressor, condenser, expansion valve (or orifice tube), and evaporator. The compressor, driven by the engine belt or an electric motor in hybrid and EV models, pressurizes refrigerant gas. The condenser releases heat to the outside air, and the expansion valve drops pressure so the evaporator can absorb heat from the cabin.
The system depends on a precise refrigerant charge. Too little charge and cooling fails. Too much charge and compressor damage can result. This is why recharging is not simply a matter of adding gas — the correct amount and the correct type must both be confirmed before any service begins.
Signs Your Auto AC Needs Recharging
A refrigerant system is sealed, so a drop in charge almost always means a leak. Watch for these warning signs before assuming a recharge is all you need:
- Air from the vents is cool but not cold, especially at idle.
- Cooling performance fades gradually over weeks or months.
- The compressor clutch cycles rapidly or not at all.
- Visible oil residue or dye around fittings, hoses, or the compressor.
- Hissing or bubbling sounds near the expansion valve or lines.
- Musty or unusual odors from the vents, sometimes linked to moisture or contamination.
If cooling is completely absent, the issue may be electrical (compressor clutch, relay, pressure switch) rather than a charge problem. Our guide on reasons for car AC not blowing cold air covers the diagnostic sequence in detail.
Auto AC Refrigerant Types
Automotive refrigerant has evolved significantly. Using the wrong type can damage the system or create safety hazards. Confirm the correct refrigerant for your vehicle before any service.
| Refrigerant | Status | Typical Vehicle Age | Service Notes |
|---|---|---|---|
| R-12 (Freon) | Phased out | Pre-1995 vehicles | Not available for new production; retrofit required. Read more on R-12 Freon. |
| R-134a | Common, gradually being replaced | 1995 to roughly 2021 | Widely supported; still available at service centers. |
| R-1234yf | Current standard | Newer vehicles | Lower global warming potential; requires specific equipment. |
DIY Recharge vs Professional Service
Retail recharge kits are widely available, but they are not a universal solution. Here is a balanced comparison to help you decide which path fits your situation.
DIY Recharge (Retail Kit)
- Convenient for a top-up on a known slow-leak system.
- Basic kits include a gauge and a trigger.
- Works for some vehicles with accessible low-side ports.
- Useful for emergency cooling until a full repair is scheduled.
Professional Service
- Recovers, evacuates, and recharges to exact specification.
- Includes leak detection with electronic and UV dye tools.
- Replaces the receiver-drier or accumulator as needed.
- Verifies vent temperature and system pressures after service.
For a system that has lost charge gradually over years, a professional service that includes leak detection is the more sensible option. Adding refrigerant without finding the leak only postpones the failure. If you want to know what a full diagnostic sequence covers, our guide on quick fixes for car AC not blowing cold air walks through it.
Tools Needed for Recharging an Auto AC System
A proper recharge — whether DIY or pro — relies on the right tools. The list below covers what each stage requires.
Basic DIY Kit
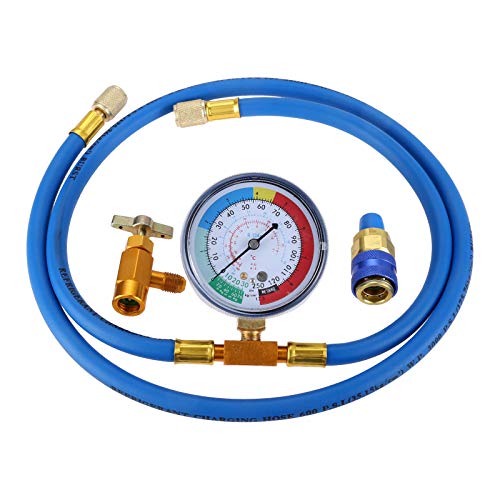
A retail recharge kit with a trigger, gauge, and hose. Suitable for a simple top-up. Ensure the kit matches your refrigerant type (R-134a or R-1234yf) and includes a low-side coupler that fits your vehicle's service port.
Manifold Gauge Set and Vacuum Pump
A manifold gauge set reads both high and low side pressures, allowing proper diagnosis. A vacuum pump removes moisture and air before recharging. This tier is the minimum for a correct service, and it is typically what a professional shop uses.
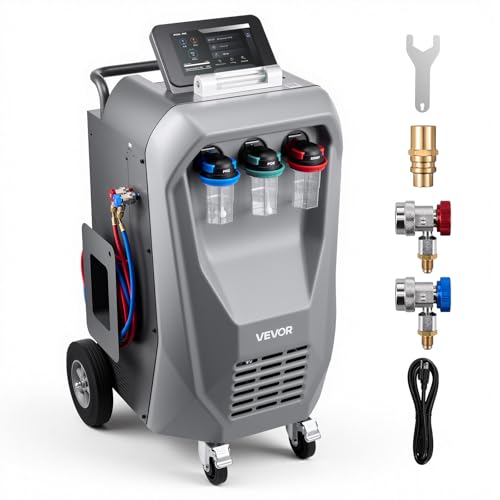
Refrigerant Recovery Machine and Leak Detector
A recovery machine captures refrigerant for reuse or proper disposal — legally required in most jurisdictions. An electronic leak detector or UV dye kit locates the leak before recharging. This tier represents a full professional-grade service setup.
- Safety glasses and nitrile gloves — refrigerant causes frostbite on contact.
- Thermometer to verify vent temperature after service.
- Shop towels and a leak-detection spray bottle.
- Owner's manual for the correct charge capacity and oil type.
Step-by-Step Recharge Process (Professional Approach)
This sequence reflects the correct order of operations for a full recharge. Skipping steps — especially leak detection and evacuation — is the most common reason recharges fail within weeks.
Diagnose the system. Confirm the AC is actually low on charge rather than suffering from a failed compressor clutch, blown fuse, or pressure switch. Check the vent temperature with the engine idling and the AC on maximum.
Locate and repair the leak. Use an electronic leak detector or UV dye. Common leak points include O-ring seals, service ports, condenser fittings, and the compressor shaft seal. Repair the leak before recharging — otherwise the new refrigerant will simply escape again.
Recover remaining refrigerant. Use a recovery machine to capture the existing charge. Never vent refrigerant to the atmosphere — it is regulated in most regions for environmental and safety reasons.
Replace the receiver-drier or accumulator. These components trap moisture and should be replaced any time the system is opened. Skipping this step introduces moisture that can form acid and damage the compressor.
Evacuate the system. Connect a vacuum pump and pull a deep vacuum for at least 30–45 minutes. This removes air and moisture. Hold the vacuum for 10–15 minutes to confirm the system is sealed.
Charge to the specified amount. Add refrigerant by weight (using a scale) or by volume per the manufacturer's specification. Overcharging reduces cooling and stresses the compressor; undercharging causes the clutch to cycle and the compressor to starve of oil.
Verify performance. Measure vent temperature with the engine idling and the AC on max. Confirm high-side and low-side pressures match the manufacturer's chart for the ambient temperature. A properly functioning system typically delivers vent temperatures well below ambient.
Document the service. Record the refrigerant amount added, the leak found, parts replaced, and vent temperature. This record is useful if a follow-up service is needed.
- Never open the high-side port while the system is running — high-pressure refrigerant can cause serious injury.
- Do not recharge a system that has been open to the atmosphere without replacing the drier and evacuating it.
- Do not use stop-leak products as a substitute for a proper leak repair — they can clog the expansion valve and the condenser.
- Never mix R-12 and R-134a refrigerants or oils.
Factors That Influence Recharge Service Outlay
The overall outlay for auto AC service is shaped by several factors. Understanding them helps you interpret a shop's estimate and compare it fairly against alternatives.
Refrigerant Type
R-1234yf refrigerant carries a higher material outlay than R-134a due to supply and handling requirements. Older R-12 systems require retrofit work, which adds labor and component complexity.
Leak Severity
A simple O-ring replacement is a small job. A leak in the evaporator core — buried inside the dashboard — requires significant labor to access and replace. The complexity of the repair dominates the overall outlay far more than the refrigerant itself.
Component Replacement
Compressor, condenser, and evaporator replacements each involve different labor. A compressor replacement requires system flushing, drier replacement, and full evacuation — a much more involved service than a routine recharge.
Shop Tier and Region
A dealership service department typically operates at a different tier than an independent shop. Regional labor rates also vary. Comparing quotes from at least two shops in your area is standard practice.
Keeping Your Auto AC System Healthy
Recharging is a corrective action. Preventive habits reduce the need for it in the first place.
- Run the AC for a few minutes every couple of weeks, even in cooler weather, to keep the compressor seal lubricated.
- Clean debris from the condenser (in front of the radiator) periodically, especially after summer road trips.
- Replace the cabin air filter on schedule — a clogged filter reduces airflow and can mimic a refrigerant issue.
- Watch for early warning signs of reduced cooling and address them before the compressor is stressed.
- Schedule an annual AC check before the hot season, when shops are less busy.
For related diagnostics, see our pages on reasons an air conditioner is not cooling and the vehicle-specific replacing AC condenser in a car guide. If you are also maintaining a home system, our preventive maintenance of an air conditioning unit overview covers the parallel homeowner tasks.
Related Guides Worth Reading
These pages complement the recharge process and cover adjacent situations that commonly appear during auto AC repair:
Frequently Asked Questions
How often does an auto AC system need recharging?
A sealed system in good condition does not lose refrigerant on a schedule. If you need a recharge more often than once every few years, there is a leak that should be located and repaired. A system that needs annual recharge is usually leaking slowly.
Can I recharge my car AC with a store-bought kit?
Retail kits are a reasonable temporary measure for a system with a known slow leak, but they do not diagnose or repair leaks. A proper recharge involves recovering old refrigerant, evacuating the system, and recharging by weight — steps most DIY kits cannot perform safely or legally.
Why does my car AC blow cold only when driving?
This is often a sign of low refrigerant combined with a slightly weak condenser fan or restricted airflow at idle. It can also indicate an overcharge or a failing compressor. Proper diagnosis involves checking both high-side and low-side pressures with manifold gauges.
How do I know which refrigerant my car uses?
Check the under-hood sticker or the owner's manual. Older vehicles (pre-1995) used R-12. Most vehicles from 1995 to roughly 2021 use R-134a. Newer vehicles increasingly use R-1234yf. Never assume — using the wrong refrigerant will damage the system.
Is it safe to recharge an auto AC system at home?
It can be safe for a simple top-up with a properly matched kit if you follow the instructions and wear eye protection. Full recharge — recovery, evacuation, and charging by weight — requires specialized equipment and training and is best left to a professional.
What is the difference between recharging and refilling an AC system?
The terms are often used interchangeably, but strictly speaking, "recharging" refers to the full service — recovering, evacuating, and adding refrigerant — while "refilling" or "topping up" usually refers to adding refrigerant to a system that is already partially charged. See refilling an AC system for the distinction on home systems.
Disclaimer
Some of the content on this site uses AI assistance. Information is provided for educational purposes only. We are not responsible for any losses resulting from the use of this information. By using this site, you waive any right to bring legal claims against us arising from your use of the information provided. If you do not agree, please do not use this site. Read the full disclaimer.