Vertical Sliding Window Air Conditioner Kit: Complete Guide
Everything you need to know about selecting, installing, and sealing a vertical sliding window AC kit for a secure and efficient fit
START LEARNINGWhy this guide matters: A vertical sliding window has a different geometry than a standard double-hung window. A dedicated kit bridges the gap between the AC unit and the sash, blocking outside air, insects, and water while keeping the unit stable. This guide walks you through every stage so you can choose and install with confidence.
What Is a Vertical Sliding Window Air Conditioner Kit?
A vertical sliding window air conditioner kit is a set of components designed to mount a window AC unit into a window that opens by sliding the sash up and down rather than side to side. Unlike a standard horizontal sliding window, a vertical window leaves an opening in the shape of a tall rectangle, so the AC unit must be supported and sealed differently. The kit typically combines a support bracket, a flexible or rigid filler panel, weather sealing, and mounting hardware into one package.
The primary job of the kit is to create a stable platform for the unit while closing the remaining gap above or beside the AC. Without a kit, many vertical windows cannot hold a standard window AC safely, and the unit may tilt, vibrate, or allow air and moisture to leak. If you are still comparing window types, our overview of vertical air conditioners explains how these systems differ from other configurations.
What Is Typically Included in the Kit?
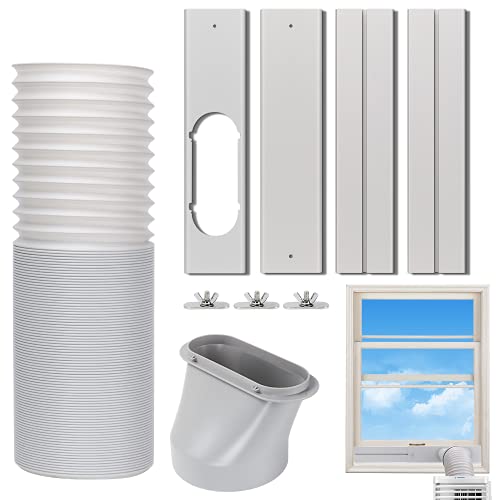
Kits vary by manufacturer, but most vertical sliding window AC kits share a common set of parts. Understanding each component helps you evaluate whether a kit is complete or whether you need to purchase add-ons separately.
- Support bracket or mounting frame — carries the weight of the AC unit and anchors it to the window sill or wall.
- Filler panel or sash seal — fills the vertical gap that remains once the AC is seated, often made from insulated plastic or foam.
- Weather stripping and foam tape — blocks drafts, dust, and insects around the perimeter.
- Mounting hardware — screws, bolts, and sometimes a safety lock or angle bracket.
- Instruction sheet — outlines assembly order and window-specific adjustments.
Some kits are sold as universal packages, while others are matched to a specific AC model. If you prefer a one-size-fits-many approach, a universal window AC support bracket can be combined with a separate seal. For a full installation package, a dedicated vertical window air conditioner installation kit is usually the more complete option.
Why Use a Vertical Sliding Window AC Kit?
Installing a window AC in a vertical sliding window without a kit is possible in some cases, but it is rarely ideal. A proper kit addresses several practical problems at once.
Safety and Stability
A window AC unit is heavy, and a vertical sash does not naturally support the unit's weight the way a horizontal window can. A bracket transfers the load to the sill and frame, reducing the risk of the unit tipping or falling. This is especially important in upper-floor apartments and rental units.
Air and Water Sealing
The gap above a vertically mounted AC is large. A filler panel and weather stripping close that gap, preventing conditioned air from escaping and preventing rain, humidity, and insects from entering. This improves comfort and helps the unit run more efficiently, which matters if you are also following general ceiling fan and AC usage tips to reduce strain on the system.
Reduced Vibration and Noise
A rigid bracket and snug seal reduce rattling and vibration, which in turn lowers noise inside the room. Solid mounting also protects the compressor from unnecessary movement.
Cleaner Installation
Kits produce a neater appearance than improvised foam and tape. A finished installation is easier to remove at the end of the season and easier to reinstall the following year.
Types of Vertical Sliding Window AC Kits
Not all kits are built the same way. The right choice depends on your window frame, the AC unit you own, and whether you rent or own the property.
| Kit Type | Best For | Key Traits |
|---|---|---|
| Bracket-only kit | Renters and simple installs | Lightweight, easy to remove, requires separate sealing |
| Bracket + filler panel kit | Most vertical windows | Balanced coverage of support and sealing |
| Full installation kit | Permanent or seasonal installs | Includes hardware, insulation, and weather stripping |
| Universal adjustable kit | Multiple window sizes | Adjustable width and height, flexible fit |
Entry-level kits usually cover the essentials, while mid-range and high-end tier kits add thicker insulation, corrosion-resistant hardware, and more precise adjustability. If your goal is a permanent installation in a home you own, a full kit is often the more dependable long-term investment.
Checking Compatibility With Your Window and AC Unit
Before choosing a kit, confirm three measurements: the width of the window opening, the height of the AC unit, and the depth of the sill. The kit must be wide enough to span the opening and tall enough to close the gap above the unit. Also check the weight rating of the bracket against the weight of your AC.
Window frame material matters as well. Vinyl and aluminum frames accept most brackets with standard screws, while wood frames may require pilot holes. If your window is unusually narrow or tall, a very small air conditioner window may be the better starting point before you shop for a kit. For casement-style windows, the installation approach is entirely different, and our guide on venting a portable air conditioner through a casement window covers that alternative.
Step-by-Step Installation Overview
The exact sequence depends on the kit, but most vertical sliding window AC installations follow a similar path. Always read the manufacturer's instructions first, and have a second person help lift the unit.
- Measure and dry-fit. Open the window, measure the opening, and test the bracket position before attaching anything.
- Mount the support bracket. Secure the bracket to the sill or frame using the provided hardware. Confirm it is level.
- Seat the AC unit. With help, lift the unit onto the bracket and slide it into position. Many units have a slight backward tilt for drainage.
- Install the filler panel. Slide the panel into the gap above the unit and lock it into place according to the kit instructions.
- Apply weather sealing. Add foam tape or weather stripping around the perimeter to close small gaps.
- Test stability and drainage. Gently push the unit to confirm it does not move, and verify that condensation drains away from the window.
For a more detailed walkthrough of the parts and fitting process, see our guide on the vertical window air conditioner installation kit. If you are installing a portable unit instead, the approach changes and you may need a universal window seal for portable air conditioners.
Sealing and Insulating the Installation
Sealing is where many installations fall short. Even a well-mounted unit can leak air if the filler panel and perimeter are not properly insulated. Use closed-cell foam tape rather than open-cell foam, because closed-cell foam resists moisture. Pay attention to the corners where the panel meets the window frame, as these are common leak points.
If the window sash can be locked, lock it after installation to prevent accidental opening. For windows that cannot be locked, a simple sash lock or wedge can add security. Proper sealing also reduces the load on the AC, which pairs well with broader efficiency habits such as those in our guide to reducing AC electricity usage.
Maintenance and Seasonal Care
A vertical sliding window AC kit is low-maintenance, but a few habits extend its life and keep performance steady.
- Inspect the bracket and screws at the start of each cooling season for loosening or rust.
- Replace worn weather stripping when it loses elasticity or begins to peel.
- Clean the filler panel and surrounding frame to prevent dust buildup.
- Remove the unit and store the kit indoors during the off-season to avoid weather damage.
- Check that the window sill has not absorbed moisture, which can weaken wood over time.
These small steps are part of a broader routine; our seasonal AC checklist covers the full set of tasks for keeping a window unit in good condition.
Common Installation Mistakes to Avoid
Most problems with vertical window AC kits come from a handful of avoidable errors.
- Skipping the bracket. Relying on the window sash alone can lead to instability and, in the worst case, the unit falling.
- Ignoring the tilt. A unit that tilts the wrong way can drip condensation into the room instead of outside.
- Under-sealing. Leaving gaps around the filler panel defeats much of the cooling effort.
- Over-tightening screws. This can crack vinyl frames or strip wood.
- Using the wrong kit size. A kit that is too narrow or too short will not seal or support correctly.
If you notice water appearing inside rather than outside, our guide on water coming out of air conditioner vents can help you trace the cause.
Kit vs. Alternative Cooling Options
A vertical sliding window AC kit makes sense when you already own a window AC and have a vertical window. If you are starting fresh, it is worth comparing other options. A portable air conditioner avoids window mounting entirely, though it needs a venting path. A through-the-wall AC is a permanent solution that requires wall modification. A ductless mini-split offers quiet, efficient cooling without a window footprint but involves professional installation.
For many renters and apartment dwellers, the vertical window kit remains the most practical balance of effort, portability, and cooling performance. If your window is horizontal rather than vertical, a U-shaped AC unit is a popular modern alternative that simplifies the seal.
Frequently Asked Questions
Do I need a special kit for a vertical sliding window?
Yes, in most cases. Vertical sliding windows require a bracket and filler panel designed for a tall opening. A standard horizontal window kit will not fit or seal correctly.
Can I install a window AC in a vertical window without a kit?
It is possible in some windows, but it is not recommended. Without a bracket and seal, the unit is less stable and more likely to leak air, moisture, or insects into the room.
How do I know which kit size to choose?
Measure the window opening width, the height of your AC unit, and the sill depth. Match those measurements to the kit's stated range. Also confirm the bracket's weight rating covers your AC unit.
Will a vertical window AC kit work with any AC brand?
Many kits are universal or adjustable, but some are model-specific. Check the kit description for compatibility notes and compare dimensions with your unit before purchasing.
How often should the kit be replaced?
Brackets and hardware can last for many seasons with care. Weather stripping and foam seals typically need replacement every one to three years depending on sun exposure and climate.
Can I use the kit in a rental apartment?
Usually yes, especially with bracket-only or removable kits that do not require permanent modification. Check your lease and confirm the installation does not damage the window frame.
Ready to Choose the Right Kit?
Review the recommended vertical sliding window air conditioner kits below and compare features, compatibility, and kit contents before you decide.
VIEW RECOMMENDED KITS