Vertical Window Air Conditioner Installation Kit: Complete Guide
Everything you need to know about choosing, installing, and sealing a vertical sliding window AC kit — from bracket support and panel sizing to step-by-step setup and troubleshooting.
Why this guide matters: Vertical sliding windows are common in modern homes, yet most window AC units are engineered for traditional double-hung openings. A dedicated vertical window air conditioner installation kit bridges that gap — securing the unit, sealing the opening, and protecting your window frame. This guide walks you through compatibility, components, installation, and long-term care so you can buy with confidence.
What Is a Vertical Window AC Installation Kit?
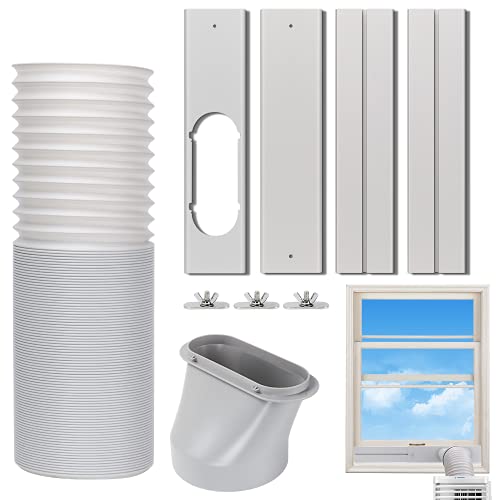
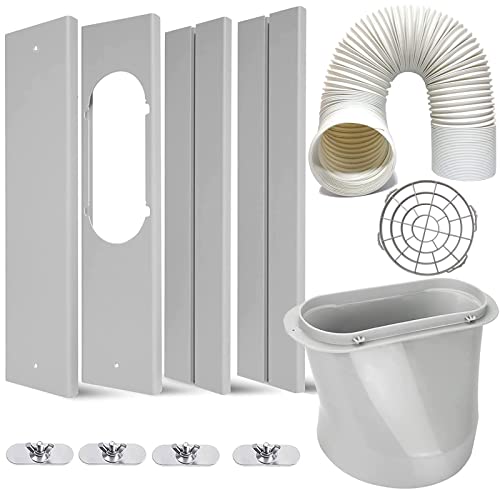
A vertical window air conditioner installation kit is a coordinated set of mounting and sealing hardware designed to seat a window AC unit into a vertical sliding window opening. Unlike standard side panels that expand horizontally, vertical kits provide components that expand upward and downward, matching the tall, narrow geometry of a sliding window. The kit typically includes a reinforced top and bottom filler panel, accordion-style side seals, foam weatherstripping, mounting screws, and often an external support bracket.
These kits solve three problems at once: they stabilize the unit against the vertical frame, they block air and water intrusion around the opening, and they distribute the unit's weight so the window sash is not stressed. If you are still mapping out which cooling format suits your room, our overview of vertical air conditioners is a useful companion read before you commit to a kit.
Core Components You Should Expect
- Top and bottom filler panels — adjustable plates that close the vertical gap above and below the unit.
- Accordion side seals — flexible panels that compress against the window jamb to block drafts.
- Foam weatherstripping — closed-cell tape applied along frame edges and sash contact points.
- Support bracket — an L-shaped or triangular external bracket that carries the unit's weight.
- Mounting hardware — screws, anchors, and sometimes a security lock to prevent movement.
- Drain kit (optional) — a hose adapter or splash guard for condensate management.
Compatibility: Will a Vertical Kit Fit Your Window and AC?
Before ordering any kit, confirm two things: the window type and the AC unit's dimensions. Vertical kits are built for single-hung, double-hung, and sliding windows that open vertically. Casement windows — which crank outward — need a different bracket solution entirely. If your window is a slider, our dedicated guide on the vertical sliding window air conditioner kit explains the specific panel geometry involved.
Window Type Quick Check
- Vertical sliding window: The sash moves up and down. Standard vertical kits fit here.
- Double-hung window: Both sashes move. Most vertical kits work, provided the lower sash can be secured.
- Casement window: Crank-out sash. Standard vertical kits do not apply; look for casement-rated brackets.
- Awning window: Top-hinged. Generally not compatible with vertical AC kits.
AC Unit Dimension Checklist
- Measure the unit's width, height, and depth, including the rear grille.
- Confirm the kit's maximum opening height and width exceed your unit's dimensions by at least 1 inch.
- Check the kit's weight rating against the AC's shipping weight plus a 20% safety margin.
- Verify the kit's panel depth matches your wall thickness or window reveal.
Editor's note: Many buyers assume a universal window seal will cover a vertical opening. In practice, vertical openings need taller filler panels, not just wider side seals. If you already own a portable unit and are working out venting, the universal window seal for portable air conditioner is a separate product category — do not substitute it for a vertical AC mounting kit.
Vertical Window AC Kit Tiers Compared
Vertical kits are not one-size-fits-all. The table below groups them by market tier so you can match the kit's build quality and feature set to your unit's weight and your climate. Descriptors reflect relative positioning, not absolute figures.
| Tier | Best For | Typical Build | Weight Range | Key Features |
|---|---|---|---|---|
| Entry-level | Small units up to 8,000 BTU; light-duty seasonal use | Basic stamped panels, foam seals, simple bracket | Up to ~85 lbs | Top and bottom fillers, basic weatherstripping |
| Mid-range | 8,000–12,000 BTU units; year-round installation | Reinforced steel bracket, denser foam, adjustable panels | ~100–150 lbs | Anti-vibration pads, improved sealing, security lock |
| Premium | 12,000–18,000 BTU units; harsh weather climates | Heavy-gauge steel, weather-resistant coating, precision fit | ~150–200 lbs | Rust-proof finish, insulated panels, drain adapter |
| Professional-grade | Large units 18,000+ BTU; multi-story and commercial use | Welded bracket, commercial hardware, modular frame | 200 lbs+ | Engineered load rating, tamper-resistant fasteners |
Mid-range kits usually offer a smoother installation experience than entry-level kits because the panels telescope more precisely and the bracket hardware is less prone to stripping. Premium and professional-grade kits justify their position through corrosion resistance and load certification — both important if the unit faces wind-driven rain or sits on an upper floor.
Step-by-Step Installation Process
The sequence below assumes you have already confirmed compatibility and have a helper available. Window AC units above 8,000 BTU are heavy enough to require two people during placement.
-
Measure and Dry-Fit the Opening
Record the vertical opening height, width, and sill depth. Dry-fit the top and bottom filler panels before mounting anything. The panels should overlap the window frame by at least 1 inch on each side without forcing the sash.
-
Install the Support Bracket
Mount the external bracket to the exterior wall or window frame using the supplied anchors. Confirm the bracket is level with a spirit level. For upper-floor installations, check local building guidance on bracket anchoring before drilling.
-
Apply Foam Weatherstripping
Run closed-cell foam tape along the bracket seat, the window sill, and the vertical jamb contact points. This step prevents vibration noise and blocks drafts before the unit is seated.
-
Seat the AC Unit
With a helper, lift the unit onto the bracket and slide it into the opening. The unit should sit with a slight backward tilt (about 3 degrees) so condensate drains outward. Lock the unit to the bracket using the supplied screws.
-
Install the Filler Panels
Slide the top and bottom filler panels into the kit's tracks. Expand them until they contact the window frame, then secure with the provided clips or screws. The panels should be snug but not bowed.
-
Insert Accordion Side Seals
Compress the accordion seals into the vertical gaps between the unit and the window jamb. Trim excess length with a utility knife. Confirm no daylight is visible through the edges.
-
Close and Lock the Sash
Lower the window sash until it rests on the kit's top filler panel. Engage the window lock. If the sash does not meet the filler panel flush, add a foam shim strip to close the gap.
-
Final Seal and Test
Run a bead of removable weather sealant along any remaining seams. Wait for the sealant to cure, then run the AC for 15 minutes and check for air leaks, vibration, and proper condensate drainage.
Safety reminder: Never rely on the window sash alone to hold the unit. The bracket and kit hardware carry the load. If you are installing above the first floor, confirm your bracket is rated for the unit's weight and anchored into structural material, not just siding.
Sealing and Weatherproofing Tips
A well-sealed vertical installation keeps cooled air inside and moisture outside. Poor sealing is the most common reason homeowners report higher energy use after a DIY install.
Use Closed-Cell Foam
Open-cell foam absorbs water and degrades quickly. Closed-cell weatherstripping resists moisture and maintains its seal through seasonal expansion.
Seal the Sill First
The window sill is the most overlooked leak point. Apply a continuous foam strip along the sill before the bracket goes down.
Check the Top Filler
The top filler panel meets the sash under pressure. Add a thin foam shim if the sash does not compress the panel evenly.
Drain Path Matters
Confirm the unit tilts slightly outward. If condensate pools inside the window, adjust the bracket shims rather than forcing the seal.
Inspect Monthly
Foam seals compress over time. Check for drafts once a month during cooling season and replace compressed strips as needed.
Support the Weight
If you notice the unit sagging after a few weeks, the bracket is under-rated. Upgrade to a heavier-duty bracket rather than adding shims.
For households dealing with air quality alongside cooling, sealing the window opening pairs well with broader ventilation maintenance. Our guide on ventilation systems explains how window openings interact with whole-home airflow.
Common Installation Problems and Fixes
The Kit Does Not Fit the Window Opening
Most fit failures trace back to measuring the AC unit instead of the window opening. Measure the clear opening between the jamb stops, not the glass width. If the opening is taller than the kit's maximum panel extension, you need a taller kit or a different mounting approach.
The Unit Vibrates or Rattles
Vibration usually means the bracket is not level or the foam pads are missing at the contact points. Re-level the bracket, add anti-vibration pads under the unit's feet, and confirm the side seals are compressed evenly.
Air Leaks Around the Panels
Gaps at the top and bottom fillers are common when the panels are not extended fully. Extend the panels until they contact the frame, then add a foam shim strip if the gap exceeds a quarter inch.
Water Pools on the Sill
Pooling water indicates the unit is tilted inward or the drain path is blocked. Check the bracket tilt first, then inspect the drain pan and hose for debris. If the unit has no drain hose, a splash guard can redirect condensate.
The Window Sash Will Not Close Fully
The top filler panel may be too tall for the sash travel. Trim the panel to the correct height or switch to a kit with a lower-profile top plate. Never force the sash — doing so can crack the glass or bend the frame.
If your unit is installed but not cooling properly after setup, the issue may be unrelated to the kit. Our troubleshooting guide on AC not cooling solutions covers refrigerant, filter, and thermostat causes.
Maintenance and Seasonal Care
Vertical kits are low-maintenance but not zero-maintenance. At the start of each cooling season, inspect the bracket for rust or loose fasteners, replace compressed foam seals, and clean the AC filter. At the end of the season, remove the unit if the kit is not rated for winter exposure, or cover the exterior bracket to prevent ice damage.
- Check bracket screws every 60 days during active use.
- Replace foam weatherstripping annually — it compresses permanently over time.
- Clean the drain path before the first hot week of the season.
- Inspect the accordion seals for cracks or UV degradation.
- Re-level the bracket if you notice new vibration or noise.
Frequently Asked Questions
What is a vertical window air conditioner installation kit?
A vertical window air conditioner installation kit is a bundle of hardware and sealing components designed to mount a window AC unit in a vertical sliding or casement window. It typically includes support brackets, accordion side panels, foam seals, mounting screws, and sometimes a reinforced frame that keeps the unit secure while blocking air leaks around the vertical opening.
Can any window air conditioner be installed in a vertical window?
Not every unit is suitable. Window air conditioners are engineered for either double-hung (vertical movement) or sliding (horizontal movement) windows. A vertical window installation kit adapts the unit's mounting frame and side panels to a vertical opening, but the AC itself must be compatible with the kit's dimensions and weight rating. Always check the kit's compatibility list before purchase.
Do I need a support bracket for a vertical window AC installation?
Yes, a support bracket is strongly recommended, especially for units above 8,000 BTU. Vertical windows typically lack the sill depth of double-hung windows, so an external or internal bracket carries the unit's weight and prevents sagging, vibration, and potential fall hazards. Many vertical kits include a bracket, but confirm the weight rating matches your AC.
How do I seal gaps around a vertical window AC kit?
Use the foam weatherstripping and accordion panels included in the kit to fill the vertical opening. Apply closed-cell foam tape along the frame edges, insert the side panels, and seal any remaining gaps with removable weather sealant or foam strips. Proper sealing prevents cooled air from escaping and keeps insects and rainwater out.
Can I install a vertical window AC kit in a casement window?
Casement windows crank outward and do not provide a stable vertical channel, so standard vertical kits are not designed for them. Specialized casement window AC brackets and kits exist, but they require the sash to be fixed or removed. If you have a casement window, look for a kit explicitly rated for casement installations rather than a standard vertical sliding window kit.
How much weight can a vertical window AC bracket hold?
Weight capacity varies by tier. Entry-level brackets often support up to around 85 lbs, mid-range brackets typically handle 100 to 150 lbs, and heavy-duty or professional-grade brackets can support 200 lbs or more. Always choose a bracket rated above your AC unit's shipping weight plus a safety margin.
Related Guides Worth Reading
If you are comparing mounting options before finalizing your setup, these resources cover adjacent topics that often come up during the buying process:
- Universal window AC support bracket — a cross-compatible bracket option for many window types.
- Very small window air conditioner — sizing considerations for compact vertical windows.
- Types of air conditioning units — a broader look at cooling formats before you commit to window mounting.
Ready to Explore Vertical Window AC Kits?
Browse curated options that match your window type and unit weight — then install with confidence.
View Kit Options