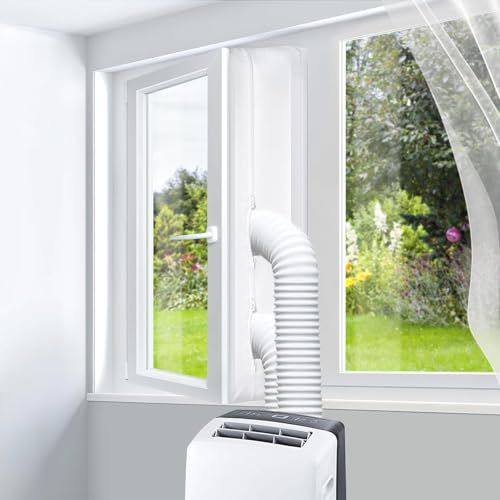
Installing a Portable AC Unit in a Casement Window
A practical, safety-first guide to venting a portable air conditioner through a crank-out window — including the right kits, sealing methods, and mistakes to avoid.
Why this guide matters: Casement windows are common in modern homes, but they are not natively compatible with most portable AC vent kits. A standard horizontal sliding kit will not seal around a crank-out sash. If you are shopping for a portable unit and wondering whether your window type is a dealbreaker, the short answer is no — you simply need the correct casement window vent kit and a careful sealing approach.
Understanding the Casement Window Challenge
Casement windows open outward on a vertical hinge, with the sash swinging away from the frame using a crank mechanism. This creates a fundamentally different sealing geometry than a double-hung or sliding window, where the sash moves within a fixed track and offers a flat surface for a vent panel.
The core problem is threefold:
- The opening is not flat. The swinging sash creates an angled gap that a rigid horizontal panel cannot bridge.
- The sash can move. A crank-out window is not locked in place by a track, so any vent hardware must not interfere with the crank arm or allow the sash to swing shut on the exhaust hose.
- Air leakage is significant. Unless the gap around the hose is sealed properly, hot outdoor air will re-enter the room, defeating the purpose of the portable unit.
This is why a dedicated casement window vent kit is essential. Standard kits sold with most portable ACs assume a sliding or double-hung window. If you are still comparing window types for cooling, our guide on installing a portable air conditioner in a crank-out window covers similar swing-window mechanics, and our broader resource on cooling options when you have no suitable window may help if your casement setup proves unsuitable.
Two Proven Installation Methods
There are two established approaches for venting a portable AC through a casement window. Both work; the right choice depends on your window size, how permanent you want the setup to be, and whether you need to open and close the window regularly.
Method 1: Fabric Sleeve / Zippered Seal Kit
A fabric sleeve with a zippered opening fits around the crank-out sash and the exhaust hose passes through the zipper opening. The fabric is secured to the window frame with adhesive strips or hook-and-loop fasteners.
Best for: Renters, temporary setups, and windows where drilling or permanent hardware is not allowed.
Trade-off: Less rigid than a panel system, so sealing quality depends on careful installation and periodic re-taping.
Method 2: Rigid Acrylic or Plastic Panel Kit
A pre-cut or cut-to-size rigid panel fits into the window opening, with a circular hose connector mounted in the panel. The panel is secured to the frame or sash, and the hose attaches to the connector.
Best for: Homeowners who want a sturdier, more permanent seal and a cleaner finished look.
Trade-off: Requires measuring and sometimes cutting the panel; the window typically cannot be fully closed while the panel is installed.
Tools and Materials Checklist
Before starting, gather the following. Most items are inexpensive and reusable for future seasons.
- Casement window vent kit — fabric sleeve or rigid panel type, sized for your window and hose diameter (commonly 5–6 inches).
- Measuring tape — to confirm window opening dimensions and hose diameter.
- Closed-cell foam weatherstripping — for reinforcing gaps around the panel or sleeve.
- Removable caulk or sealant tape — for temporary, residue-free sealing.
- Utility knife or scissors — for trimming panels or fabric if needed.
- Masking tape — for marking cut lines and temporary holds.
- Exhaust hose and hose adapter — confirm the hose is long enough to reach the window without sharp bends.
- Insulation wrap (optional) — for wrapping the exposed hose to reduce heat gain.
- Window lock or sash brace — to prevent the crank-out sash from swinging shut on the hose.
If your hose run is unusually long, our guide on long exhaust hoses for portable air conditioners explains how length affects performance and what to watch for.
Step-by-Step Installation Process
The following sequence applies to both methods, with notes where they diverge.
Step 1: Measure the Window and Hose
Measure the full height and width of the casement opening, and confirm the diameter of your exhaust hose. Casement vent kits are usually sized by hose diameter and adjustable within a window size range. Write down the measurements before ordering or cutting anything.
Step 2: Prepare the Window Frame
Clean the frame and sash with a damp cloth and let them dry completely. Dust and grit prevent adhesive strips and weatherstripping from bonding properly. Inspect the crank mechanism and hinge for smooth operation.
Step 3: Install the Vent Kit
For a fabric sleeve kit: Attach the sleeve to the window frame according to the manufacturer's instructions, typically with adhesive strips along the frame and hook-and-loop straps around the sash. Open the zipper only enough for the hose to pass through.
For a rigid panel kit: Insert the panel into the opening and secure it to the frame or sash using the provided brackets or adhesive strips. If cutting is required, mark the panel against the opening, cut slightly oversized, and test-fit before final securing.
Step 4: Connect the Exhaust Hose
Attach the hose to the portable unit's exhaust outlet, then route it to the window connector. Keep the hose as straight and short as possible. Avoid sharp bends, kinks, or upward loops, which trap hot air and reduce exhaust efficiency.
Step 5: Seal Remaining Gaps
Apply closed-cell foam weatherstripping to any gaps between the panel or sleeve and the frame. For irregular gaps, use removable caulk. Check the perimeter by running your hand along the seal; you should not feel warm outdoor air entering.
Step 6: Secure the Sash
Because a casement sash can swing freely, secure it so it cannot close against the hose. Use the window's lock, a sash brace, or a tension strap. Never rely on friction alone; a gust of wind or an accidental nudge can damage the hose or the window.
Step 7: Test and Adjust
Turn on the unit and run it for 15–20 minutes. Check that the hose is expelling warm air outdoors, that the seal is holding, and that the window sash is stable. Adjust weatherstripping or hose routing as needed.
Sealing and Insulation Best Practices
Sealing quality is the single biggest factor in how well a portable AC performs in a casement window setup. Poor sealing lets hot air back in and forces the compressor to work harder.
- Seal the full perimeter, not just the hose opening. Hot air enters through any gap between the panel or sleeve and the frame.
- Use closed-cell foam, not open-cell foam. Closed-cell foam resists moisture and holds its shape better around window hardware.
- Wrap the exposed hose. Insulation wrap on the hose reduces heat gain before the air reaches the window.
- Check the seal after temperature swings. Adhesive strips can loosen in heat; inspect and re-press them monthly during cooling season.
- Do not block the intake. Keep the unit's air intake clear and at least 12–18 inches from walls or furniture.
For a deeper look at how portable units compare with other window solutions, our guide on the most efficient dual-hose portable air conditioners explains why dual-hose designs often seal and cool more effectively than single-hose models.
Common Mistakes to Avoid
| Mistake | Why It Hurts | Better Approach |
|---|---|---|
| Using a sliding-window kit on a casement window | The panel cannot sit flush; the seal fails and the sash may force the hose | Use a casement-specific fabric sleeve or rigid panel kit |
| Leaving large gaps around the hose | Hot outdoor air re-enters, reducing cooling and raising energy use | Seal with closed-cell foam and removable caulk |
| Letting the sash swing freely | The sash can crush the hose or damage the window hardware | Lock the sash or use a brace to hold it in position |
| Kinking or looping the exhaust hose | Traps hot air and reduces exhaust flow | Keep the hose short, straight, and gently sloped |
| Skipping insulation on the hose | Heat gain reduces cooling efficiency | Wrap the exposed hose with insulation wrap |
If you are still deciding between a portable unit and other options, our overview of portable air conditioners and our guide to selecting a portable AC for your situation can help frame the comparison.
Maintenance and Seasonal Care
A casement window setup requires slightly more maintenance than a standard sliding-window installation because the seal is more exposed to movement and weather.
- Inspect the seal monthly. Re-press adhesive strips and replace weatherstripping if it compresses or peels.
- Clean the hose connector. Dust and lint can accumulate at the window connector and restrict airflow.
- Check the sash lock and brace. Confirm the sash cannot move against the hose, especially after storms.
- Remove and store the kit at season's end. Clean fabric sleeves according to the manufacturer's instructions and store rigid panels flat.
- Service the portable unit. Clean or replace the air filter regularly and inspect the condenser coils; our HVAC maintenance guide covers general upkeep practices that apply to portable units as well.
If you notice the unit running constantly without reaching the set temperature, the issue may be the seal rather than the unit itself. Re-check the window perimeter before assuming the appliance is failing. For broader troubleshooting, our guide to AC units that are not cooling walks through diagnostic steps.
Ready to Choose the Right Portable Unit?
Compare venting options, hose configurations, and window compatibility before you commit.
Explore Portable AC OptionsFrequently Asked Questions
Can you install a portable AC in a casement window?
Yes. A portable AC can be vented through a casement window using a casement-specific vent kit, either a fabric sleeve with a zippered hose opening or a rigid panel with a hose connector. Standard sliding-window kits will not seal properly on a crank-out sash.
What type of vent kit works with a casement window?
A casement window vent kit is required. Fabric sleeve kits wrap around the swinging sash and secure with adhesive strips, while rigid acrylic or plastic panel kits fit into the opening and hold a circular hose connector. Both are designed specifically for crank-out windows.
How do I seal gaps around the exhaust hose in a casement window?
Use the sealing panel or fabric sleeve included in the casement vent kit, then reinforce any remaining gaps with closed-cell foam weatherstripping or removable caulk. Check the full perimeter, not just the hose opening, and re-inspect the seal monthly during cooling season.
Can I use a standard sliding window kit on a casement window?
No. Standard sliding window kits rely on a flat, tracked sash profile. A casement window swings outward on a vertical hinge, so the panel will not sit flush, the seal will fail, and the sash may force the hose against the frame.
Do I need to secure the window sash during operation?
Yes. Because a casement sash can swing freely, secure it with the window lock or a sash brace so it cannot close against the exhaust hose. Never rely on friction alone.
Related Cooling and Installation Guides
If your casement setup proves unsuitable for a portable unit, consider a through-the-wall installation or a ductless system. Our guides on installing a through-the-wall air conditioner and installing a mini-split AC system cover alternatives that do not depend on window sash geometry. For homes where window access is genuinely limited, our overview of low-profile air conditioners may also be useful.
Before committing to any installation, confirm local electrical requirements and, where applicable, permit rules. Our general AC installation guide covers the pre-installation checks that apply across unit types.