Mounting Bracket for Mini Split Condensing Unit
Everything you need to know about selecting, installing, and maintaining a secure mounting bracket for your mini split outdoor unit — from bracket types and load ratings to wall preparation and long-term durability.
What You Will Find on This Page
- Why the Right Mounting Bracket Matters
- Types of Mounting Brackets for Condensing Units
- Tier Comparison: Entry-Level to Professional-Grade
- How to Select the Right Bracket
- Matching Brackets to Wall Materials
- Installation Step by Step
- Vibration, Noise, and Weather Protection
- Long-Term Maintenance and Inspection
- Frequently Asked Questions
Why the Right Mounting Bracket Matters
A mini split condensing unit is the outdoor half of your ductless mini split system, and it carries the compressor — the heaviest and most vibration-prone component in the entire system. The mounting bracket is the only thing standing between that vibrating mass and gravity. It is not a cosmetic accessory; it is a structural interface between your equipment and your building.
An improperly selected or installed bracket can lead to several problems. Excessive vibration shortens compressor life and loosens refrigerant connections. Poor drainage causes water pooling and corrosion at the base of the unit. A bracket that cannot carry the load may deflect over time, stressing the refrigerant line set and causing leaks at the flare fittings. In extreme cases, bracket failure can drop the unit entirely.
The right bracket does four things: it supports the full operating weight with a safety margin, it isolates vibration from the wall or ground, it keeps the unit level and at the correct height for drainage and airflow, and it resists corrosion for the life of the equipment. Every decision in this guide flows from those four requirements.
Types of Mounting Brackets for Condensing Units
There are two broad families of mounting solutions for mini split outdoor units: wall-mounted brackets and ground-mounted stands or pads. Each suits a different site condition, and some installations benefit from a hybrid approach.
Wall-Mounted Brackets
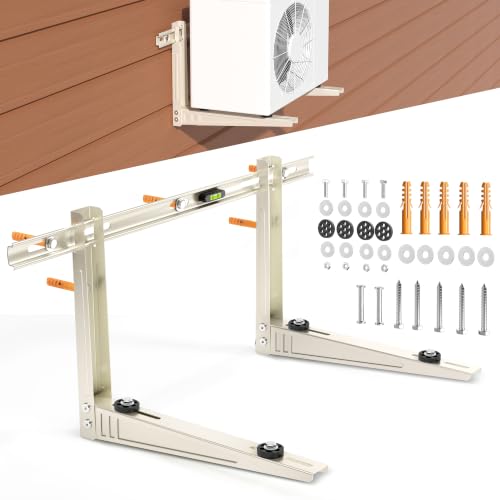
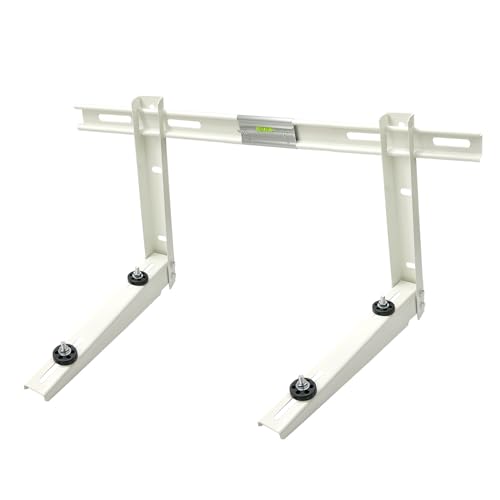
A mini split wall bracket is a pair of L-shaped or triangular steel arms that bolt to the exterior wall and extend outward, with the condensing unit resting on top. This is the most common solution in urban and suburban homes where ground space is limited or where the unit needs to sit above snow line and above pedestrian traffic.
Wall brackets are typically fabricated from galvanized steel or stainless steel and are available in folding and fixed designs. Folding brackets simplify transport and allow the arms to be adjusted during installation. Fixed brackets are simpler and often stiffer.
Ground-Mounted Stands and Pads
A mini split stand is a free-standing steel or aluminum frame that sits on a concrete pad or other hard surface, raising the unit above grade. A mini split pad is the base surface itself — precast concrete, composite, or rubber — that the stand rests on. Ground mounting is the preferred approach when a suitable wall is not available, when the wall is of lightweight construction, or when service access from the ground is desired.
Hybrid and Specialty Solutions
Some installations use wall brackets combined with a ground stand for extra support on tall or exposed walls. Others use ceiling-hung brackets in commercial settings, or roof-mounted curb systems for flat-roof buildings. For homeowners, the wall bracket versus ground stand decision usually comes down to available space and wall suitability.
| Bracket Type | Best For | Key Advantage | Watch Out For |
|---|---|---|---|
| Folding wall bracket | Retrofit installs, tight access | Arms fold for handling and adjustment | Hinge points must be inspected over time |
| Fixed wall bracket | New installs on solid masonry | Maximum rigidity, fewer moving parts | Requires precise hole spacing |
| Ground stand (raised) | Snow regions, service access | Keeps unit clear of debris and water | Needs a level, stable pad beneath |
| Low-profile ground stand | Mild climates, fenced enclosures | Discreet appearance, simple install | Check clearance for drainage and airflow |
| Heavy-duty commercial bracket | Multi-unit or large-capacity systems | High load rating, reinforced construction | Requires structural assessment of wall |
Tier Comparison: Entry-Level to Professional-Grade
Brackets are not all built to the same standard. The tier you choose should reflect the size of your unit, your climate exposure, and how long you expect the installation to last. The table below uses neutral market-tier descriptors rather than numerical figures, so it remains useful regardless of where you shop.
| Tier | Typical Construction | Best For | Relative Durability |
|---|---|---|---|
| Entry-level | Galvanized steel, basic powder coat, simple rubber pads | Small-capacity units in sheltered locations | Adequate for mild conditions; inspect annually |
| Mid-range | Heavier gauge steel, thicker coating, anti-vibration isolators | Most residential installations in mixed climates | Solid choice for the tier; good long-term performance |
| Premium | High-grade steel, multi-layer finish, enhanced damping | Larger units, exposed walls, coastal proximity | Strong corrosion resistance and vibration control |
| Professional-grade | Stainless steel or hot-dip galvanized, engineered load rating | Multi-unit arrays, commercial rooftops, harsh environments | Long-term investment with minimal maintenance |
The practical takeaway: a mid-range bracket is the sensible default for a typical single-zone residential system. Step up to premium or professional-grade when the wall is exposed to prevailing weather, when the unit is large, or when the installation is difficult to service later. Entry-level brackets can work well for small units in protected locations, but they should be inspected more often.
Rule of thumb: Choose a bracket rated comfortably above the combined weight of the condensing unit, the refrigerant charge, and any accessories. A safety margin protects you against dynamic loads during high wind and compressor start-up.
How to Select the Right Bracket
Selecting a bracket is a short checklist, but each item matters. Work through these criteria before you order anything.
1. Unit Weight and Dimensions
Look up the operating weight of your outdoor unit in the manufacturer's specification sheet — not the shipping weight, which includes packaging and sometimes a pre-charged line set. Then measure the footprint. The bracket arms must span the unit's mounting feet, and the bracket's load rating must exceed the operating weight with a margin.
2. Wall Load Capacity
The bracket is only as strong as what it is bolted to. A professional-grade bracket bolted into a lightweight insulated facade is a hazard. Confirm that the wall is solid masonry, reinforced concrete, or structural framing capable of carrying the load and the vibration. If you are unsure, have a contractor assess the wall before ordering.
3. Material and Finish
Galvanized steel with a powder-coated finish is the workhorse choice. Stainless steel is the premium choice for coastal or highly humid environments. Avoid untreated or thinly painted steel, which will corrode at the first sign of moisture. Pay attention to the coating on cut edges and bolt holes, which are common corrosion starting points.
4. Vibration Isolation
Rubber pads or isolator bushings between the bracket and the unit reduce noise transmission into the wall. Better brackets include these as standard; entry-level brackets sometimes offer them as an optional extra. For bedrooms and shared walls, this feature is worth prioritizing.
5. Height and Clearance
Wall brackets should hold the unit high enough to keep the base clear of snow, splash, and debris — typically at least 12 inches above grade. Ground stands usually raise the unit 4 to 12 inches. In all cases, respect the manufacturer's minimum clearances for airflow and service access.
6. Accessories and Compatibility
Check whether the bracket includes wall anchors appropriate for your wall type, anti-vibration pads, and a drain kit. If you are installing a multi-zone system, review the layout options in our multi-zone mini split guide before finalizing bracket positions, since multiple outdoor units may need to be stacked or spaced along a wall.
Matching Brackets to Wall Materials
The same bracket behaves very differently depending on what it is fastened to. The table below summarizes the main wall types and the fastening approach that suits each.
| Wall Material | Suitability | Recommended Fastening | Notes |
|---|---|---|---|
| Solid masonry / brick | Excellent | Through-bolts or chemical anchors into the masonry | Confirm brick condition; avoid mortar joints for anchors |
| Reinforced concrete | Excellent | Expansion anchors or cast-in inserts | Verify rebar location before drilling |
| Structural wood framing | Good with assessment | Lag bolts into studs, with blocking as needed | Locate studs precisely; add blocking for load spread |
| Insulated facade / EIFS | Poor without modification | Requires structural standoffs to load-bearing substrate | Do not anchor directly into cladding |
| Vinyl or metal siding | Poor on its own | Anchor through to sheathing and studs | Use sealing washers to protect the siding |
If your wall falls into the last two categories, a ground-mounted mini split stand on a suitable mini split pad is often the safer and simpler route. It avoids penetrating the facade and puts the unit where it is easy to service.
Installation Step by Step
The following sequence reflects a typical wall-mounted installation. Local codes and manufacturer instructions always take precedence, and any work at height or involving structural fasteners should be carried out by a qualified installer.
- Plan the location. Confirm clearances for airflow and service, keep the unit away from windows and doors where noise carries, and check that the refrigerant and drain routes are practical. Our mini split installation services overview covers the broader planning considerations.
- Verify the wall. Confirm the substrate is suitable and locate studs, anchors, or embed points. Mark the bracket hole pattern using the bracket itself as a template.
- Drill and anchor. Drill at the specified diameter and depth, clean the holes, and install anchors appropriate to the substrate. Do not skip the cleaning step — dust in the hole reduces anchor grip.
- Mount the bracket. Bolt the arms to the wall and check level in both directions. Tighten fasteners to the manufacturer's specification rather than guessing.
- Add vibration isolation. Fit rubber pads or isolator bushings at the contact points between the unit and the bracket.
- Set the unit. With help, lift the condensing unit onto the bracket. Confirm it sits level and that the drain port is at the low point.
- Connect and leak-test. Route the refrigerant line set with proper support and minimum bend radius, then pressure-test and evacuate the system per standard practice.
- Seal penetrations. Seal all wall penetrations with appropriate sealant to prevent water intrusion and air leakage.
- Inspect and record. Do a final torque check, confirm drainage, and photograph the installation for your records.
DIY note: If you are considering a self-install, read our mini split DIY guide first. Bracket mounting is only one part of the job, and refrigerant handling has legal and safety requirements that vary by jurisdiction.
Vibration, Noise, and Weather Protection
Vibration is the most underappreciated factor in bracket selection. A compressor running at full speed generates continuous low-frequency vibration. If that vibration travels into the building structure, you get noise inside the home, and you also get fatigue at the bracket fasteners and at the refrigerant connections.
There are three layers of defense. First, choose a bracket that is rigid enough not to flex. Second, use rubber isolators at the unit-to-bracket interface. Third, make sure the fasteners are torqued correctly and checked periodically, because vibration loosens what is not properly tightened. If noise is a particular concern, our guide to the most energy-efficient mini split air conditioner options also discusses quieter operating designs.
Weather protection is the second half of the durability story. Powder-coated galvanized steel handles most climates well. In coastal areas, salt-laden air accelerates corrosion, so stainless steel or a hot-dip galvanized finish is a worthwhile upgrade. Keep the bracket clear of fallen leaves and check that the drain path does not direct water onto the bracket itself.
Long-Term Maintenance and Inspection
Brackets are low-maintenance, but they are not maintenance-free. A brief inspection twice a year — ideally at the start of cooling season and the start of heating season — will catch almost all problems early.
- Check fasteners. Look for loose bolts and rust staining around holes, which indicates movement or moisture. Re-torque to specification if needed.
- Inspect the finish. Touch up any scratches or chips in the coating before rust spreads. Pay particular attention to cut edges and welded joints.
- Verify level. The unit should remain level; a shift may indicate anchor movement or substrate settlement.
- Check isolators. Rubber pads harden over time. Replace them if they are cracked or compressed flat.
- Clear debris. Remove leaves and dirt from around the bracket and from the drain path.
If the bracket is more than a decade old, or if the installation is in a coastal or high-wind area, have it inspected by an HVAC professional. If the compressor itself needs attention, our guide to mini split compressor replacement explains when repair versus replacement is the sensible path.
Frequently Asked Questions
What size mounting bracket do I need for a mini split condensing unit?
Can I mount a mini split condensing unit on a wall?
Do mounting brackets reduce vibration and noise?
How high should a mini split condensing unit be mounted?
Are stainless steel brackets better than galvanized steel?
Final Considerations Before You Decide
A mounting bracket is a small component in the overall cost of a mini split system, but it plays an outsized role in safety, noise, and equipment longevity. The decision framework is simple: match the bracket to the unit's weight and footprint, match the fastening to the wall substrate, and choose a material and finish that will survive your local climate.
If you are still deciding between system types, our overview of mini split heat pumps and the guide to mini split heating and air conditioning systems can help you compare configurations. Once the system is chosen, the bracket decision becomes straightforward — and with the right one, your outdoor unit will sit quiet, level, and secure for years.