Mini Split Wall Bracket: The Complete Guide to Secure Mounting
A mini split wall bracket is a critical component that ensures the safety, performance, and longevity of your outdoor condenser unit. This comprehensive guide covers everything you need to know about selecting, installing, and maintaining the right bracket for your system.
Installing a mini split wall bracket is one of the most important steps in setting up a ductless mini split system. The outdoor condenser is the heart of your system and must be mounted securely to withstand wind, vibration, and weather. A properly chosen bracket protects your investment, reduces noise, and simplifies future maintenance. Whether you are planning a new installation or replacing an old mounting system, understanding bracket types, materials, and load ratings will help you make an informed decision.
What Is a Mini Split Wall Bracket?
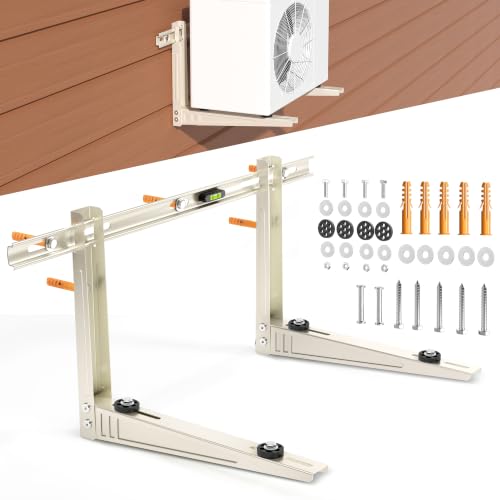
A mini split wall bracket is a metal framework designed to support and secure the outdoor condenser unit of a mini split system against an exterior wall. It is typically made from heavy-duty steel and is engineered to hold the weight of the condenser while keeping it elevated above the ground. This elevation protects the unit from snow accumulation, standing water, debris, and pest intrusion, while also improving airflow around the condenser coils.
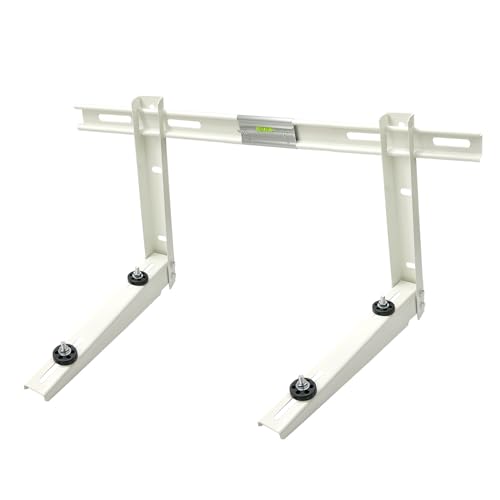
Brackets are available in several configurations, including fixed wall-mount designs, adjustable arms, and floor-standing models. The most common type for residential applications is the wall-mounted L-shaped bracket, which attaches directly to the building's exterior and supports the condenser on a horizontal platform. When paired with a mini split stand or mini split pad, you can choose between wall-mounted or ground-mounted solutions depending on your property layout.
Why a Quality Bracket Matters
Choosing a high-quality mini split wall bracket is not just about convenience—it is about safety and long-term performance. A substandard bracket can fail under the stress of the condenser's weight and vibration, leading to costly damage or injury. A robust bracket offers several key benefits:
- Structural Safety: Heavy-duty brackets are engineered to support the full operating weight of the condenser with a safety margin. This prevents sagging, deformation, or catastrophic failure.
- Vibration Dampening: Many premium brackets include rubber or neoprene isolators that reduce vibration transfer to the wall. This minimizes noise and prevents cracks in the building's exterior finish.
- Weather Resistance: A rust-proof finish, such as galvanized steel or powder coating, ensures the bracket survives years of rain, snow, and UV exposure without corroding.
- Improved Airflow: Mounting the condenser off the ground allows for better heat dissipation, which improves the efficiency of your mini split heat pump and extends its lifespan.
- Easier Maintenance: An elevated unit is easier to access for cleaning, coil inspection, and servicing, which is essential for keeping your system running efficiently.
Editor's Note: A bracket is a long-term investment in the safety and efficiency of your entire mini split system. Skimping on this component can compromise the performance of even the most premium condenser. Always choose a bracket rated well above your unit's weight and made from corrosion-resistant materials.
Types of Mini Split Brackets
There are several types of brackets available, each suited to different installation scenarios and property types. Understanding these options will help you choose the right solution for your home.
Wall-Mounted L-Bracket
The most popular choice for residential installations. This bracket is bolted directly to the exterior wall and features a horizontal arm that supports the condenser. It is ideal for homes with sturdy exterior walls, such as brick, concrete, or wood frame with proper blocking. Wall-mounted brackets keep the unit off the ground and are compatible with most mini split units.
Adjustable Wall Bracket
These brackets feature sliding or telescoping arms that allow you to adjust the width and depth to fit different condenser sizes. They are versatile and can be used across multiple installations or when upgrading to a larger unit. Adjustable brackets are a good choice for professional installers who need flexibility across jobs.
Floor-Standing Bracket (Ground Mount)
When wall mounting is not feasible, a floor-standing bracket or mini split stand can be used. These units rest on a stable base, such as a concrete pad, and hold the condenser at an elevated height. They are common in installations where the exterior wall is not load-bearing or where local codes require ground-level placement. Combining a stand with a mini split pad provides a complete ground-mount solution.
Heavy-Duty Brackets for Multi-Zone Systems
For larger systems, such as those used in multi-zone mini split configurations, a heavy-duty bracket may be required to support a larger, heavier condenser. These brackets are often constructed from thicker steel and may include additional bracing or crossbars for maximum stability.
| Bracket Type | Best For | Key Features | Installation Complexity |
|---|---|---|---|
| Wall-Mounted L-Bracket | Standard residential installations on masonry or wood-frame walls | Fixed arms, compact design, vibration isolators | Moderate — requires solid wall anchoring |
| Adjustable Wall Bracket | Variable condenser sizes and installer flexibility | Telescoping arms, multiple mounting positions | Moderate to High — careful adjustment needed |
| Floor-Standing Bracket | Walls that cannot support a wall mount, or code-restricted sites | Elevated platform, heavy base, corrosion-resistant | Low to Moderate — ground preparation required |
| Heavy-Duty Bracket | Large condensers and multi-zone outdoor units | Thick steel, extra bracing, high load rating | High — professional installation recommended |
Materials and Durability
The material of your bracket directly affects its lifespan and reliability. The two most common materials are galvanized steel and stainless steel, each with distinct advantages.
Galvanized Steel
Galvanized steel is the standard choice for most mini split wall brackets. It is coated with a layer of zinc that provides excellent rust and corrosion resistance. High-grade galvanized steel is heavy-duty and can withstand harsh weather conditions for many years. It offers solid build quality at a mid-range tier, making it a popular option for residential installations.
Stainless Steel
Stainless steel brackets are the premium option. They offer superior rust-proof performance, making them ideal for coastal areas or regions with high humidity and salt exposure. Stainless steel is also more resistant to scratches and dents. While more of an investment, a stainless steel bracket is a long-term solution that can outlast the condenser itself.
Powder-Coated Finish
Many brackets include a powder-coated finish on top of the steel. This adds an extra layer of protection against UV rays and moisture, and it gives the bracket a clean, professional appearance. When evaluating a bracket, look for a weather-resistant coating and sealed welds to ensure maximum durability.
Material Matters: In coastal or high-humidity environments, always choose stainless steel or a bracket with a reinforced weather-resistant coating. The additional investment is a small fraction of the total system cost and protects your equipment from premature failure.
Sizing and Load Capacity
Selecting the correct bracket size and load rating is essential for safety. The bracket must support not only the dead weight of the condenser but also the dynamic loads created by compressor vibration and wind. Follow these guidelines when sizing your bracket:
- Check the Condenser Weight: Consult the installation manual for your mini split condenser or heat pump. The manual lists the operating weight, which includes the refrigerant charge.
- Add a Safety Margin: Choose a bracket with a load rating at least 50% higher than the condenser's operating weight. For example, if your unit weighs 100 lbs, select a bracket rated for 150 lbs or more. This margin accounts for vibration, wind, and potential ice loads.
- Match the Footprint: Ensure the bracket's horizontal arms or platform are wide and deep enough to fully support the condenser's base. The unit should not overhang the bracket significantly.
- Consider the Wall Type: The bracket must be anchored to structural members. For wood-frame walls, use lag bolts into studs. For masonry, use appropriate anchors or through-bolts. If the wall cannot support the load, consider a ground-mounted option like a mini split stand or mounting bracket for mini split condensing unit.
For installations on sloped or uneven surfaces, an adjustable bracket or a leveling stand may be necessary. Always verify local building codes, which may specify minimum clearances and anchoring requirements.
Installation Step by Step
Proper installation is critical for the safety and performance of your mini split system. While some homeowners may attempt a DIY installation, professional installation is strongly recommended to ensure the bracket is correctly anchored and the condenser is safely mounted. The following steps outline the typical process:
-
Gather Tools and Materials
You will need a drill, masonry bits or wood bits (depending on your wall), a level, a measuring tape, lag bolts or masonry anchors, and the bracket kit. Always wear safety glasses and gloves. Review the bracket manufacturer's instructions carefully before starting.
-
Determine the Mounting Location
Choose a location that provides adequate clearance for airflow and service access. The condenser should be positioned so that it is not blocked by fences, shrubs, or other obstructions. Consider the path of the mini split line set and electrical conduit, and ensure the bracket location aligns with the mini split installation services plan.
-
Mark and Prepare the Wall
Use a level to mark the bracket's mounting holes on the wall. Confirm that the marks align with wall studs or solid masonry. If using a wood-frame wall, pre-drill pilot holes. For masonry, mark the anchor locations and drill holes to the specified depth.
-
Secure the Bracket
Attach the bracket to the wall using the appropriate lag bolts or masonry anchors. Tighten the bolts securely, but do not overtighten, as this can damage the wall or the bracket. Check that the bracket is level and firmly in place with no wobbling.
-
Mount the Condenser
With the help of a second person, carefully lift the condenser onto the bracket. Align the condenser's mounting feet with the bracket's mounting holes or slots. Use the supplied bolts or clamps to secure the condenser to the bracket. Ensure the unit is level and stable.
-
Connect Refrigerant Lines and Electrical
After the condenser is securely mounted, connect the mini split line set and electrical wiring according to the manufacturer's instructions and local codes. This step should be performed by a licensed HVAC technician or electrician.
-
Final Inspection
Double-check all connections, ensure the bracket is level, and confirm the condenser is secure. Test the system to verify it operates correctly and that there are no unusual vibrations or noises. If you have any doubts, consult a mini split installer.
Professional Tip: If you are installing a mini split DIY system, pay extra attention to the bracket installation. A poorly anchored bracket can cause the condenser to fall, which is dangerous and can void your warranty. When in doubt, hire a professional.
Common Installation Mistakes to Avoid
Even experienced installers can make mistakes. Being aware of these common pitfalls can help you ensure a safe and durable installation:
- Mounting to Unsuitable Walls: Never mount a bracket to drywall, vinyl siding, or other non-structural surfaces without proper blocking. The bracket must be anchored to solid wood studs, concrete, or masonry.
- Using Inadequate Fasteners: Always use the fasteners specified by the bracket manufacturer. Using drywall screws or undersized anchors is a recipe for failure.
- Ignoring Load Ratings: Overloading a bracket beyond its rated capacity can lead to bending or collapse. Always verify the combined weight of the condenser and any accessories.
- Skipping Vibration Isolators: If your bracket includes rubber isolators, use them. They significantly reduce noise and prevent long-term damage to the wall and the condenser.
- Poor Drainage: Ensure the bracket installation allows for proper drainage of condensate. The unit should be slightly tilted toward the drain ports, and the drain line should be routed away from the building.
- Neglecting Local Codes: Some jurisdictions have specific requirements for condenser placement, clearance, and anchoring. Always check with your local building department before installing.
Maintenance and Inspection
Once your mini split wall bracket is installed, regular inspection and maintenance will ensure it remains safe and reliable for years to come. Include the following checks in your seasonal HVAC maintenance routine:
- Check for Corrosion: Inspect the bracket for signs of rust or corrosion, especially if you live in a coastal area. Surface rust can be treated with a rust-inhibiting paint, but severe corrosion may require bracket replacement.
- Tighten Fasteners: Over time, vibration can loosen bolts and anchors. Periodically check and tighten all fasteners to the manufacturer's torque specifications.
- Inspect for Vibration Damage: Look for cracks in the wall around the mounting points. If you notice new cracks or worsening vibration, have the installation inspected by a professional.
- Clean the Condenser Area: Keep the area around the condenser free of leaves, debris, and snow. This ensures proper airflow and reduces the load on the bracket.
- Verify Level: Check that the condenser remains level. If it has shifted, it may indicate a problem with the bracket or the wall anchors. Address any issues promptly.
For a comprehensive maintenance schedule, refer to our mini split heating and cooling systems guide. If you ever need to replace a component, our resources on mini split compressor replacement and mini split replacement cost can provide additional context.
Frequently Asked Questions
In most installations, a wall bracket is essential. It securely mounts the outdoor condenser unit to an exterior wall, keeping it off the ground and away from snow, debris, and potential flood damage. It also helps maintain proper airflow and can simplify maintenance. However, in some cases, a ground-mounted stand or pad may be more appropriate. Consult your installer to determine the best solution for your property.
High-quality brackets are typically made from heavy-duty galvanized steel or stainless steel. These materials offer excellent rust-proof and weather-resistant properties, ensuring durable construction and long-term reliability in outdoor conditions. Some brackets also feature a powder-coated finish for added UV and moisture protection.
The bracket's load capacity must exceed the operating weight of your outdoor condenser unit. Always check your condenser's manual for its weight and add a safety margin of at least 50%. It is safer to choose a bracket rated for significantly more weight than the unit itself. For example, if your unit weighs 120 lbs, choose a bracket rated for 180 lbs or more.
While a DIY installation is possible for those with strong construction skills and the right tools, it is not recommended. Proper installation requires securing the bracket to structural wall members (studs, concrete, or brick) and safely lifting the heavy condenser. Hiring a professional ensures the job is done correctly and safely. An incorrectly installed bracket can fail, causing injury or property damage.
We recommend inspecting your bracket at least twice a year, ideally in the spring and fall before peak heating and cooling seasons. Check for corrosion, loose fasteners, and any signs of wear. If you live in a harsh climate or coastal area, inspect more frequently.
Related Mini Split Resources
Ready to Secure Your Mini Split System?
A proper mini split wall bracket is the foundation of a safe, efficient, and long-lasting installation. Explore our recommended mounting brackets and find the perfect match for your condenser unit. For more information on system components, check our guides on mini split heads and mini split remote thermostats.
View Recommended Brackets