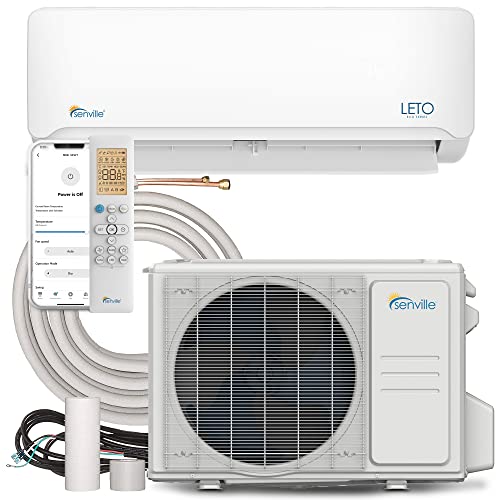
Installation of Split Air Conditioning System
A complete, practical walkthrough of how a split air conditioning system is installed — from site survey and placement through line set routing, electrical connections, vacuuming, and final testing.
START WITH PLANNINGHow a Split Air Conditioning System Works
A split air conditioning system separates the noisy, heat-rejecting components from the living space. The outdoor condenser unit houses the compressor and condenser coil, while the indoor unit contains the evaporator coil and the blower that distributes conditioned air. The two halves are connected by a refrigerant line set and a condensate drain, with electrical power and control wiring completing the system.
Because there is no ductwork, a split system is often described as a ductless solution. This makes it a strong fit for rooms that were added later, homes without existing ducts, and spaces where zoning is more practical than conditioning an entire house. If you are comparing system formats before committing, the overview of split systems and the guide to split units explain the differences between single-zone, multi-zone, and conventional configurations.
Key components of a split system installation:
Indoor evaporator unit, outdoor condenser unit, refrigerant line set (liquid and suction lines), condensate drain line, communication cable, power supply circuit, wall bracket or floor stand, and mounting hardware for both units.
The installation sequence matters because each step depends on the one before it. Placement decisions determine line set length. Line set length determines how much refrigerant the system needs. The electrical circuit must be sized before the outdoor unit is connected. Skipping ahead or rushing the vacuum stage is the most common reason a new system underperforms from day one.
Planning and Site Survey
Professional installation begins with a survey, not a drill. Before any bracket is mounted, the installer confirms the cooling load, identifies the route between indoor and outdoor units, and verifies that the electrical panel can support the new circuit. A proper load calculation ensures the selected capacity matches the room rather than being guessed from square footage alone.
What to Confirm Before Installation Day
- Cooling load: A room-by-room load calculation accounts for windows, insulation, ceiling height, occupancy, and appliance heat. The guide to HVAC sizing explains why oversizing a split system causes short cycling and poor humidity control.
- Line set route: Measure the shortest practical path between the indoor and outdoor units, including vertical rise. Longer runs require additional refrigerant and may need a larger line set.
- Electrical capacity: Check the main panel for available breaker space and confirm the service can handle the added load. The system inspection process covers how a technician evaluates panel capacity.
- Permits and code: Many jurisdictions require a permit for HVAC installation and separate sign-off for electrical work. Confirm requirements with the local building department before work begins.
- Drain path: Condensate must flow downhill to a safe discharge point. Gravity drains are preferred; condensate pumps are used when gravity is not possible.
Indoor and Outdoor Unit Placement
Placement has a direct effect on comfort, efficiency, and serviceability. The indoor unit should deliver air across the room rather than directly at occupants, and the outdoor unit needs unobstructed airflow to reject heat effectively.
Indoor Unit Placement Guidelines
- Mount high on a wall with enough clearance above and below for airflow and filter access.
- Position the unit so the supply air sweeps across the room, not straight down onto a seating area or bed.
- Avoid locations above heat sources, near direct sunlight on the unit, or where curtains and furniture block the air path.
- Keep the unit within reach for routine filter cleaning and accessible for service.
- Confirm the wall structure can support the bracket and the unit weight; use appropriate anchors for masonry, drywall over studs, or other substrates.
Outdoor Unit Placement Guidelines
- Maintain the clearance specified in the installation manual on the front, sides, and rear of the unit.
- Set the unit on a level, solid pad or wall bracket that isolates vibration and keeps the base above standing water.
- Avoid recirculation of hot discharge air by keeping the unit away from walls, fences, and enclosures that trap heat.
- Keep the unit clear of dryer vents, exhaust fans, and other heat or moisture sources.
- In cold climates, raise the unit above expected snow depth and protect it from roof runoff and ice.
For whole-home projects that involve multiple indoor heads, the layout is planned alongside the zoning system design so each zone receives balanced capacity. Placement also influences how the system integrates with a smart thermostat if the system supports remote control.
Mounting the Indoor Unit
The indoor unit is hung on a metal bracket that is fastened to the wall. Accurate bracket leveling is essential because a tilted unit can cause condensate to drip from the wrong side or pool inside the housing.
- Hold the bracket against the wall at the chosen height and mark the mounting holes.
- Drill the holes and insert anchors appropriate for the wall material.
- Fasten the bracket and verify it is level in both directions.
- Drill the wall penetration for the line set and drain, angling it slightly downward toward the outdoors so condensate drains outward.
- Feed the line set, drain hose, and communication cable through the sleeve or penetration, protecting the ends from debris.
- Hang the indoor unit on the bracket and confirm it seats firmly without wobble.
Line Set and Drain Routing
The line set carries refrigerant between the indoor and outdoor units. It consists of an insulated suction line and a smaller liquid line, both cut to the measured length and flared or brazed according to the manufacturer's specification. Proper routing protects the lines from kinks, abrasion, and UV damage.
Routing Best Practices
- Keep bends gradual and avoid sharp kinks that restrict refrigerant flow.
- Support the line set at regular intervals with clamps or saddles to prevent sagging and vibration.
- Protect exposed outdoor sections with UV-resistant line hide or conduit.
- Maintain the minimum bend radius specified in the installation manual.
- Route the condensate drain with a continuous downward slope and avoid traps unless specified.
Line set length affects refrigerant charge. Short runs may require no adjustment, while longer runs require additional charge calculated from the manufacturer's table. The system installation reference explains how line set length and charge adjustments are documented for future service.
Line Set Sizing at a Glance
| System Class | Typical Line Set Focus | Installation Consideration |
|---|---|---|
| Entry-level single-zone | Short, simple runs | Factory charge often covers a short run; confirm in the manual |
| Mid-range single-zone | Moderate runs with some vertical rise | May require additional refrigerant and a condensate pump |
| Premium multi-zone | Multiple branch runs from one outdoor unit | Branch boxes and individual line sets must be planned together |
| High-end tier | Longer runs and complex routing | Precise charge calculation and documented commissioning are essential |
Electrical Connections
Split systems require a dedicated power circuit sized to the nameplate rating. The outdoor unit nameplate lists minimum circuit ampacity and maximum overcurrent protection, which determine the wire gauge and breaker size. The indoor unit is typically powered from the outdoor unit or from its own circuit, depending on the model.
- Confirm the panel has capacity for the new circuit and install the correct breaker.
- Run wiring in conduit or approved cable per local code.
- Install a service disconnect near the outdoor unit where required.
- Connect the communication cable between indoor and outdoor units using the terminals specified in the manual.
- Ground the equipment properly and verify all connections are tight.
If the existing panel is already near capacity, an electrician may recommend a panel upgrade before the split system is installed. The HVAC service overview describes how electrical and mechanical work are coordinated on a single project.
Vacuum and Refrigerant Charge
Once the line set is connected and the electrical work is complete, the system is evacuated with a vacuum pump. This step removes air and moisture from the refrigerant circuit. Moisture left in the system reacts with refrigerant oil and can cause acid formation, compressor damage, and ice in the metering device.
The Vacuum Process
- Connect a manifold gauge set to the service ports.
- Connect the vacuum pump and evacuate the system to the level specified in the installation manual.
- Close the valves and perform a standing vacuum test to confirm the system holds vacuum without rising pressure.
- Release the factory charge from the outdoor unit, then add additional refrigerant if the line set length requires it.
- Record the final charge, vacuum level, and ambient conditions on the commissioning sheet.
Why the vacuum matters: A system that is not properly evacuated may cool at first but lose capacity over time. Moisture and non-condensable gases raise head pressure, reduce efficiency, and shorten compressor life.
Refrigerant handling is regulated in most regions. Only certified technicians should open the refrigerant circuit, and refrigerant must be recovered rather than vented. The HVAC technician reference explains the certifications required for this work.
Testing and Commissioning
Commissioning verifies that the system performs as designed before the installer leaves. It includes electrical checks, refrigerant checks, airflow verification, and a full operating cycle in both cooling and, where applicable, heating mode.
- Verify supply voltage and running amperage against the nameplate values.
- Confirm suction and liquid line temperatures and pressures are within the expected range.
- Measure the temperature difference between return and supply air.
- Check that condensate drains freely and does not back up.
- Confirm the indoor unit operates at each fan speed and that the remote control responds.
- Check for vibration, unusual noise, and refrigerant leaks at all connections.
- Verify the outdoor unit cycles off and on correctly at the setpoint.
- Document all readings and leave the commissioning sheet with the homeowner.
Commissioning data is valuable later. If performance drops in a future season, the original readings give a technician a baseline for diagnosis. The unit maintenance guide explains how these readings are used during routine service visits.
Common Installation Mistakes
Most early-life problems with split systems trace back to installation shortcuts rather than manufacturing defects. The following mistakes appear repeatedly in service calls.
| Mistake | Consequence | Correct Approach |
|---|---|---|
| Skipping or rushing the vacuum | Moisture damage, reduced capacity, compressor wear | Evacuate to the specified level and perform a standing vacuum test |
| Undersized or oversized line set | Poor refrigerant flow, noise, efficiency loss | Follow the manufacturer line set table for the model and run length |
| Improper condensate slope | Water damage, mold, indoor unit overflow | Maintain continuous downward slope and add a pump only when needed |
| Unsealed wall penetration | Air leakage, moisture intrusion, insects | Use a weatherproof sleeve and sealant around the line set |
| Wrong breaker or wire gauge | Tripping, overheating, failed inspection | Size the circuit to the nameplate minimum circuit ampacity |
| Poor outdoor unit airflow | High head pressure, reduced cooling, short compressor life | Respect clearance distances and avoid heat-trapping enclosures |
Many of these issues are avoidable when the installation follows the manufacturer manual and local code. If a system installed by a previous contractor is underperforming, a system repair visit can identify whether the cause is installation-related or a component failure.
DIY vs Professional Installation
Some homeowners consider installing a split system themselves to keep the project manageable. It helps to separate the work into two categories: tasks that are reasonable for a skilled DIYer and tasks that require licensed professionals.
Reasonable DIY Tasks
- Measuring the room and preparing for the site survey.
- Clearing the installation area and planning furniture placement around the indoor unit.
- Mounting the indoor bracket and drilling the wall penetration.
- Routing and securing the line set and drain within the planned path.
- Preparing the outdoor pad and clearing the installation zone.
Tasks for Licensed Professionals
- Refrigerant line connections, brazing or flaring, and leak testing.
- Evacuation, charge adjustment, and refrigerant handling.
- Electrical circuit installation, disconnect, and grounding.
- Final commissioning and performance verification.
- Permit-related inspections and warranty documentation.
Manufacturer warranties often require installation by a licensed professional. Attempting the refrigerant and electrical work without the proper license can void coverage and create safety risks. If you prefer to delegate the entire project, the guide to HVAC service providers explains how to compare qualified contractors.
First-Week Checks and Maintenance
The first week after installation is the best time to confirm the system is performing as expected. Small issues are easier to correct while the installer is still responsible for the work.
- Check that the indoor unit drains condensate without dripping or pooling.
- Listen for unusual noises at startup and during operation.
- Confirm the remote control and any connected thermostat respond correctly.
- Verify the outdoor unit is not short cycling and that airflow is unobstructed.
- Note the temperature difference between return and supply air and compare it to the commissioning sheet.
Routine maintenance keeps the system efficient. Cleaning or replacing filters every few weeks during heavy use, keeping the outdoor coil clear of debris, and scheduling periodic professional service are the highest-impact habits. The tune-up service overview covers what a seasonal check includes, and the cleaning services guide explains coil cleaning and drain flushing.
Frequently Asked Questions
How long does a split air conditioner installation take?
A single-zone split system installation typically takes between four and eight hours for a qualified technician. Multi-zone systems or installations that require long line set runs and significant electrical work can extend into a full day or more. The indoor and outdoor unit placement, wall thickness, and whether the electrical circuit already exists all influence the total time.
Can I install a split air conditioning system myself?
The mechanical mounting and basic preparation can be done by a confident DIYer, but the refrigerant circuit, vacuuming, and electrical connections should be handled by a licensed professional. Refrigerant handling is regulated, and an improper vacuum or charge will reduce efficiency and may void the manufacturer warranty. Many regions also require a permit and licensed tradespeople for the electrical portion.
What size line set do I need for a split AC system?
Line set sizing depends on the capacity of the system and the length of the run between the indoor and outdoor units. Most residential single-zone systems use a liquid line and a suction line sized according to the manufacturer specification table. Always follow the installation manual for the specific model, because undersized or oversized line sets affect refrigerant flow and system performance.
Where should the outdoor unit be placed?
The outdoor unit needs adequate airflow clearance, a level and solid base, and protection from direct snow accumulation and debris. Keep it away from dryer vents and other heat sources, and maintain the clearance specified in the manual on all sides. A shaded location improves efficiency, but the unit must still be able to discharge heat freely.
Do split air conditioning systems need a dedicated electrical circuit?
Yes. Most split systems require a dedicated circuit sized to the minimum circuit ampacity listed on the unit nameplate. The circuit includes the correct breaker, wiring gauge, and a disconnect near the outdoor unit where required by local code. An electrician should verify the panel capacity and install the circuit according to local regulations.
Should the line set be shortened or coiled?
Excess line set should be handled according to the installation manual. Coiling excess line horizontally or vertically is common, but sharp kinks and tight coils restrict refrigerant flow. The preferred practice is to cut and re-flare the line set to the measured length or to coil it neatly with a radius that meets the manufacturer specification.
Next Step: Find a Qualified Installer
Understanding the installation process helps you evaluate quotes, ask better questions, and confirm that the work will meet code and manufacturer requirements. If you are ready to move from research to hiring, compare licensed contractors in your area through HVAC service companies or look for a local HVAC technician with split system experience.
For larger projects involving multiple rooms, the guide to HVAC services in my area explains how to request quotes and compare scope. When the installation is complete, keep the commissioning sheet with your other appliance records; it is the starting point for every future maintenance visit.