Portable Air Conditioner for Vertical Windows
A complete research guide to choosing and installing a portable AC unit with a vertical sliding sash window — covering window kits, hose setup, sealing, sizing, and what to check before you buy.
EXPLORE RECOMMENDED MODELSEditorial guide updated for the current buying season
Why Vertical Windows Need a Different Approach
A portable air conditioner for vertical windows is one of the most searched cooling configurations, and for good reason. Vertical sliding sash windows are standard in many older homes, apartments, and multi-story buildings, yet the window kits bundled with most portable AC units are designed primarily for horizontal sliding or hung windows. Buyers who assume the included kit will fit often discover the exhaust hose cannot be mounted securely, the gap above the sash remains open, and cooling performance drops because hot outdoor air leaks back into the room.
This guide is written for the research stage of the buying journey. You already know you want a portable air conditioner. What you need is a clear understanding of how vertical windows interact with portable AC exhaust systems, which accessories are genuinely required, how to size the unit correctly, and which product characteristics separate a solid choice from a frustrating one. Once you finish reading, you will be able to evaluate any portable AC listing with confidence.
It is worth noting upfront that the window orientation itself does not change how much cooling a room needs. A vertical window does, however, change how the unit is installed, how well the exhaust is sealed, and how much of the window opening remains usable. Those installation factors directly affect real-world performance, and they are the focus of this guide.
Key insight: The single most common cause of disappointing portable AC performance in vertical window rooms is an unsealed gap above the raised sash. A correct vertical window kit plus proper foam sealing often resolves the problem without any change to the unit itself.
How Vertical Windows Change the Setup
Vertical windows — also called single-hung or double-hung sash windows — open by raising the lower sash upward. The opening that results is a vertical rectangle, and the exhaust hose and window panel must be positioned inside that rectangle. This is fundamentally different from a horizontal sliding window, where the opening is wide and short.
There are several practical consequences you should understand before ordering anything:
- The opening is tall but narrow. A standard horizontal window panel will not fit. You need a vertical panel that spans the height of the raised sash opening, or a kit with panels that can be rotated and locked into a vertical orientation.
- The sash must be supported. A raised lower sash is held by friction or a balance mechanism. When you insert a panel and hose, you introduce weight and lateral force. Most kits include a small locking bracket or foam spacer to hold the sash in position and prevent it from dropping.
- Screen removal is usually required. The screen must come out so the panel and hose can pass through. Keep the screen stored safely for the off-season.
- Security and access. A raised sash with a kit panel creates a partial opening. If the room is on the ground floor, check that the panel cannot be pushed inward from outside, and consider a secondary window lock or a security bar.
- Rain and wind exposure. Vertical kits sit in a more exposed position than horizontal ones. A slight downward slope on the exterior of the hose and a sealed top edge help prevent water intrusion during storms.
If your window is a different style, the installation logic changes again. For example, a window that opens outward on a crank mechanism requires a different bracket approach, and a side-opening window uses a panel mounted on the vertical frame. If you are comparing window styles, the same core principles apply across portable AC setups for vertical sliding windows and vertical crank window configurations, but the hardware differs.
The Vertical Window Kit Explained
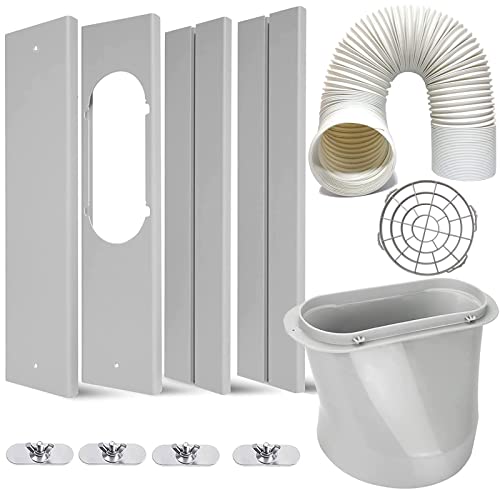
A vertical window kit is the accessory that makes a portable AC work with a sash window. It typically consists of an adjustable panel assembly, a hose connector collar, sealing foam, and sometimes a sash lock bracket. Understanding what is inside the kit helps you judge whether a product listing is suitable before you order.
What a Complete Vertical Kit Contains
- Adjustable vertical panel. Usually two or three interlocking plastic or aluminum panels that slide to match the height of the raised sash opening. The panel is the structural element that holds the hose collar.
- Hose connector collar. A circular opening, typically sized for a 5-inch or 6-inch exhaust hose, with a twist-lock or snap-fit connection. Confirm the collar diameter matches your unit's hose.
- Sealing foam or weatherstrip. Foam strips that fill the narrow gaps between the panel edges and the window frame, and between the panel and the sash.
- Sash lock or support bracket. A small piece that prevents the raised sash from sliding down onto the panel.
- Exhaust hose. Sometimes included with the unit rather than the kit. Hoses come in different diameters and lengths; the diameter must match the collar.
Universal vs. Unit-Specific Kits
Some manufacturers sell a dedicated vertical kit for their own units, which guarantees a precise fit for the hose collar and panel dimensions. Universal kits are adjustable and fit a broader range of hoses, but they require careful measurement. A universal kit is a reasonable choice when the original kit is lost or when the bundled kit is horizontal-only. The key measurement is the collar diameter: most portable AC hoses are either 5 inches or 6 inches, and a mismatch makes the kit unusable without an adapter.
When the Included Kit Is Not Enough
Many portable AC units ship with a kit described as "sliding window kit." In practice, some of these kits support both horizontal and vertical orientation because the panels can be rotated. Others are strictly horizontal. Before buying, read the kit description carefully and check whether the panel is described as adjustable in height or only in width. If the listing is ambiguous, assume you may need a separate vertical kit. A dedicated vertical window kit for portable AC units is a modest accessory that resolves the fit problem cleanly.
Step-by-Step Installation for a Vertical Window
The installation process is straightforward but benefits from careful sequencing. The steps below assume a standard double-hung sash window and a portable AC with a compatible vertical kit.
- Measure the opening. Raise the lower sash to the height you intend to use, then measure the width and height of the open rectangle. Compare these measurements against the kit's stated adjustment range. If the opening is taller than the kit can cover, you will need to raise the sash less or use an extension panel.
- Remove the screen. Store it flat in a dry place. Screens are easily bent and difficult to straighten once creased.
- Assemble the panel. Slide the interlocking panels to the measured height and lock them in place. Most panels have a positive detent or a screw clamp at each joint. Confirm the assembly is rigid before proceeding.
- Attach the hose collar. Fit the collar into the circular cutout on the panel and twist to lock. Some kits use a snap ring; others use a threaded collar. Make sure the connection is fully seated so the hose does not sag or detach under load.
- Insert the panel into the window opening. Position the panel in the opening so the collar faces the interior. The panel should sit flush against the window frame on both sides.
- Install the sash support. Place the included bracket or foam spacer between the top edge of the panel and the bottom of the sash. This prevents the sash from dropping and also closes the upper gap.
- Connect the exhaust hose. Attach one end of the hose to the unit's exhaust outlet and the other end to the panel collar. Twist to lock both ends. Keep the hose as short and straight as possible; excess length and sharp bends reduce exhaust efficiency.
- Seal the perimeter. Apply foam weatherstrip along the left and right edges of the panel and along the top edge where the sash meets the panel. This is the step most often skipped and the one that matters most for performance.
- Test the seal. Turn the unit on and hold a thin strip of tissue near the panel edges. If the tissue flutters toward the room, outdoor air is leaking in. Add foam until the flutter stops.
Renters should note that none of these steps require drilling or permanent modification, provided the kit uses tension-fit panels. That makes the setup fully reversible at the end of the season.
Sealing and Insulating the Gap
The exhaust hose carries hot air out of the room, but the portable AC also draws replacement air into the room from somewhere. In a well-sealed space, that replacement air enters through gaps around doors, windows, and the exhaust panel itself. The larger those gaps, the more hot outdoor air enters, and the harder the unit must work to maintain the set temperature. Sealing the vertical window opening is therefore not cosmetic — it directly affects cooling consistency.
Materials That Work Well
- Closed-cell foam weatherstrip. Compresses to fill irregular gaps and resists moisture. Preferred over open-cell foam for exterior-adjacent sealing.
- Insulated tape or foil tape. Useful for sealing the top edge of the panel where the sash meets it, and for wrapping the hose where it passes through the collar.
- Foam board inserts. For very tall openings where the panel does not reach the top of the sash, a cut-to-size foam board can fill the remaining space and be sealed at the edges.
- Draft stoppers. A simple fabric draft stopper along the bottom of the sash adds a secondary barrier without interfering with the panel.
Sealing the Hose Path
The hose itself is a common leak point. Most exhaust hoses are flexible and slightly porous at the seams. Wrapping the hose in an insulating sleeve or foil tape reduces heat radiating back into the room. Also check that the hose does not have a sharp bend — a kink restricts airflow and can cause the unit to overheat and shut down. The exhaust path should be as direct as possible.
Practical tip: After installation, run the unit for 20 minutes and feel the panel edges and hose surface. Warm spots indicate leaks or insufficient insulation. A small amount of additional foam and tape typically resolves both.
BTU Sizing for Your Room
Sizing a portable AC for a vertical window room follows the same logic as any other room: match the unit's cooling capacity to the room's heat load. Window orientation does not increase or decrease the required capacity, but it can affect how much heat enters through the window itself. South-facing and west-facing windows receive more direct solar gain, and a room with large single-pane sash windows will feel warmer than a similarly sized room with shaded windows.
General Sizing Framework
| Room Size (approximate) | Typical Capacity Range | Best Suited For |
|---|---|---|
| Up to 150 sq ft | 5,000 – 6,000 BTU | Small bedrooms, home offices, compact studios |
| 150 – 250 sq ft | 8,000 – 10,000 BTU | Standard bedrooms, small living rooms |
| 250 – 400 sq ft | 12,000 – 14,000 BTU | Large bedrooms, open living areas, small apartments |
| 400 – 550 sq ft | 14,000 – 18,000 BTU | Open-plan living spaces, lofts |
These ranges assume an 8-foot ceiling, average insulation, and two occupants. Adjust upward for high ceilings, large unshaded windows, kitchens, rooms with heat-generating electronics, or rooms with more than two regular occupants. Adjust downward only slightly for well-shaded rooms — undersizing is a more common mistake than oversizing for portable units, because portable AC performance degrades quickly when the unit cannot keep up.
Single-Hose vs. Dual-Hose in Vertical Windows
Single-hose units exhaust air out and draw replacement air in through room gaps, which slightly depressurizes the room. Dual-hose units draw replacement air directly from outside through a second hose, which keeps room pressure balanced and generally improves efficiency in tightly sealed rooms. Vertical window kits for dual-hose units require two collars or a wider panel. If your room is well sealed and you plan to run the unit for long hours, a dual-hose configuration is worth considering. You can read more about the trade-offs in the single-hose portable AC overview.
For very small rooms, a lower-capacity unit is usually sufficient and easier to position. The same sizing logic applies to compact setups, so the guidance on portable AC for a very small room is worth reviewing if you are cooling a bedroom or study.
Features That Matter for Vertical Window Setups
Not every feature is equally valuable in a vertical window room. The following list focuses on characteristics that directly affect installation, comfort, or long-term usability in this specific configuration.
Window Kit Compatibility
This is the single most important buying criterion. Confirm that the bundled kit supports vertical orientation, or budget for a separate vertical kit. Check the collar diameter and the panel height range. A unit with excellent cooling capacity is useless if the hose cannot be mounted securely.
Hose Diameter and Length
A 5-inch hose is more flexible and easier to route in a narrow vertical opening. A 6-inch hose moves more air and is common on higher-capacity units. Hose length matters too: a hose that is too long introduces unnecessary resistance, while a hose that is too short prevents proper positioning. Most units ship with a hose in the 5- to 7-foot range, which suits typical sash windows.
Condensate Management
Portable AC units produce condensate. Entry-level units often require manual draining via a lower plug, while mid-range and premium units increasingly use self-evaporating systems or include a condensate pump. In a vertical window setup, the unit typically sits on the floor near the window, so a gravity drain is usually feasible. If the unit must sit on a raised surface or in an area without a floor drain, a model with a built-in condensate pump or a self-evaporating system reduces maintenance chores significantly.
Noise Level
Portable AC units are generally louder than window units because the compressor and fan are inside the room. If the room is a bedroom or home office, prioritize a model with a lower published sound level and a night mode. Inverter-driven compressors are quieter and more efficient across the operating range; the inverter compressor portable AC guide explains how the technology changes real-world behavior.
Mobility and Footprint
Castors and side handles make seasonal repositioning easier. Check the unit's footprint against the space available in front of the window. A narrow footprint is helpful in small rooms where the unit must sit close to furniture. The portable AC on wheels overview covers mobility features in more detail.
Additional Functions
Dehumidification mode is useful in humid climates, and a heater function extends the unit's usable season. Some models add air purification. These features are convenience-oriented rather than essential, but they can justify a step up in tier if you will use the unit year-round. The portable AC with dehumidifier guide and the heat pump portable AC overview are useful references if these functions matter to you.
Market Tiers Compared
Portable AC units for vertical windows fall into recognizable market tiers. The table below describes what each tier generally offers so you can align your expectations with the product category you are considering. Tiers reflect relative market position, not absolute figures.
| Tier | Typical Characteristics | Best For |
|---|---|---|
| Entry-level | Basic mechanical or simple digital controls, single-hose exhaust, manual drain, horizontal-oriented kit that may need a separate vertical panel, higher noise level. | Occasional use in small rooms, renters who need a reversible setup, buyers prioritizing simplicity. |
| Mid-range | Digital controls with remote, 24-hour timer, better fan and compressor acoustics, self-evaporating or partial self-evaporating condensate handling, kit more likely to support vertical orientation. | Regular seasonal use in bedrooms and living areas, buyers who want a balance of features and simplicity. |
| High-end tier | Inverter compressor, dual-hose option, quieter operation, precise temperature control, smart connectivity, condensate pump, dedicated vertical kit, better build quality. | Long daily runtimes, bedrooms and home offices where noise matters, well-sealed rooms where efficiency gains are noticeable. |
| Premium / professional-grade | Heavy-duty construction, advanced humidity control, commercial-oriented controls and serviceability, longer warranty terms, robust kit hardware. | Server closets, small commercial rooms, and demanding residential applications with continuous operation. |
In practical terms, the mid-range tier is the most common choice for vertical window rooms because it tends to include a kit that can be oriented vertically and offers quieter operation without jumping to flagship-level features. The high-end tier becomes worthwhile when the unit will run for many hours a day and the room is tightly sealed, since inverter efficiency and dual-hose balance produce measurable comfort improvements in that scenario.
Common Mistakes to Avoid
- Assuming the included kit fits vertically. Always verify the kit orientation before buying. A horizontal-only kit forces a separate purchase or a return.
- Leaving the gap above the sash unsealed. This is the most frequent installation error. Hot air enters, the unit runs continuously, and the room never reaches the set temperature.
- Oversizing or undersizing based on window style. Window orientation does not determine BTU needs. Size by room heat load, not by window type.
- Kinking or over-extending the exhaust hose. A restricted hose causes overheating, short cycling, and premature wear. Keep the path short and smooth.
- Skipping the condensate plan. Decide in advance whether the unit will self-evaporate, use a pump, or require manual draining. A unit that fills its tank overnight in a bedroom is a nuisance.
- Ignoring the sash support. A sash that drops onto the panel can crack the panel or dislodge the hose. Use the included bracket or a foam spacer.
- Placing the unit too close to a wall. Portable AC units need clearance around intake and exhaust vents. Follow the manufacturer's clearance guidance; tight placement reduces airflow and efficiency.
Maintenance and Troubleshooting
Portable AC maintenance for a vertical window setup is minimal but regular. The filter is the first item: most units have a washable mesh filter that should be rinsed every two to four weeks during heavy use. A clogged filter reduces airflow, forces the compressor to run longer, and can cause the evaporator to ice over. Remove the filter, rinse it under lukewarm water, let it dry fully, and reinstall.
Check the exhaust hose and panel seal at the start of each season. Foam weatherstrip compresses over time and may need replacement. Look for cracks in the panel joints and re-tape if necessary. Clean the exterior of the hose collar and inspect the hose for pinholes or separated seams.
Condensate handling deserves attention. If the unit uses a tank, empty it before it reaches the full mark; many units shut down automatically when the tank is full, and the shutdown can happen mid-night. Units with a self-evaporating system still benefit from a periodic check of the drain path. If you notice water pooling around the unit, check the drain plug and the hose connection at the collar.
If the unit runs but does not cool, the first things to check are the filter, the hose connection, and the seal at the window. A disconnected hose or a large unsealed gap can make a functional unit appear broken. If those are fine and the unit still underperforms, consult the troubleshooting guidance for a portable AC that is not cooling enough. Persistent issues with the compressor or refrigerant circuit are outside the scope of routine maintenance and should be handled by a qualified technician.
Frequently Asked Questions
Can a portable air conditioner be used with vertical windows?
Yes. Portable AC units work with vertical sliding sash windows when paired with a vertical window kit. The kit fills the gap above the raised sash and holds the exhaust hose securely in place.
What size portable AC do I need for a room with a vertical window?
Sizing depends on room area, ceiling height, sun exposure, and occupants rather than window orientation. Match capacity to the room's heat load, not to the window style. Use the sizing framework above as a starting point.
Do I need a special window kit for a vertical sliding window?
Many units ship with an adjustable kit that can be mounted vertically. If your kit is designed only for horizontal windows, a dedicated vertical window kit or a universal kit with vertical panel support is required.
How do I seal the gap above a vertical window when using a portable AC?
Use the vertical panel from the kit to fill the open gap, then seal remaining edges with closed-cell foam weatherstrip or insulated tape. A tight seal prevents hot outdoor air from re-entering the room.
Can I use a portable AC with a vertical window without drilling?
Yes. Most vertical window kits use tension-fit panels and sealing foam rather than screws. This makes them suitable for renters and for windows where permanent modification is not permitted.
Ready to Compare Portable AC Models?
You now have the framework to evaluate any portable air conditioner for a vertical window room — kit compatibility, sealing, sizing, and the features that matter for your use case. Explore recommended models below and check availability for the current season.
VIEW RECOMMENDED MODELS