Window Panel for Portable Air Conditioner
A complete guide to choosing, installing, and sealing a portable AC window panel so your unit exhausts hot air efficiently and keeps cool air inside.
START LEARNINGWhat Is a Window Panel for a Portable Air Conditioner?
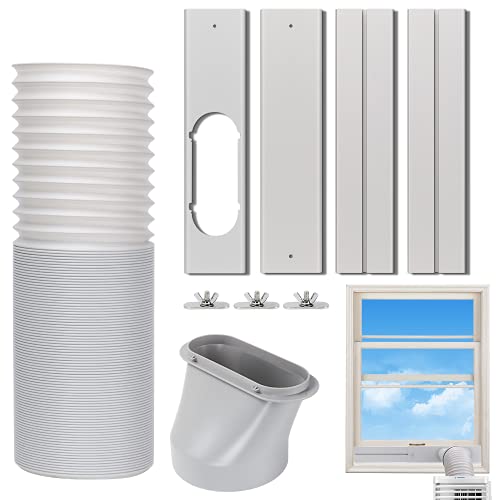
A window panel for a portable air conditioner is a rigid insert that fits into your window opening and holds the exhaust hose in place while sealing the gap around it. Portable AC units pull heat out of the room and push it through an exhaust hose, and that hose has to vent somewhere. The window panel is the bridge between the hose and the outside world.
Most portable AC boxes include a basic foam or thin plastic window insert. These starter pieces work, but they flex, leave gaps, and often do not fit non-standard windows. A dedicated portable AC window kit solves those problems with adjustable rails, a hose connector ring, and weather stripping that locks the panel against the window frame.
If your home uses sliding windows instead of sash windows, the shape of the panel matters. This guide covers the standard horizontal sliding window panel, but you can also read about window air conditioner options for sliding windows and sliding glass door solutions if your opening is taller or wider than a typical window.
Why the Window Panel Matters More Than You Think
It is tempting to treat the window panel as an afterthought. After all, the air conditioner itself is the star of the show. But the panel is what separates a portable AC that actually cools a room from one that runs constantly and never quite gets there.
It keeps hot air outside
An open window with a hose hanging out of it is essentially a hole in your wall. The panel closes that hole except for the hose port, so the exhaust goes out and the outdoor heat stays out. Without it, the unit pulls in hot humid air and your room never stabilizes.
It keeps insects and debris out
A loose foam insert leaves gaps where bugs, dust, and pollen can enter. A rigid panel with a tight hose collar closes those gaps. This matters even more if you have allergies or live in an area with heavy insect activity.
It supports the exhaust hose
Exhaust hoses are heavy and warm. If they sag or kink, airflow drops and the compressor works harder. A panel holds the hose at the correct height and angle, which keeps the exhaust path short and straight.
It protects your window frame
Repeatedly opening and closing a window around a foam insert wears out weather stripping and can scratch the frame. A panel kit that stays in place with adjustable rails is gentler on the window over time.
For a deeper look at how exhaust airflow fits into the whole cooling process, the AC refrigerant cycle explained article is a useful companion read.
Anatomy of a Window Panel Kit
Most portable AC window kits share the same core parts. Knowing what each piece does helps you spot a well-made kit versus a stripped-down one.
| Component | What It Does | What to Look For |
|---|---|---|
| Panel rails | Slide against each other to match your window width | Thick plastic or aluminum, smooth sliding tracks, secure locking clips |
| Hose connector ring | Holds the exhaust hose in the panel opening | Matches your hose diameter (typically 5–6 inches), locks firmly with a twist |
| Weather stripping / foam tape | Seals the panel edges against the window frame | Closed-cell foam, adhesive-backed, enough length to cover all edges |
| Window lock / security bracket | Keeps the window from sliding open around the panel | Adjustable bracket or clamp that fits your window track |
| Insulation foam block | Fills the remaining gap at the top of the window | Dense foam that compresses to fit without crumbling |
Some kits also include a rain guard or a small drip deflector for the outdoor side of the panel. These are nice extras if you live in a rainy climate, because they stop water from running down the hose and into the unit.
Types of Window Panel Kits
Not all window panels are built the same. The right choice depends on your window style, your hose size, and how permanent you want the installation to be.
1. Sliding rail kits
These are the most common. Two or more rails slide past each other to fill the window width, and a collar holds the hose. They work well for horizontal sliding windows and double-hung windows. Entry-level rail kits are usually plastic; mid-range and high-end kits use thicker plastic or aluminum rails that resist warping.
2. Fixed-frame kits
These are cut or assembled to a specific window size and stay in place. They offer the tightest seal but are less portable. They are a good fit if you use the same window every summer and want a permanent, draft-free setup.
3. Universal adjustable panels
These use a spring-loaded or telescoping design to fit a range of window widths. They are convenient for renters and for people who move the unit between rooms. The trade-off is a slightly looser seal than a custom-fitted frame, which is why weather stripping matters so much with this type.
4. Door-height and tall opening kits
Standard window kits top out around 50–60 inches in height. If your opening is a sliding glass door or a tall casement, you need a kit designed for that height. For those situations, the sliding glass door window air conditioner guide and the sliding windows guide cover the alternatives in more detail.
How to Measure Your Window for a Portable AC Panel
Measure twice, install once. A panel that is too narrow leaves a gap; one that is too wide will not sit flat against the frame. Grab a tape measure and note four numbers before you shop.
- Window opening width. Measure the clear opening between the left and right jambs at the widest point. This is the number the panel rails must cover.
- Window opening height. Measure from the sill to the top of the open sash. The panel plus the foam block must fill this height.
- Sill depth. Measure how deep the sill is from the interior wall to the glass. The panel needs enough flat surface to rest on without tipping.
- Hose diameter. Check your portable AC manual or measure the hose coupler. Most hoses are 5 or 6 inches, but some compact models use smaller sizes.
Also note whether your window is a horizontal slider, a double-hung sash, or a casement. Each style needs a different panel orientation. If you are unsure whether your window can support a vented setup at all, the window mounted air conditioning unit overview walks through the structural considerations.
| Measurement | Where to Measure | Why It Matters |
|---|---|---|
| Width | Inside jamb to inside jamb | Panel must span the full opening |
| Height | Sill to top of open sash | Panel plus foam block must fill the gap |
| Sill depth | Wall face to glass | Panel needs a stable resting surface |
| Hose diameter | Hose coupler or manual | Collar must match the hose without adapters |
Step-by-Step Installation
Installing a window panel takes about 15–30 minutes with basic tools. You will need a tape measure, a screwdriver, scissors for the weather stripping, and a helper if the panel is large.
Clean the window track
Wipe dust and grit from the sill and track so the panel and weather stripping sit flush.
Assemble the rails
Slide the rails to match your measured width. Lock the clips so the panel holds its size.
Fit the hose collar
Snap or screw the collar into the panel opening, then twist the hose onto it until it locks.
Apply weather stripping
Run foam tape along the top, bottom, and side edges that contact the window frame.
Seat the panel
Lower the panel into the sill, then close the window sash against it so it presses into the weather stripping.
Lock and seal the gaps
Install the window lock bracket and press the foam block into any remaining top gap.
Once the panel is in, run the AC on fan-only for a minute and feel around the edges for leaks. If you feel warm air moving, add another strip of weather stripping or tighten the window against the panel. For broader maintenance habits, the AC maintenance guide covers seasonal checks that pair well with this installation routine.
Sealing Tips for Maximum Efficiency
The panel is only as good as the seal around it. These habits make a noticeable difference in how well your portable AC performs.
- Use closed-cell foam tape, not open-cell sponge. Closed-cell foam resists moisture and compresses evenly, so it seals better around uneven window frames.
- Seal the top gap first. Hot air rises, and the top of the window is where most leaks hide. A dense foam block pressed into the gap is more effective than tape alone.
- Keep the hose short and straight. A long, looping hose traps heat and reduces exhaust flow. Position the AC close to the window so the hose runs straight out.
- Check the outdoor side. Make sure the hose end is not buried in shrubs or blocked by a screen. Air has to escape freely for the unit to cool.
- Insulate the hose if it runs through a hot space. A hose sleeve reduces heat gain and keeps the exhaust stream moving efficiently.
Humidity also affects how comfortable a room feels, and a leaky panel lets humid outdoor air in. If you want to understand the comfort side of cooling, the guide on what humidity level is good for a house explains the target range.
Common Problems and Fixes
The panel does not fit the window width
Most adjustable kits cover a range, but if your window is wider than the maximum, you need a kit with additional extension rails or a different model. Do not force the rails past their locking points; they will bow and leak.
The hose keeps popping out of the collar
This usually means the collar size does not match the hose. Check the hose diameter and use an adapter ring if needed. Also make sure the hose is not pulling sideways, which twists the coupler loose over time.
Hot air still comes in around the panel
Add weather stripping along the contact edges and close the window sash more firmly against the panel. If the window frame is uneven, use a thicker foam strip at the low spots.
Condensation forms on the panel
Some condensation is normal when indoor and outdoor temperatures differ a lot. Wipe it dry and make sure the panel is not blocking the unit's drain path. If water pools, check the AC leaking water solutions guide for drainage fixes.
The unit runs but the room stays warm
Check the panel seal first, then the hose routing, then the filter. A dirty filter and a leaky panel together can make a portable AC feel useless. The things to check when AC is not cooling article has a full troubleshooting order.
Choosing by Build Tier
Window panel kits fall into a few broad build tiers. Use this table to match the kit to how often you will use it and how permanent you want the setup to be. The tiers describe build quality and intended use, not any specific figure.
| Tier | Best For | Typical Characteristics |
|---|---|---|
| Entry-level | Occasional use, renters, single-season setups | Thin plastic rails, basic foam seal, simple collar; adequate for light use but flexes more |
| Mid-range | Regular summer use, multi-room homes | Thicker rails, smoother sliding tracks, better weather stripping, more secure window lock |
| High-end tier | Permanent installations, harsh climates | Reinforced rails, aluminum components, dense insulation foam, drip deflector, precise fit |
| Top-tier | Custom windows, long-term whole-home setups | Custom-fitted frame, premium materials, weather-resistant coating, professional-grade sealing hardware |
As a rule of thumb, a mid-range kit is the sweet spot for most households: it seals well, holds up across multiple summers, and is still easy to remove. Entry-level kits are fine for a spare bedroom or a unit you only run a few weeks a year. If you are installing in a window that faces wind-driven rain, step up to a high-end or top-tier kit with a drip deflector.
If you are still deciding whether a portable unit is the right type for your space, the portable AC unit that does not need a window article explains the venting alternatives, and the most efficient portable air conditioner guide covers efficiency differences across models.
Frequently Asked Questions
Final Thoughts
A window panel for a portable air conditioner is a small part of the setup, but it decides whether the unit performs like it should. Measure your window carefully, match the kit to your hose size, and take the extra few minutes to seal the edges. The payoff is a room that cools faster, a unit that runs less, and fewer drafts around the window.
If you are still comparing cooling options, the window mounted air conditioning unit guide and the air conditioning units for small spaces article can help you weigh a portable AC against a window unit. And if you notice the room feeling clammy even after the panel is sealed, check the humidity level your house should have to see whether a dehumidifier belongs in your setup.