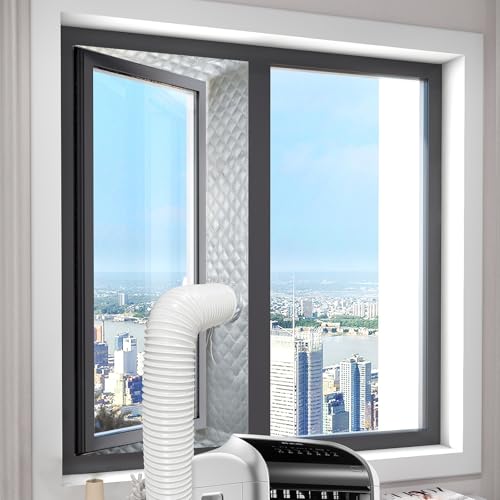
Portable AC Window Kit for Casement Windows: The Complete Guide
A standard sliding-window panel will not fit a crank-out casement window. If you own a casement or crank-out window and want to run a portable air conditioner, you need a dedicated venting kit designed for that window style. This guide explains how those kits work, how to measure for a correct fit, and what to look for before you buy.
Quick answer: Casement windows swing outward on a hinge rather than sliding up and down or side to side. That means the flat, height-adjustable panels included with most portable ACs simply do not fit. A casement-specific kit uses a rigid frame or panel that mounts in the window opening, holds the exhaust hose collar, and allows the window sash to close against it — sealing the gap so exhaust air goes outside instead of back into the room.
Why Standard Portable AC Window Kits Do Not Work on Casement Windows
The standard window kit included in most portable AC boxes is designed for double-hung and sliding windows. It consists of two or more flat panels that slide past each other to match the window width or height, plus a foam seal and a hose connector. The panel sits in the window track, and the sash closes down onto it.
Casement windows do not have a vertical or horizontal sliding track. They pivot on hinges and crank outward. The frame profile is different, the opening geometry is different, and the sash moves in a completely different arc. Attempting to force a standard panel into a casement opening leaves large gaps, lets hot outdoor air leak in, and defeats the purpose of the exhaust hose. In practice, the portable AC ends up recirculating warm air and never cools effectively.
This is why a dedicated portable air conditioner for casement windows setup relies on a kit built for that window type. If you are still choosing a portable unit and have not yet settled on a model, our broader guide to portable AC units covers the categories and features that matter before you commit to a specific window configuration.
How a Casement Window Kit Works
A casement window kit serves three functions: it anchors the exhaust hose, it seals the opening, and it lets the window close against a solid surface. The components vary slightly by design, but most kits share the same building blocks.
Rigid Vent Panel or Frame
A clear or white rigid panel sized to the window opening, often with pre-scored cut lines so you can trim it to fit. The panel holds the hose collar and sits between the window frame and the sash.
Hose Collar or Adapter
A circular opening with a threaded or snap-fit collar that accepts the exhaust hose. Some kits include adapters for multiple hose diameters.
Weather Seal or Foam Gasket
Foam strips or rubber gaskets that seal the panel edges against the window frame and sash, preventing hot air from leaking around the kit.
Adjustable Brackets or Stops
Hardware that holds the window sash snug against the panel so the window cannot be opened by wind or force.
The assembled kit inserts into the window opening, the exhaust hose connects to the collar, and the casement sash closes against the outer face of the panel. The result is a sealed path from the portable AC's exhaust to the outdoors, with the window providing security and weather resistance.
Crank-Out and Casement: Are They the Same?
In common usage, "casement" and "crank-out" describe the same family of windows. Some kits are marketed specifically as a portable air conditioner crank out window kit, while others use the more general casement label. Both aim to do the same job. If you already own a kit labeled for one and your window is the other, confirm the dimensions and hinge side before assuming compatibility. For a closer look at the crank-out variant specifically, see our portable air conditioner for crank out window overview.
How to Measure Your Casement Window for a Kit
Fit is everything with casement kits. A panel that is too large will not seat; one that is too small leaves gaps. Measure carefully before ordering.
Window Opening Width
Measure the clear opening between the left and right jambs at the point where the panel will sit. Note the narrowest point.
Window Opening Height
Measure from the sill to the top of the opening. Casement windows are often taller than they are wide.
Sash Depth and Hinge Side
Note how far the sash swings and which side it hinges on. Some kits assume a specific hinge direction.
Hose Diameter
Measure the exhaust hose outlet on your portable AC. The kit collar must match that diameter.
Write down all four measurements and compare them against the kit specification sheet. Many kits are adjustable within a range, but a large window may require a kit marketed for that size class. If your window is unusually small, a dedicated portable air conditioner for small window setup may be the better match.
Compatibility Checks Before You Buy
Not every casement kit fits every portable AC, and not every kit fits every casement window. Run through this checklist before ordering:
- Hose diameter match: The kit collar must accept your hose. Common diameters are standardized, but adapters are sometimes needed.
- Window opening range: Confirm your measured width and height fall within the kit's stated range.
- Hinge side: Some panels are pre-cut for a specific hinge direction. If your window hinges the other way, check whether the panel can be flipped or trimmed.
- Sash thickness: The panel and gasket must clear the sash when the window closes.
- Security: Look for kits that include a locking mechanism or a bracket that holds the sash closed. A casement window left unsecured against a vent panel is a security risk.
- Weather sealing: Kits with foam gaskets and edge seals perform better in wind and rain than bare panels.
If you are still deciding whether a portable AC is the right cooling approach for the room, our guide to the moving cool air conditioner category explains the broader trade-offs and how portable cooling compares with other options.
Casement Window Kit Tiers: What to Expect
Casement kits fall into recognizable tiers. The differences are mostly in adjustability, sealing quality, and how much custom fitting is required.
| Tier | Typical Characteristics | Best For |
|---|---|---|
| Essential tier | Basic rigid panel with pre-scored cut lines, foam edge seal, single hose collar, minimal hardware | Single window, occasional use, buyers comfortable trimming the panel |
| Balanced tier | Adjustable frame or multi-piece panel, better gaskets, hose adapters for common diameters, sash stop bracket | Everyday use, windows that vary in size, renters who need a removable setup |
| High-end tier | Reinforced frame, premium sealing system, integrated locking bracket, wide sizing range, clear instructions and template | Long-term use, security-sensitive installations, windows with irregular frames |
| Professional-grade | Custom-fabricated panels or multi-window adapters, heavy-duty hardware, commercial sealing materials | Multiple units, commercial spaces, permanent or semi-permanent installations |
Higher tiers generally offer better sealing, which matters more than it sounds. Every gap around a casement panel lets hot outdoor air back into the room and undermines cooling performance. If your portable AC seems to run constantly and never quite cools, a leaky window kit is a likely contributor. Our troubleshooting guide for a portable air conditioner not cooling enough covers the checks to run in that situation.
Installation Steps and Sealing Tips
Installing a casement kit takes about 15–30 minutes once you have the right parts. Follow this order for a clean, sealed result:
- Dry-fit the panel. Place the panel in the opening without sealing to confirm the fit and orientation before trimming.
- Trim if needed. Cut along the pre-scored lines or use a template. Leave enough material for the gasket to compress.
- Attach the hose collar. Seat the collar in the panel opening and confirm the hose locks in securely.
- Install the weather seal. Apply foam gasket around the panel edges and along the sash contact line.
- Close the sash against the panel. Crank the window shut until the sash compresses the gasket against the panel face.
- Add the sash stop or lock bracket. Secure the window so it cannot be opened from outside.
- Connect the hose and test. Run the AC and check for air leaks around the panel edges. Seal any gaps with additional foam.
Common Sealing Mistakes
- Skipping the foam gasket: Even a 1/8-inch gap can leak enough hot air to reduce cooling noticeably.
- Over-trimming the panel: Better to trim conservatively and add weatherstripping than to cut too much and leave a gap.
- Ignoring the hose insulation: The exhaust hose gets hot. An portable air conditioner exhaust hose insulation sleeve reduces heat radiating back into the room.
- Forgetting security: A casement window propped open against a vent panel can be forced. Always use a bracket or lock.
For a broader view of how intake and exhaust airflow interact in portable units, the portable air conditioner intake and exhaust guide explains why the exhaust path matters and what happens when it is not sealed.
Alternatives If Your Casement Window Cannot Take a Kit
Some casement windows — very small ones, unusual frames, or sealed units in rentals — cannot accept a standard panel. In those cases, consider:
- Side-opening window adapters: A portable air conditioner side opening window panel is designed for windows that open to the side rather than crank out.
- Custom acrylic panel: Local glass shops can cut a rigid panel to your exact opening with a pre-drilled hose hole. This is often the cleanest permanent solution.
- Door-based venting: Some rooms allow venting through a balcony door or a pet door insert. Check whether the room has an alternative opening before giving up on portable cooling.
- Different AC category: If the window is truly unsuitable, a wall-mounted or through-the-wall unit may be a better fit. Our most energy efficient wall air conditioner roundup covers that category.
If you are comparing kit options and also considering a different cooling approach, it helps to understand the trade-offs in efficiency. The most energy efficient room air conditioner guide provides context on how portable units compare with window and mini-split options.
Frequently Asked Questions
Can I use a regular portable AC window kit on a casement window?
Not effectively. Standard kits are designed for sliding and double-hung windows. The flat adjustable panel does not match the casement frame, leaving gaps that let hot air in and exhaust air recirculate. A casement-specific kit is required for a proper seal.
What is the difference between a casement kit and a crank-out kit?
In practice, they are the same window type and the terms are often used interchangeably. Both are designed to fit a window that swings outward on hinges. Check the dimensions and hinge side rather than relying on the label alone.
How do I measure my casement window for a kit?
Measure the clear opening width and height at the narrowest point, note the sash depth and which side the window hinges on, and measure your exhaust hose diameter. Compare all four figures against the kit's stated size range.
Can I cut a casement kit panel to fit my window?
Many rigid panels come with pre-scored cut lines and can be trimmed to size. Trim conservatively and use foam gasket to seal the remaining gap. Panels that cannot be trimmed are usually marketed as adjustable frames.
Does the exhaust hose need to be insulated?
It helps significantly. The exhaust hose gets hot, and that heat radiates back into the room. An insulation sleeve reduces the load on the portable AC and improves cooling performance.
What if my casement window is too small for any kit?
Options include custom-cut acrylic panels, side-opening window adapters, or a different cooling category such as a wall-mounted unit. If the window simply cannot accommodate a vent path, portable cooling is not practical for that room.
Bottom Line
A casement window needs a casement-specific venting kit, not the flat panel that ships with most portable ACs. Measure your opening carefully, match the hose diameter, confirm the hinge side and sash depth, and prioritize a kit with a solid sealing system and a sash-lock bracket. Once installed, seal every edge and insulate the exhaust hose — those two steps make the difference between a portable AC that works and one that runs endlessly without cooling the room. If you are also weighing a different cooling format, explore the portable ductless mini split air conditioner option to see how it compares for efficiency and installation flexibility.