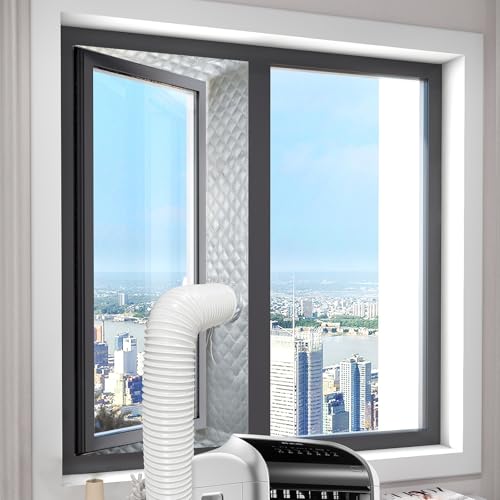
Window Air Conditioner for Crank Out Windows: What You Need to Know
If your home has crank out (casement) windows, a standard window AC won't fit. Here's a complete guide to the solutions that actually work — from specialized casement AC units to alternative cooling options.
EXPLORE SOLUTIONSQuick Summary
- The problem: Standard window AC units require a double-hung (vertical sliding) window. Crank out windows swing open outward and cannot hold a conventional AC unit.
- Best solution: Casement window AC units with a specialized mounting kit are the most practical direct replacement.
- Alternative options: Ductless mini-split systems and portable AC units with casement window venting kits offer flexible alternatives.
- Key consideration: Always verify the window opening dimensions, wall strength, and local building codes before installation.
Why Standard Window AC Units Don't Work in Crank Out Windows
Crank out windows — also called casement windows — operate on a completely different mechanism than double-hung windows. Instead of sliding up and down within a frame, casement windows are hinged on one side and swing outward when you turn a crank handle.
Standard window air conditioners are engineered around the structure of a double-hung window. They rest on the bottom sill, are supported by the window frame, and are secured by closing the upper sash down onto the unit. This design relies on the vertical stacking of window sashes to hold the AC in place and seal the gap.
A crank out window has no bottom sash to close over the AC unit. The window opening is also typically narrower and taller than a double-hung window. When the window swings outward, the hinge mechanism and the open sash interfere with the physical space an AC unit needs. The result: a standard window AC simply cannot be mounted securely.
This is a common frustration for homeowners in older buildings, modern apartments, and many European-style homes where casement windows are the norm. Fortunately, there are several proven solutions.
Solutions for Cooling a Room with Crank Out Windows
There is no single universal answer, because the right choice depends on your window size, wall construction, cooling needs, and whether you are allowed to make permanent modifications. Below are the four main approaches, ranked from most direct replacement to most flexible.
1. Casement Window AC Units (Purpose-Built)
Manufacturers produce air conditioners specifically designed for casement and crank out windows. These units are narrower and taller than standard window ACs, and they come with a specialized mounting bracket and filler panel system that bridges the gap between the AC and the window frame.
The casement AC mounts to the window frame or an external support bracket. The window cranks open, the AC sits in the opening, and a filler panel (usually included or sold separately) closes the remaining space. This is the closest thing to a "drop-in" solution for crank out windows, but it still requires careful measurement and, often, professional installation.
Mid-tier casement AC units generally offer better sealing and more robust mounting hardware than entry-level models. If you want a reliable long-term installation, look for models with adjustable filler panels and a sturdy external bracket.
2. Ductless Mini-Split Systems
A ductless mini-split is the most energy-efficient long-term solution for a room with crank out windows. Instead of blocking the window, a mini-split mounts on the wall or ceiling and connects to an outdoor compressor through a small hole (typically 2–3 inches) drilled in the wall.
Because the window is left completely unobstructed, you retain natural light and ventilation when the AC is off. Mini-splits are available in entry-level single-zone configurations up to premium multi-zone systems with heat pump capability. They are quiet, efficient, and do not require window space, but they do require professional installation and a permanent wall modification.
3. Portable Air Conditioners with Casement Window Kits
A portable AC sits on the floor and exhausts hot air through a hose that vents out the window. Most portable AC units ship with a standard sliding-window kit, but casement-specific venting kits are widely available. These kits use a fabric or rigid panel that fits into the crank out window opening and holds the exhaust hose in place.
Portable units are the most flexible option — they can be moved from room to room and require no permanent installation. The trade-off is that they are generally less efficient than window or mini-split units, and the window must remain slightly open for the exhaust hose, which can let some outside air in.
4. Through-the-Wall Air Conditioners
If you have an exterior wall available and are willing to make a permanent modification, a through-the-wall AC unit can be installed independently of the window. This frees up the window entirely and provides a clean, built-in look. Through-the-wall units are common in hotels and apartments, and they are available in a range of cooling capacities.
This is the most involved option and typically requires professional installation, wall framing, and electrical work. It is best suited for homeowners planning a long-term cooling solution.
Side-by-Side Comparison of Cooling Options
The table below summarizes how each solution performs across the factors that matter most when cooling a room with crank out windows.
| Solution | Best For | Installation | Efficiency | Window Blocked? |
|---|---|---|---|---|
| Casement Window AC | Direct replacement, single room | Moderate (DIY possible with kit) | Good | Yes |
| Ductless Mini-Split | Long-term, whole-room comfort | Professional | Excellent | No |
| Portable AC + Casement Kit | Renters, temporary cooling | Easy (DIY) | Moderate | Partially |
| Through-the-Wall AC | Permanent built-in solution | Professional | Good | No |
If you are specifically looking for a window-mounted unit, the casement window AC guide covers the direct-fit options in more detail. For a broader overview of window unit styles, see the window air conditioner resource page.
Pros and Cons: Casement Window AC vs. Alternatives
Casement Window AC — Pros
- Direct replacement for crank out windows
- No permanent wall modification required
- Lower upfront investment than mini-split
- Self-contained and easy to remove seasonally
Casement Window AC — Cons
- Fewer models available than standard window ACs
- Blocks the window opening
- Requires precise measurement and a support bracket
- Sealing can be challenging in older window frames
Mini-Split — Pros
- Highest energy efficiency
- Keeps window unobstructed
- Quiet operation
- Heating and cooling in one system (heat pump models)
Mini-Split — Cons
- Higher upfront investment
- Requires professional installation
- Permanent wall penetration
- May require permits in some jurisdictions
Portable AC + Casement Kit — Pros
- No permanent installation
- Can be moved between rooms
- Renter-friendly
- Simple setup with the right kit
Portable AC + Casement Kit — Cons
- Lower cooling efficiency
- Window must stay partly open for exhaust
- Noisier than window or mini-split units
- Takes up floor space
How to Install a Casement Window AC: Step-by-Step
Installing a purpose-built casement window AC is more involved than sliding a standard unit into a double-hung window, but it is manageable for a confident DIYer. Follow these steps carefully, and consult a professional if your window frame is damaged or your wall cannot support an external bracket.
- Measure the window opening. Record the width and height of the clear opening with the window fully cranked open. Also measure the depth of the window frame. Compare these dimensions to the AC unit's specifications — the unit must fit with the filler panel fully extended.
- Check the electrical requirements. Most casement AC units run on a dedicated 115V circuit. Verify that the outlet near the window can handle the amperage draw, and avoid using extension cords. If you are unsure, consult a licensed electrician.
- Install the external support bracket. Casement AC units rely on an external bracket because the window frame does not provide a bottom sill. Follow the manufacturer's instructions to anchor the bracket to the exterior wall. This is the most critical safety step.
- Mount the AC unit. With a helper, lift the unit onto the bracket and slide it into the window opening. The unit should sit level or with a slight downward tilt toward the outside for drainage.
- Install the filler panel and side seals. Casement AC kits include a filler panel that spans the gap between the AC unit and the window frame. Attach the panel, then apply weatherstripping or foam insulation around the edges to seal air gaps.
- Secure the window. Close and lock the crank out window against the AC unit's frame or filler panel. Some kits include a security bracket to prevent the window from being forced open from the outside.
- Test and seal. Turn on the AC and check for air leaks around the filler panel. Apply additional weatherstripping or caulk as needed. Ensure water drains properly to the exterior.
Safety note: Casement AC units are heavy and are mounted at height. If you are not comfortable working on a ladder or anchoring a bracket into exterior wall material, hire a professional installer. Improper mounting can cause the unit to fall, damaging property or causing injury.
Practical Tips for Crank Out Window AC Installations
Even with the right equipment, casement windows present unique challenges. Keep these tips in mind to get the best performance from your installation.
- Choose the right BTU rating. Cooling capacity matters more than anything else. An undersized unit will run constantly without reaching the set temperature, while an oversized unit will cycle on and off and fail to remove humidity. Use a BTU calculator based on room square footage, ceiling height, sun exposure, and occupant count. For small rooms, see the small room window AC guide.
- Consider inverter technology. Inverter-driven compressors modulate speed rather than cycling on and off, which improves efficiency and temperature stability. If available in a casement form factor, inverter window AC units are worth the consideration.
- Seal aggressively. The gap between a casement window and an AC unit is a prime spot for air leaks. Use closed-cell foam weatherstripping, not open-cell foam, which absorbs moisture and degrades quickly.
- Support the unit properly. An external bracket is not optional for casement installations. The window frame is not designed to carry the weight of an AC unit, and relying on the crank mechanism to hold it is unsafe. If you need a no-drill option, explore no-drill window AC brackets.
- Check local regulations. Some apartment buildings and homeowner associations restrict exterior modifications, including AC brackets and through-the-wall installations. Confirm before you buy.
- Maintain the unit seasonally. Clean or replace the air filter every month during cooling season. A clogged filter reduces airflow, strains the compressor, and can cause the unit to ice up. For maintenance guidance, refer to the AC filter cleaning guide.
Common Problems with Casement Window AC Units
Casement window AC installations are more sensitive to alignment and sealing than standard window units. Here are the issues you are most likely to encounter — and how to address them.
Water leaking inside the room
If water drips into the room instead of draining outside, the unit is likely tilted the wrong way. Casement AC units should tilt slightly downward toward the exterior. Check the bracket level and adjust the tilt. Also inspect the drain holes for debris. For more troubleshooting, see the window AC leaking water guide.
The unit runs but does not cool
In a casement installation, poor cooling is often caused by air leaks around the filler panel or by an undersized unit. Check the seal first, then verify the BTU rating against the room size. If the unit is correctly sized and sealed, the issue may be a dirty filter, low refrigerant, or a failing compressor. See the window AC not cooling properly guide for diagnostic steps.
The window will not close fully when the AC is removed
Casement AC kits sometimes require minor modifications to the window frame or the crank mechanism. If you plan to remove the AC seasonally, choose a kit designed for easy removal, and keep the original hardware so you can restore the window to its normal operation.
Excessive noise or vibration
Noise often comes from a loose bracket or an unbalanced unit. Recheck the bracket anchors and ensure the unit sits level side-to-side. Vibration can also travel through the window frame; foam isolation pads between the bracket and the wall can help.
When to Call a Professional Installer
Some casement window AC installations are straightforward, but others require professional help. Call a licensed HVAC technician or installer if:
- The window frame is damaged, rotted, or not square
- The exterior wall is brick, stone, or another material that is difficult to anchor into
- You need a new electrical circuit or outlet near the window
- You are installing a through-the-wall unit or a mini-split system
- You live in a multi-story building where ladder work is unsafe
- Local codes require a permit for the installation
Professional installation typically includes a warranty on the workmanship, which is valuable for a mounting system that must hold a heavy unit securely for years. If you are unsure which type of professional to contact, the who sells and installs window AC guide can help you identify the right contractor.
Related Window Types and Cooling Challenges
Crank out windows are not the only window style that complicates air conditioning. If your home has a different window configuration, these guides may be more relevant:
- Window AC for side opening windows — covers windows that slide horizontally
- Window AC in casement window — a close-up look at casement-specific installation
- Window AC for sliding windows — solutions for horizontal sliders
- Window AC for vertical sliding windows — the standard double-hung setup
- Window AC for windows that open sideways — another take on side-hinged windows
If you are still deciding between a window AC and a portable unit, the window air conditioner main guide compares both categories in detail. For homes without any suitable window, the window AC without a window guide explores through-the-wall and mini-split options.
Frequently Asked Questions
Final Thoughts
Crank out windows are a beautiful architectural feature, but they are not compatible with standard window air conditioners. The good news is that purpose-built casement window AC units close that gap — literally — with specialized mounting brackets and filler panels. If you want a permanent, efficient solution and are willing to modify the wall, a ductless mini-split is the top-tier choice. For renters or anyone who needs flexibility, a portable AC with a casement venting kit is the essential-tier starting point.
Before you buy, measure your window opening twice, confirm the electrical requirements, and decide whether the installation is a DIY project or a job for a professional. The right solution will keep your room cool without compromising your windows or your safety.
Ready to explore specific products? The recommended casement and window AC units below are a good place to start your research.