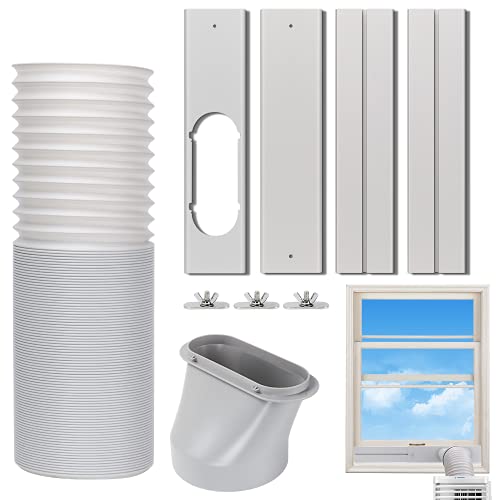
Sliding windows are one of the most common window styles in North America, yet they are also one of the trickiest to pair with a portable air conditioner. A sliding window opens sideways along a single track, so the gap you need to fill for the exhaust hose is horizontal, long, and often taller than a standard panel can cover. That is exactly the problem a portable AC window kit for sliding windows is built to solve.
If you already own a portable unit or plan to buy one, this guide walks you through how these kits work, which design fits your frame, how to install one without damaging the window, and how to seal the remaining gaps so your unit actually delivers the cold air it promises. By the end, you will know whether your current kit is adequate, whether an upgrade is worthwhile, and how to get the most cooling performance out of a side-opening window.
Quick summary: A sliding window kit is an adjustable panel — rigid, soft fabric, or a hybrid — that fills the open portion of your slider and holds the exhaust hose. Rigid panels suit longer openings and are easy to seal. Fabric seals suit odd shapes and large gaps. In most homes, a rigid panel plus foam weatherstripping gives the best balance of tightness, durability, and ease of use.
Why a Sliding Window Kit Matters
Portable air conditioners do not create cold air out of nothing — they move heat. A compressor and fan inside the unit absorb heat from the room and push it outdoors through an exhaust hose. That hose must vent outside, and the opening it passes through must be closed off as completely as possible. If the gap around the hose stays open, several things go wrong at once:
- Hot outdoor air rushes back in. The unit expels warm air, and a poorly sealed opening lets an equal amount of hot, humid air return through the same gap.
- Cooling capacity drops. The unit runs longer and still leaves the room uncomfortable because it is fighting an open door.
- Energy use rises. Longer run times mean higher electricity consumption for the same room temperature.
- Moisture and pests enter. An open gap admits humidity, dust, insects, and in some cases rainwater.
- Security risk increases. A window held open by a flimsy panel can be forced open more easily than a closed and locked window.
A purpose-built kit converts that open gap into a controlled, narrow passage for the hose. On a sliding window the geometry is unusual, which is why the generic panel that ships in the box often is not enough. Many owners of side-sliding windows find they need a dedicated slider kit or a compatible panel kit to get a proper fit. For a deeper look at the wider category, see our overview of the portable air conditioner sliding window kit.
How a Sliding Window Kit Works
A sliding window kit is essentially a bridge across the open section of your window frame. It performs three jobs simultaneously:
- It fills the opening. The kit spans the distance from the fixed glass or frame to the moving sash, leaving only a small circular or oval port for the exhaust hose.
- It anchors the hose. The hose connects to the kit's port, so the hot exhaust is directed outdoors instead of recirculating into the room.
- It holds the sash in place. Because the sliding sash presses against the kit, the window cannot be pushed further open accidentally — provided the kit is sized correctly and the window is locked.
The result is a mostly sealed opening where the only intentional passage is the exhaust hose itself. The better the seal, the closer your portable unit comes to its rated cooling capacity. For a broader explanation of how exhaust routing affects performance, see our guide to portable air conditioner intake and exhaust.
Horizontal vs. vertical sliding windows
Sliding windows are not all the same. A horizontal slider moves left or right, so the open gap is tall and narrow relative to the frame. A vertical slider (often called a single-hung or double-hung style that slides up and down) creates a wider gap at the bottom or top. The kit must match the orientation. Using a horizontal kit on a vertical slider, or vice versa, usually leaves a gap at one end. If your window slides vertically, our guide to portable air conditioner vertical window kit options is the better starting point.
Types of Sliding Window Kits Compared
Three main designs dominate the market. Each has clear strengths and trade-offs, and the right choice depends on your window opening, your climate, and how often you will install and remove the kit.
| Kit Type | Best For | Strengths | Limitations |
|---|---|---|---|
| Rigid adjustable panel (plastic or aluminum, often telescoping) | Standard horizontal sliders with a straight track | Solid structure, easy to seal, reusable season after season, holds the sash firmly | May not fit very long or irregular openings without extenders |
| Soft fabric seal (zippered or hook-and-loop fabric) | Large openings, odd frame shapes, temporary setups | Fits almost any size, compresses for storage, good for renters | Less rigid, can sag, needs careful tensioning to seal well |
| Hybrid kit (rigid panel plus fabric or foam frame) | Long sliders and openings with gaps at the edges | Combines structural support with flexible sealing | More pieces to assemble; slightly longer setup |
For most horizontal sliding windows in a typical home, a rigid adjustable panel is the practical default. It is simple to install, holds the window sash securely, and accepts foam weatherstripping easily. Fabric seals are a strong second choice for oversized openings or for people who need to remove the kit frequently, such as renters in a studio. Hybrid kits are worth considering when the opening is long enough that a single rigid panel does not reach the sash.
If your window is an unusual shape or opens in a way that a standard panel cannot handle, explore the relevant specialty guides — for example, kits for casement windows, crank-out windows, or vertical sliding windows. The sliding-window kit is not a universal solution, and forcing it onto the wrong frame type usually produces leaks.
How to Choose the Right Kit
Choosing well comes down to measuring accurately and matching the kit to both your window and your unit. Work through these steps before you order anything.
1. Measure the opening, not the whole window
Open the sliding sash to the width needed for the exhaust hose to pass through comfortably, usually around 10 to 14 inches for most portable units. Measure that open gap at its widest point. Also measure the height of the opening, from the sill to the top of the track. Write both numbers down. Kit specifications list the range they can cover, and you want your gap to fall comfortably inside that range, not at the extreme edge.
2. Check your hose diameter and connector type
Exhaust hoses are commonly around 5 to 6 inches in diameter, but connectors vary. Some kits use a circular port with a twist-lock collar; others use an oval port or a flat adapter. Confirm that the kit's port matches your hose connector. An adapter ring may be available if the diameters differ slightly, but a mismatched connector is a common reason kits leak.
3. Match the kit orientation to your slider
Confirm whether your window slides horizontally or vertically and buy the matching kit. A kit labeled for horizontal sliding windows will not close a vertical gap properly. If you are unsure, photograph the open window with a ruler against the gap and compare it with product images before purchasing.
4. Think about how often you will install and remove it
A rigid panel that stays in the window all season is the simplest option. If you need to remove the kit frequently — for ventilation, cleaning, or a seasonal move — a fabric seal or a lightweight panel with tool-free assembly is more convenient. Plan for storage space as well.
5. Consider climate and window condition
In humid or storm-prone regions, a rigid kit with a good weather seal holds up better than a loose fabric cover. In very hot climates, a tight seal matters more than convenience because any leak undermines cooling. If your window frame is warped or the track is damaged, a fabric seal can sometimes conform to irregular surfaces better than a rigid panel. For homes in muggy areas, our guide to portable air conditioner options for humid climates covers additional considerations.
Pro tip: Before installing any kit, check that the window sash locks. A properly fitted kit should let the sash press against the panel so the window can be locked. If the sash cannot lock, add a window lock or a wooden dowel in the track to prevent the window from being forced open.
Step-by-Step Installation
The exact steps vary by kit, but the sequence below covers the general process for a rigid sliding window kit. Always read your kit's instructions first, and follow the manufacturer's guidance where it differs.
- Clean the track and sill. Remove dust, grit, and old weatherstripping from the sliding track. A clean surface helps the panel sit flat and lets weatherstripping adhere properly.
- Assemble the panel to the needed width. Most rigid kits telescope or slide together. Extend the panel until it fills the open gap, then lock or tighten the connection per the instructions. Do not force it — it should extend smoothly to the required width.
- Attach the hose adapter to the panel. Fit the circular or oval adapter into the panel's port. Some adapters twist and click; others are held with a collar. Confirm it is fully seated so hot air cannot escape around the hose.
- Place the panel in the window track. Set the bottom edge into the lower track and tilt the top into the upper track. If your window has a deep sill, a panel that sits on the sill is often easier to seal than one suspended in the track.
- Slide the sash against the panel. Move the sliding sash until it touches the kit. The kit should fill the gap between the sash and the frame. Close the window as far as it will go against the panel.
- Lock the window and secure the panel. Lock the sash if the hardware allows. Add a secondary lock such as a window-bar lock or a dowel in the track so the window cannot be pushed open. Some kits include screws for the frame; use them only if you are permitted to drill and if they do not damage the window seals.
- Connect the exhaust hose. Attach one end to the portable unit and the other to the kit's port. Keep the hose as short and straight as the setup allows — long loops and sharp bends reduce airflow.
- Seal the remaining gaps. Apply foam weatherstripping or weather seal tape around the panel edges and along the sash contact point. This is the step most people skip, and it is the one that makes the biggest difference to cooling performance.
Once installed, run the unit for a few minutes and feel around the panel edges with your hand. Any noticeable warm draft means a leak that needs sealing. For a step-by-step look at the installation process in more detail, see our full guide to the portable air conditioner window kit for sliding window.
Sealing Tips for Maximum Cooling
Installation gets the kit in place; sealing makes it work. These adjustments are straightforward and require only basic materials.
- Use foam weatherstripping on the sash contact line. This is where the sliding window meets the panel, and it is the most common leak point. A self-adhesive foam strip compresses to fill small irregularities.
- Seal the top and bottom edges. Even a well-fitted panel can leave a thin gap at the track. Adhesive weather seal tape or a strip of foam closes it.
- Insulate the exhaust hose. A bare hose radiates heat back into the room. A hose cover or insulating wrap keeps more of the heat outside. See our guide to insulated exhaust hose options.
- Keep the hose short and direct. Avoid coiling or stretching the hose unnecessarily. A shorter run with gentle bends moves hot air out more efficiently.
- Check the outdoor end. Confirm the hose terminates outside the window, not into a screened area or an enclosed porch, and that it is not blocked by furniture or plants.
- Recheck the seal after a week. Vibration and window movement can loosen weatherstripping. A quick inspection after the first week catches problems early.
If your room still feels warm after sealing, the issue may be the unit's capacity, the room's heat load, or the hose routing rather than the kit itself. Our guide to portable air conditioner not cooling enough walks through the common causes in order of likelihood.
Troubleshooting Common Problems
The kit does not reach the sash
Your opening is wider than the kit's maximum span. Options include a panel extender if the manufacturer offers one, a larger kit, or a hybrid design with a fabric section that covers the remaining distance. Do not bridge the gap with tape alone — it will not hold the sash or seal reliably.
The window will not close against the panel
Check that the panel is seated fully in both tracks and that no weatherstripping is bunched at the contact point. Some panels need to be tilted slightly during placement. If the track is obstructed by a screen or a window stop, remove the obstruction only if it is safe and permitted.
Warm air leaks around the panel
This is almost always a sealing issue. Add foam weatherstripping at the sash contact line and tape along the panel edges. Feel for drafts at the top and bottom of the track as well as the sides.
The hose pops out of the port
The adapter may not be fully seated, or the connector type may be mismatched. Re-seat the adapter firmly, and check that the hose connector matches the port. If the fit is loose, an adapter ring or a short section of foil tape can secure it without blocking airflow.
Condensation around the kit
Some condensation is normal in humid weather. Wipe it up and check that the kit is not creating a cold bridge to the frame. If water pools, confirm the unit's drainage is working and consider a unit with a condensate pump. Our guide to portable air conditioners with a condensate pump explains when that feature helps.
Security concerns
Never leave a window propped open with a loose panel when the room is unattended. Use the window lock, add a secondary lock, and choose a rigid kit over a soft cover if security is a priority. A properly fitted rigid panel with a locked sash is far more secure than an open window with a fabric flap.
Ready to Improve Your Sliding Window Setup?
Compare sliding window kits, exhaust accessories, and compatible portable units in one place, then check availability for the option that fits your window.
View Recommended OptionsFrequently Asked Questions
Can you use a portable air conditioner with a sliding window?
What is a sliding window kit for a portable AC?
Do all portable AC units include a sliding window kit?
How do I seal gaps around the window kit?
Can I use a regular window kit on a sliding window?
Final thoughts
A portable AC window kit for sliding windows is a small accessory with an outsized effect on comfort. The right kit holds the exhaust hose securely, keeps the sash from moving, and closes the gap that would otherwise let hot, humid air back into the room. Measure your opening, match the kit to your slider orientation, install it carefully, and seal the contact points with foam weatherstripping. Those steps cost very little time and deliver noticeably better cooling from the unit you already own.